Want to learn how to use Firebase Storage in Android? You’ve come to the right place.

Since you know storage is the basic need of any app, even if you are building a static app that contains only 10 recipes for making delicious hot dogs.
You must be thinking why do I need cloud storage for a static app; let me explain.
You will be adding images (if not videos) about the recipe, you can add those images directly into your app.
Gut if you have some knowledge of ASO (App Store Optimization) to rank an app better on Google Play Store, then you must know that most users hate apps with huge sizes.
Google has officially recommended developers to reduce their app sizes.
So instead you can use Firebase Cloud Storage and then make the images/videos available to the users on-demand and reduce your app sizes!
As you know a great developer is the one that follows Google guidelines that are purely based on users. The better user experience you provide to users, the better your app will grow.
This was quite a basic example, but you got the idea that storage is necessary!
Here is what you will end up making if you follow along:
You can always check out this repository here for complete code.
Here is the content table for a quick overview:
Quick Jumps
What Exactly is Firebase Cloud Storage?
Firebase Cloud Storage is cloud-based storage from Firebase owned by Google to store user-generated content like photos or videos. The content can be downloaded by users on-demand to reduce the size of the app.
One of the best features of Firebase Cloud Storage is the resume feature that lets users upload a large file even if the connection fails due to some reasons thanks to Firebase Cloud Storage SDK.
It’s the same feature you use on Google Drive or Dropbox even if you disconnect and connect again, your uploading starts where it left to save your bandwidth.
How Does Firebase Cloud Storage Work?
Working with Firebase Cloud Storage is pretty straight forward.
You can upload any file and in-return you will get a URL that you can use to download that file (of course there are some other ways to download the image but you got the idea).
Remember: Cloud Storage is meant to work with Firebase Authentication. This means that you should only allow the authenticated users to access Firebase Cloud Storage for reading and writing data, otherwise anyone could dump files to your storage which could cost you more money for nothing.
But for the sake of this tutorial, I will skip the authentication part and jump straight to performing operations on Cloud Storage. That’s because I’m not going to publish this app.
What Are Firebase Cloud Storage Rules?
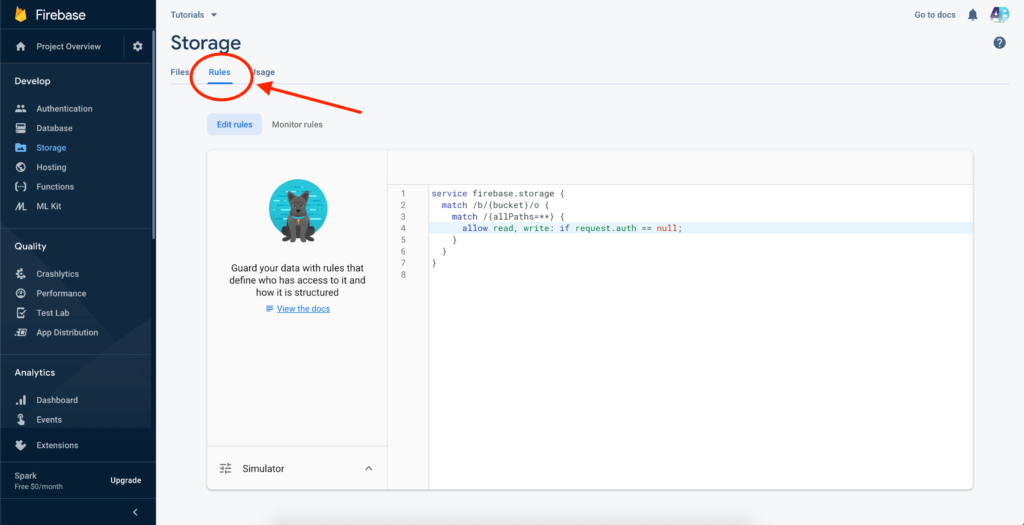
Cloud Storage Rules are pretty much the same as Firebase Realtime Database Rules, you basically write rules to allow or restrict certain users from accessing certain directories (called buckets in Firebase).
Firebase recommends that you should only let the authenticated users access the Cloud Storage, so the rules for that check are as follow:
service firebase.storage {
  match /b/{bucket}/o {
    match /{allPaths=**} {
      allow read, write: if request.auth != null;
    }
  }
}
But for the sake of this tutorial, I’m not going for authentication but letting anyone access the storage. So I will modify the rules as:
service firebase.storage {
  match /b/{bucket}/o {
    match /{allPaths=**} {
      allow read, write:if true;
    }
  }
}
You can modify the rules the way you want, like letting a particular user access a particular file. The possibilities are endless. Check out the official guide in this regard!
Implementing Firebase Cloud Storage to Android
There are two steps involved in it:
- Connecting Android Project to Firebase
- Adding Firebase Cloud Storage to Android Project
Connecting Android Project to Firebase
If you haven’t already, add Firebase to your Android project.
Here is how you can do that:
- Create or open an Android Studio Project
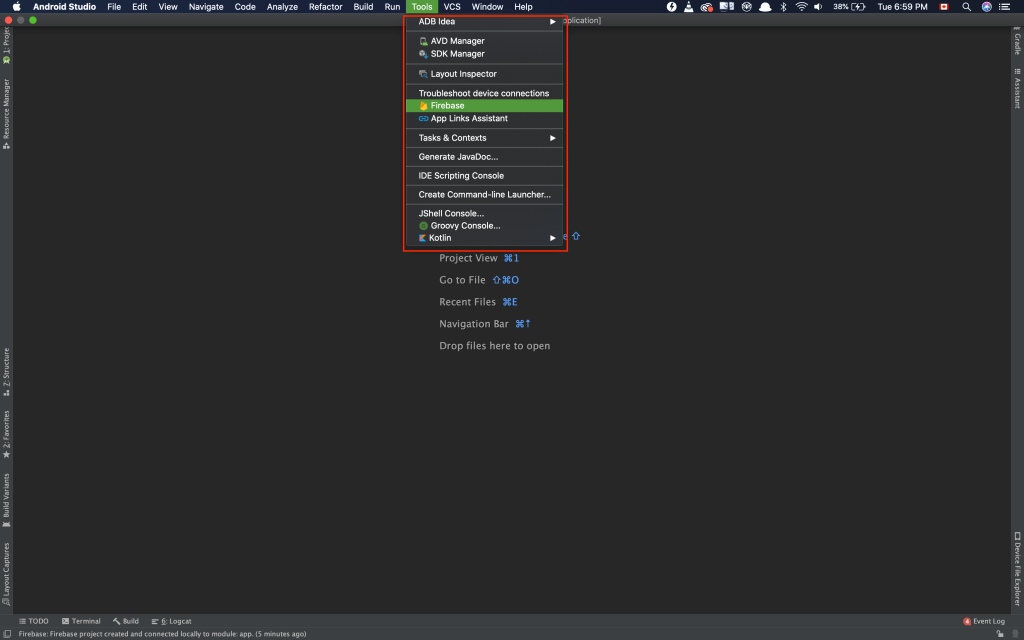
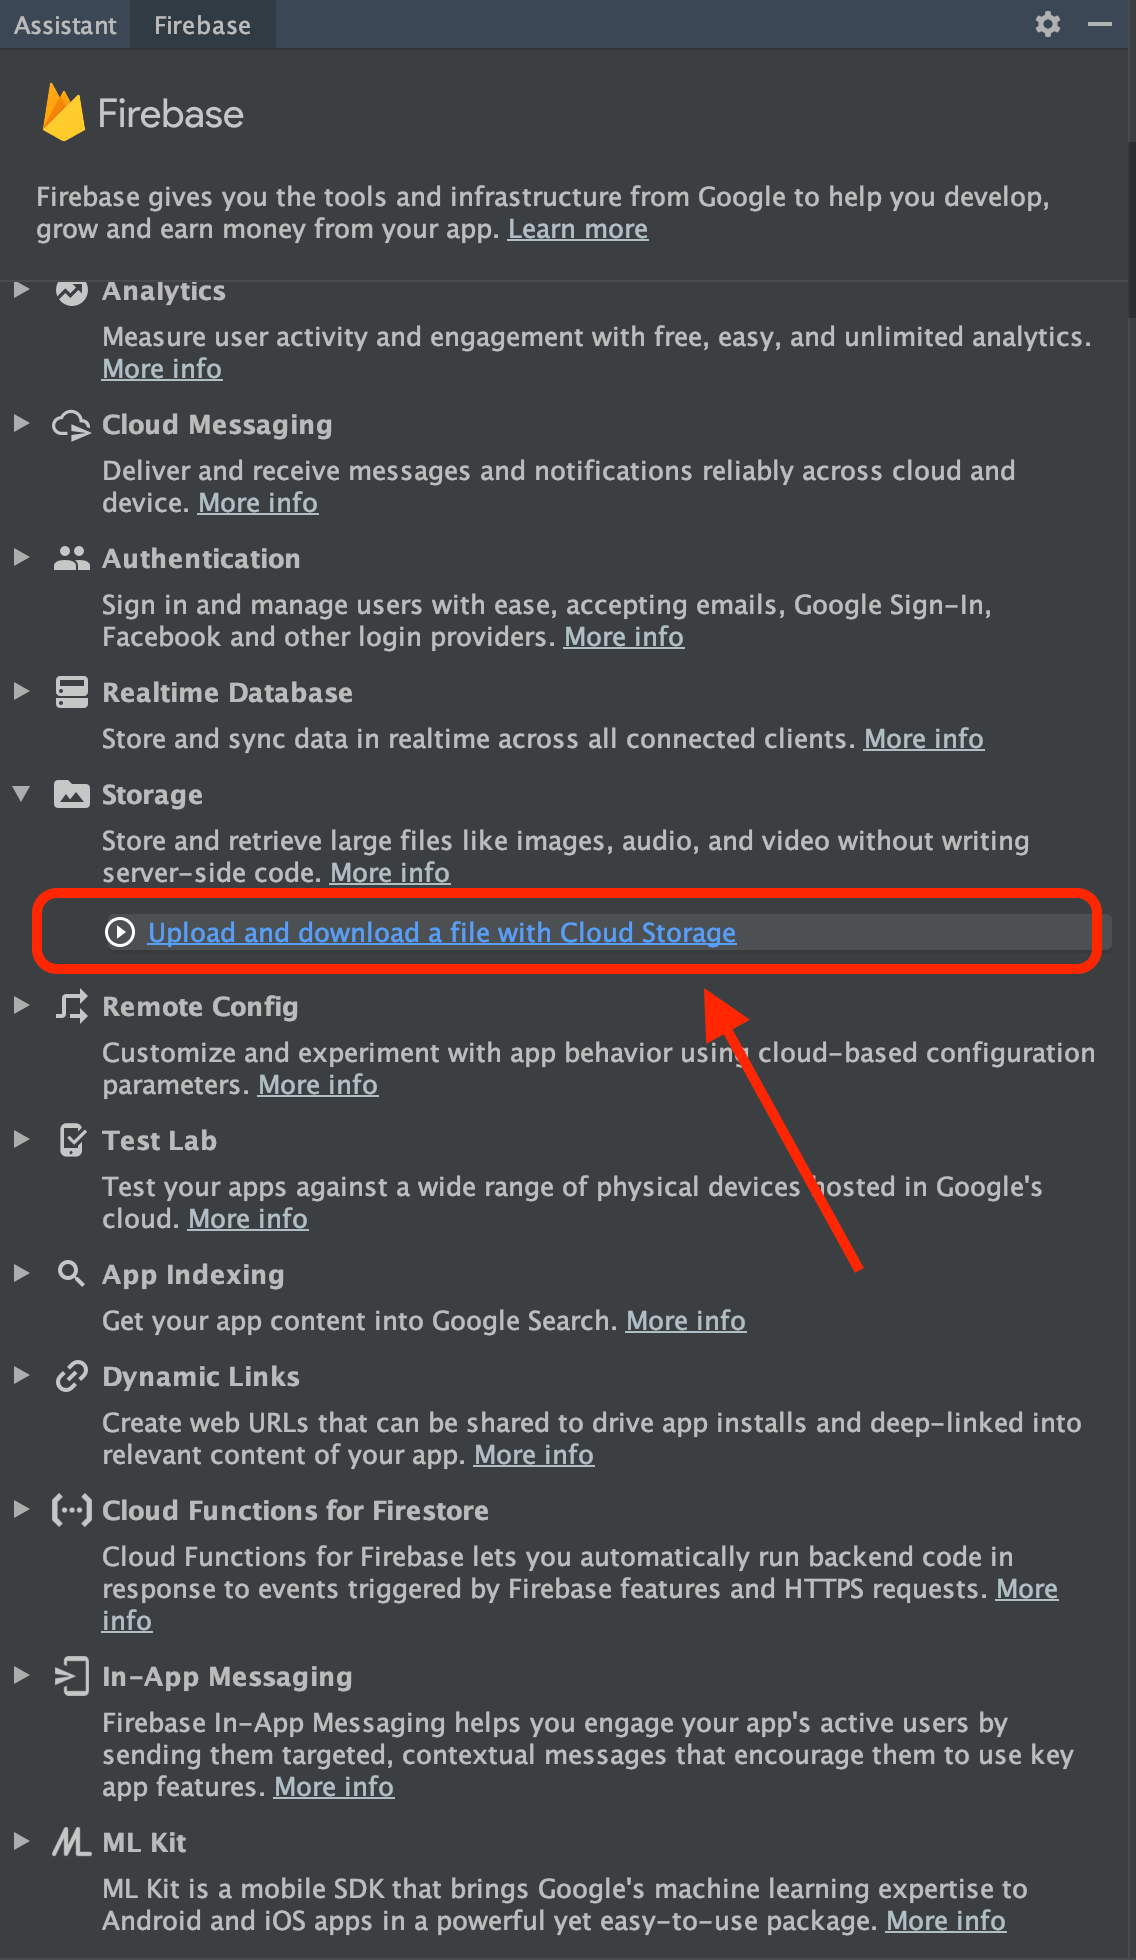
- Open Firebase Assistant in Android Studio. You can access it here: Tools>Firebase

- It will open a pane on the right side, containing all the Firebase related products. We are only interested in Firebase Cloud Storage so we will expand the “Storage” dropdown. You will see a button named “Upload and download a file with Cloud Storage” click that button

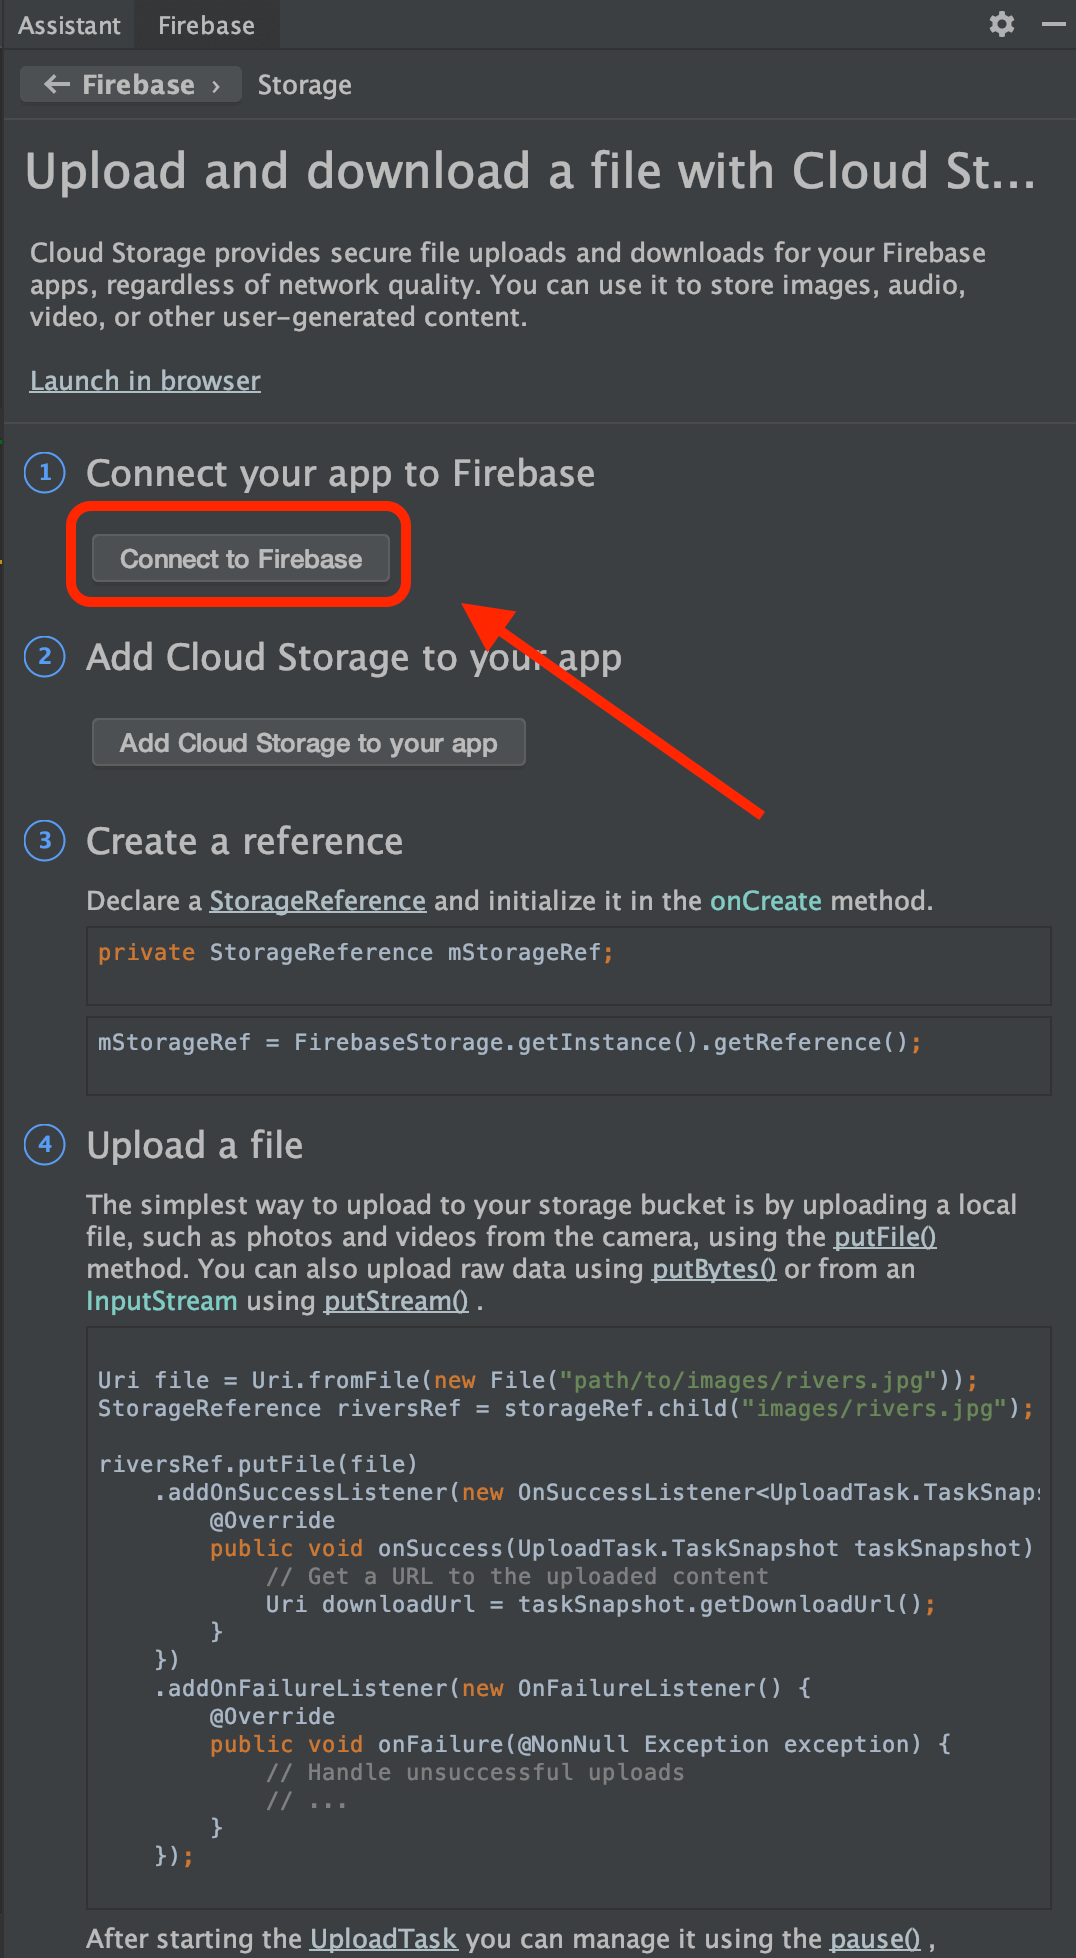
Adding Firebase Cloud Storage to Android project - Now the first option you will see is, “Connect to Firebase” just click that. It will ask you to log in if you are not already.

Adding Firebase Cloud Storage to Android Screenshot - After logging in, you will be asked to create new or choose an existing Firebase Project. Do what you like and hit “Connect to Firebase” button
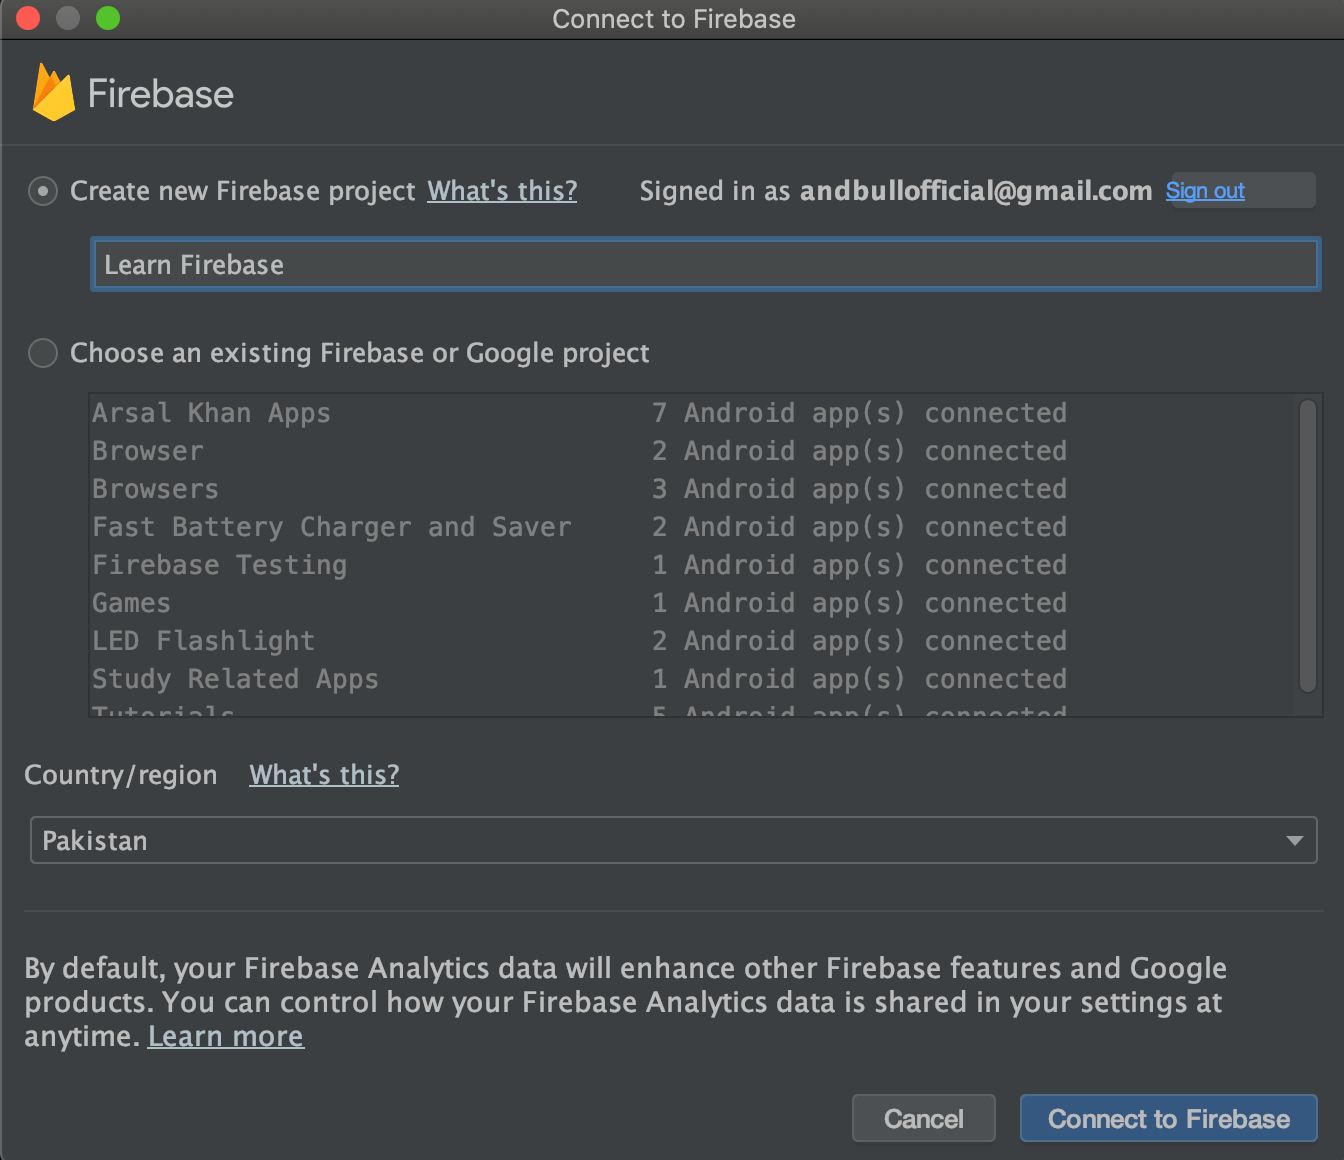

Selecting a project for Firebase Cloud Storage screenshot
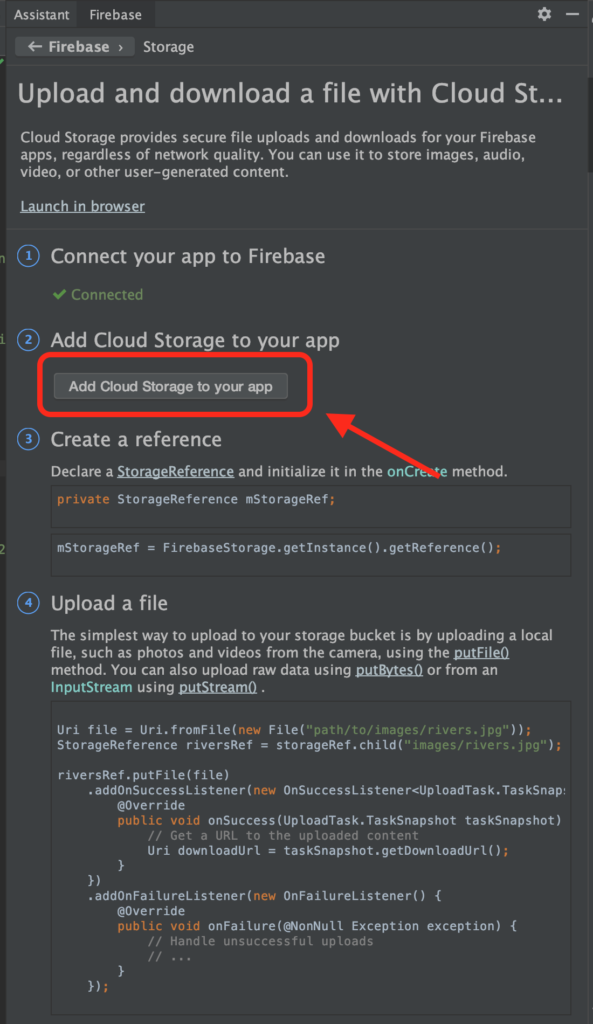
That’s it, your project is connected to Firebase. Now let’s add Firebase Storage to your project.
Adding Firebase Storage to your project
Quite easy, just click the “Add Cloud Storage to your app”, accept the changes that are going to be made and done!
Start Uploading Files to Firebase Cloud Storage
Before jumping into uploading the file, let me show you the app will look like:
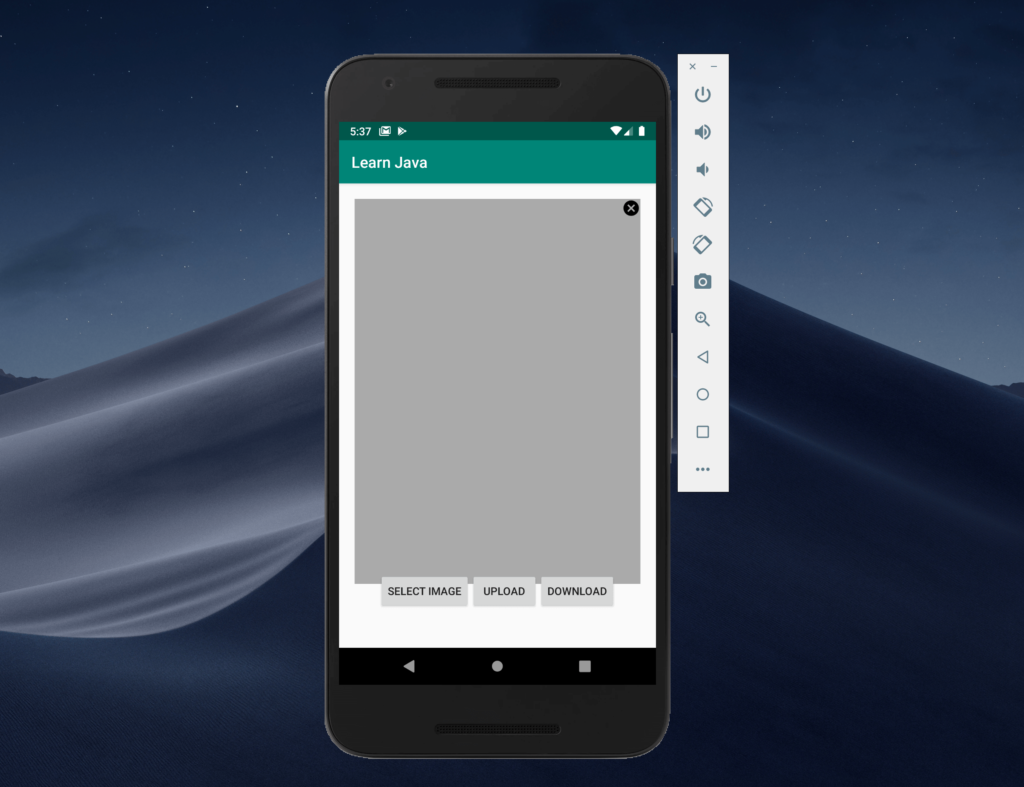
It will be having four buttons and one image view to show the image. Here is the code for creating the UI like this:
<?xml version="1.0" encoding="utf-8"?>
<RelativeLayout xmlns:android="http://schemas.android.com/apk/res/android"
    xmlns:tools="http://schemas.android.com/tools"
    android:layout_width="match_parent"
    android:layout_height="match_parent">


    <ImageView
        android:id="@+id/imageview"
        android:layout_width="500dp"
        android:layout_height="500dp"
        android:layout_margin="20dp"
        android:padding="25dp"
        android:background="@android:color/darker_gray"
         />

    <ImageView
        android:layout_width="wrap_content"
        android:layout_height="wrap_content"
        android:layout_alignTop="@+id/imageview"
        android:layout_alignRight="@+id/imageview"
        android:onClick="clearImage"
        android:src="@drawable/ic_cancel_black_24dp" />

    <LinearLayout
        android:layout_width="wrap_content"
        android:layout_height="wrap_content"
        android:layout_marginBottom="50dp"
        android:layout_alignParentBottom="true"
        android:layout_centerHorizontal="true"
        android:orientation="horizontal">


        <Button
            android:layout_width="wrap_content"
            android:layout_height="wrap_content"
            android:onClick="oneClicked"
            android:text="select image" />

        <Button
            android:layout_width="wrap_content"
            android:layout_height="wrap_content"
            android:onClick="uploadPhoto"
            android:text="Upload" />

        <Button
            android:layout_width="wrap_content"
            android:layout_height="wrap_content"
            android:onClick="downloadPhoto"
            android:text="Download" />


    </LinearLayout>
</RelativeLayout>
The grey rectangle is an image view that will display the image that we will upload or download.
The cross button on the top right corner of the grey rectangle will clear the image on the image view. Here is what will happen when the button is clicked
public void clearImage(View view) {
        //We already have the reference of Image view, so now we are setting null to it
        mImageView.setImageBitmap(null);

    }
The “Select Image” button will choose the image file from the gallery and set it to ImageView. Here is the code that will be executed when the button is clicked:
    //Request Code for starting activity for result method
    private final int PICK_IMAGE = 001;
    //Saving image uri so that we can use it to upload the file
    private Uri imageUri;

    //This function will be called when "Select Image" button will be clicked
    public void oneClicked(View view) {
        Intent intent = new Intent();
        intent.setType("image/*");
        intent.setAction(Intent.ACTION_GET_CONTENT);
        startActivityForResult(Intent.createChooser(intent, "Select Picture"), PICK_IMAGE);
    }


    //This function will be called when user selects an image and returns to app
    @Override
    protected void onActivityResult(int requestCode, int resultCode, @Nullable Intent data) {
        //We need to check if the request code is same and user actually picked some image
        if(requestCode ==PICK_IMAGE && resultCode == RESULT_OK){
            //Getting the Image URI
            imageUri = data.getData();
            try{
                //Setting the image to ImageView
                Bitmap bitmap = MediaStore.Images.Media.getBitmap(getContentResolver(), imageUri);
                mImageView.setImageBitmap(bitmap);
            } catch (FileNotFoundException e) {
                e.printStackTrace();
            } catch (IOException e) {
                e.printStackTrace();
            }

        }
        super.onActivityResult(requestCode, resultCode, data);
    }
Now comes the important functionality, uploading the selected image!
Just like Firebase Database, we need a reference of Firebase Cloud Storage, we do that using this code:
StorageReference storageReference = FirebaseStorage.getInstance().getReference();
This reference is like a path where you want to upload files, if you push files to the reference we got using the above statement then the file will appear in the main directory.
We are going to save the file under the “images” folder and name it “test_image.png”
So we will create a reference like:
storageReference.child("images/test_image.png")Now we will call the putFile() method and pass the file URI that we got when we selected the image. This function will upload the file to that reference.
We also need to keep track of progress so will consume the call-back function: addOnCompleteListener()
Here is the complete code for uploading the file, it will be called when the “Upload” button will be clicked
public void uploadPhoto(View view) {
        if(imageUri!=null)
        storageReference.child("images/test_image.png").putFile(imageUri).addOnCompleteListener(new OnCompleteListener<UploadTask.TaskSnapshot>() {
            @Override
            public void onComplete(@NonNull Task<UploadTask.TaskSnapshot> task) {
                if(task.isSuccessful()){
                    Toast.makeText(MainActivity.this, "Upload completed", Toast.LENGTH_SHORT).show();
                }else{
                    Toast.makeText(MainActivity.this, "Something went wrong: " + task.getException().getLocalizedMessage(), Toast.LENGTH_SHORT).show();
                    Log.e(TAG, "onComplete: " +task.getException().getLocalizedMessage() );
                }
            }
        });
    }
That’s it, isn’t it simple as ABC?
Let move to downloading the file
Downloading file from Firebase Cloud Storage
You won’t believe how easy it is to download files from Firebase Cloud Storage. All you need is a reference to the image.
DISCLAIMER: As it is a tutorial, but when we are working on a real project and upload a file, we save its download URL in Firebase Database (either Real-time or Firestore whichever is being used) but as we are not doing that here so we need to get the reference manually and then start the process
We already know that our file is saved by the “test_image.png” name under the images directory, so we will create a reference accordingly.
StorageReference imageReference = FirebaseStorage.getInstance().getReference().child("images/1.png");
Now there are multiple ways provided by Firebase to download the file but we are using the one which lets us get the download URL of the image.
After we have the download URL of the image, we can use Glide (a third-party library) to download and display that image from URL to ImageView.
Check out their documentation and include it in your project.
Just call getDownloadUrl() method on that reference and you will have a URL. Like this:
 public void downloadPhoto(View view) {
        StorageReference imageReference = FirebaseStorage.getInstance().getReference().child("images/1.png");

        imageReference.getDownloadUrl().addOnSuccessListener(new OnSuccessListener<Uri>() {
            @Override
            public void onSuccess(Uri uri) {
                //Setting the image to imageView using Glide Library
                Glide.with(MainActivity.this).load(uri.toString()).into(mImageView);
            }
        }).addOnFailureListener(new OnFailureListener() {
            @Override
            public void onFailure(@NonNull Exception e) {
                Log.e(TAG, "onFailure: something went wrong: "+ e.getMessage() );

            }
        });

    }
And boom, the image is downloaded and set to the image view. You can use it to set the profile picture of the user and a lot more.
Thanks a lot, guys for following along. I hope you have understood something out of this tutorial. You can like us on Facebook for more content like this!
Here is the complete MainActivity.java code:
import androidx.annotation.NonNull;
import androidx.annotation.Nullable;
import androidx.appcompat.app.AppCompatActivity;

import android.content.Intent;
import android.graphics.Bitmap;
import android.net.Uri;
import android.os.Bundle;
import android.os.Environment;
import android.provider.MediaStore;
import android.util.Log;
import android.view.View;
import android.widget.ImageView;
import android.widget.Toast;

import com.bumptech.glide.Glide;
import com.google.android.gms.tasks.OnCompleteListener;
import com.google.android.gms.tasks.OnFailureListener;
import com.google.android.gms.tasks.OnSuccessListener;
import com.google.android.gms.tasks.Task;
import com.google.firebase.storage.FileDownloadTask;
import com.google.firebase.storage.FirebaseStorage;
import com.google.firebase.storage.StorageReference;
import com.google.firebase.storage.UploadTask;

import java.io.File;
import java.io.FileNotFoundException;
import java.io.IOException;
import java.util.UUID;

public class MainActivity extends AppCompatActivity {

    private ImageView mImageView;
    private StorageReference storageReference;
    private static final String TAG = "MainActivity";
    @Override
    protected void onCreate(Bundle savedInstanceState) {
        super.onCreate(savedInstanceState);
        setContentView(R.layout.activity_main);

        mImageView = findViewById(R.id.imageview);

         storageReference = FirebaseStorage.getInstance().getReference();
//        storageReference.putFile()

    }

    //Request Code for starting activity for result method
    private final int PICK_IMAGE = 001;
    //Saving image uri so that we can use it to upload the file
    private Uri imageUri;

    //This function will be called when "Select Image" button will be clicked
    public void oneClicked(View view) {
        Intent intent = new Intent();
        intent.setType("image/*");
        intent.setAction(Intent.ACTION_GET_CONTENT);
        startActivityForResult(Intent.createChooser(intent, "Select Picture"), PICK_IMAGE);
    }


    //This function will be called when user selects an image and returns to app
    @Override
    protected void onActivityResult(int requestCode, int resultCode, @Nullable Intent data) {
        //We need to check if the request code is same and user actually picked some image
        if(requestCode ==PICK_IMAGE && resultCode == RESULT_OK){
            //Getting the Image URI
            imageUri = data.getData();
            try{
                //Setting the image to ImageView
                Bitmap bitmap = MediaStore.Images.Media.getBitmap(getContentResolver(), imageUri);
                mImageView.setImageBitmap(bitmap);
            } catch (FileNotFoundException e) {
                e.printStackTrace();
            } catch (IOException e) {
                e.printStackTrace();
            }

        }
        super.onActivityResult(requestCode, resultCode, data);
    }

    public void uploadPhoto(View view) {
        if(imageUri!=null)
        storageReference.child("images/test_image.png").putFile(imageUri).addOnCompleteListener(new OnCompleteListener<UploadTask.TaskSnapshot>() {
            @Override
            public void onComplete(@NonNull Task<UploadTask.TaskSnapshot> task) {
                if(task.isSuccessful()){
                    Toast.makeText(MainActivity.this, "Upload completed", Toast.LENGTH_SHORT).show();
                }else{
                    Toast.makeText(MainActivity.this, "Something went wrong: " + task.getException().getLocalizedMessage(), Toast.LENGTH_SHORT).show();
                    Log.e(TAG, "onComplete: " +task.getException().getLocalizedMessage() );
                }
            }
        });
    }

    public void clearImage(View view) {
        //We already have the reference of Image view, so now we are setting null to it
        mImageView.setImageBitmap(null);

    }

    public void downloadPhoto(View view) {
        StorageReference imageReference = FirebaseStorage.getInstance().getReference().child("images/1.png");

        imageReference.getDownloadUrl().addOnSuccessListener(new OnSuccessListener<Uri>() {
            @Override
            public void onSuccess(Uri uri) {
                //Setting the image to imageView using Glide Library
                Glide.with(MainActivity.this).load(uri.toString()).into(mImageView);
            }
        }).addOnFailureListener(new OnFailureListener() {
            @Override
            public void onFailure(@NonNull Exception e) {
                Log.e(TAG, "onFailure: something went wrong: "+ e.getMessage() );

            }
        });

    }
}Ask any questions in the comment section below, our experts will be happy to help you at no extra cost.
Great content! Super high-quality! Keep it up! 🙂