In this guide, you’ll learn how you can send push notifications using Firebase in Android.
Excited?
Let’s get started.
Curious to see the end result of this tutorial? Watch!
Quick Jumps
What is a Push Notification?
Push notification is a simple message that appears with a notification in the notification tray or like a popup messaging – depends on the platform.
Push Notifications are usually pushed from backend servers to the clients like Firebase in this case. It is the way to deliver users a message without opening the app. It is a highly effective tool for developers and advertisers to re-target/re-engage your dormant users.
Push notifications boost app engagement by 88% (Source: Localytics Data Team)
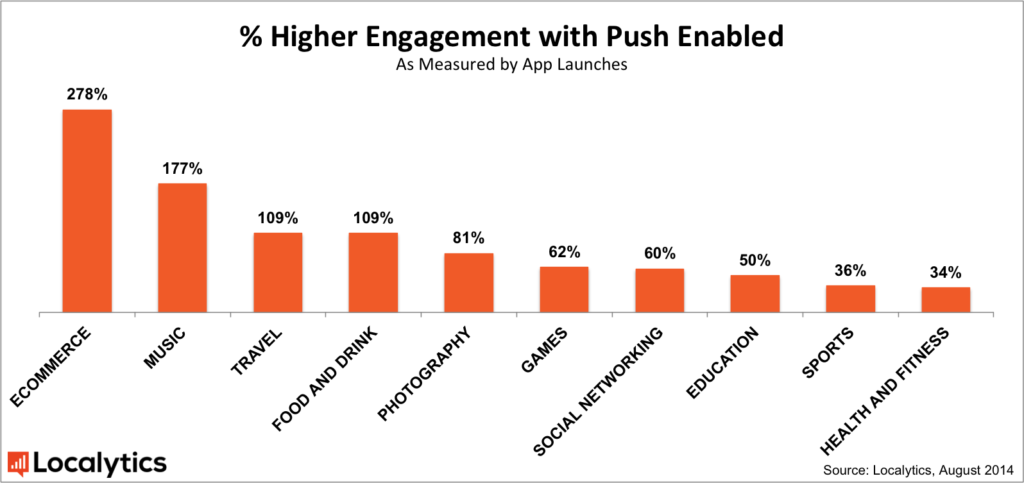
As you can see, the push notifications get benefits most from the eCommerce stores since users are excited about the new products.
What is FCM (Firebase Cloud Messaging)
Firebase Cloud Messaging is a new version of Google Cloud Messaging or GCM that is a cloud cross-platform messaging solution. You can use Firebase Cloud Messaging for any kind of end-user device including iOS, Android, or even web at no-cost.
Firebase allows two types of messages:
- Notification Notifications. The customer application will act differently based on if it is from the background or the foreground once it receives the FCM message. Considering that the Android program assembles the telling to you personally, this is among the simplest methods to send notifications to your customers. If your program receives an FCM message whenever it’s in the foreground, then the program will not manage this telling automatically, leaving one to process the message on your program’s onMessageReceived() callback. We are going to be researching onMessageReceived() later in this tutorial, but just bear in mind that if your program receives a message whenever it’s in the foreground, then by default this message will not be displayed to the consumer.
- Data Notifications, you may use info messages to send customized data components to the customer program. But, FCM does set a 4KB limitation on those information messages, therefore if your payload exceeds 4KB then you will want to fetch further information using WorkManager or the JobScheduler API.
NOTE: In this tutorial, we’ll be sending a notification message only.
Send a Push Notification from Google Firebase (Step by Step)
Here is the step by step guide how you can implement Firebase push notification with an example:
1. Things You Need to Get Started
- A Firebase account (you can use the same Google account – no extra sign up required)
- A real Android device or an emulator to test your Android App
2. Create an Application in Android Studio
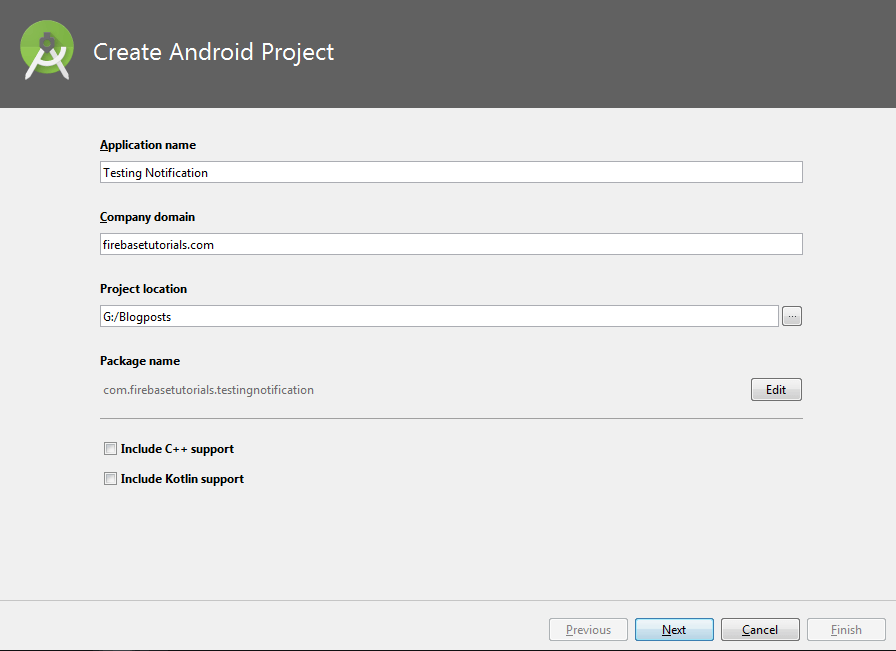
- Open Android Studio and create a new project.
- Enter the app details – the app name, domain name, location – and leave the rest as default i.e., the empty activity, and minimum Android version. In my case, the package name of my app is ‘com.firebasetutorials.testingnotification’ but you can have one of your choices.
- After Android Studio finishes the building App for you, leave it, and move to the next step, we will soon get back to Android Studio.
3. Setup Firebase for Push Notification
There are three steps to set up Firebase for your Android app notification:
- Signing up
- Creating a Project
- Registering an App
Sign up for Firebase
Before anything, you need a Firebase account. Click here and signup for Firebase Console or sign in using your Google account.
- Create a Project
Now visit the Firebase Console and hit ‘Add Project’. Enter Project name, select Country/region. And hit ‘Create Project’

- Register App with Firebase
There are three simple steps to get your Android App Registered with Firebase:
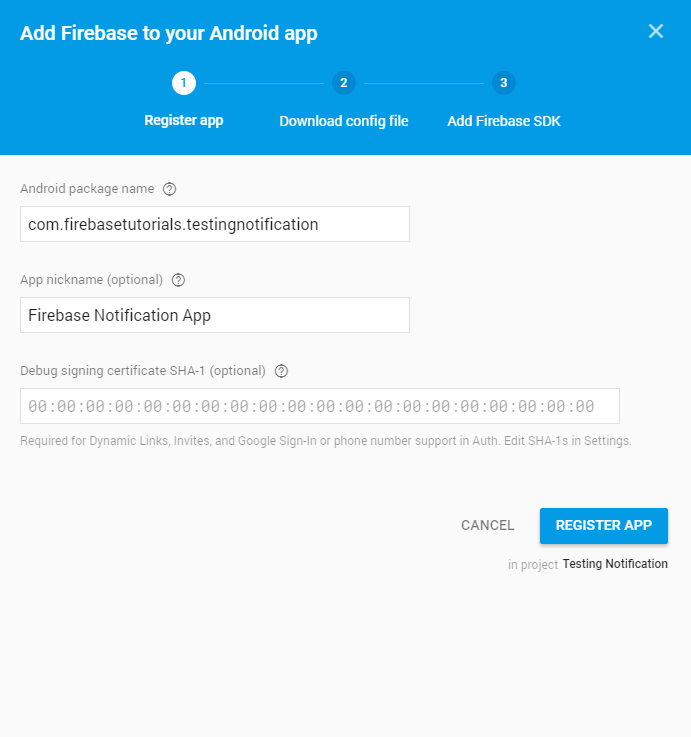
Register App
After your first project is completed, you’ll see a page like below. Hit ‘Add Firebase to your Android App’
Enter ‘Android package name’. In my case, it is ‘com.firebasetutorials.testingnotification’ – you can enter one of your choices.
NOTE: Package name should be exactly the same as the app package name. Otherwise it will not work.
Enter ‘App nickname’. I’m entering the ‘Testing Notification App’ – you can enter anything; it has nothing to do with your app.
The third field is for ‘Debug signing certificate SHA-1’ you can skip it at this point as we are not going to use Firebase Authentication.
Hit ‘Register App’ to get your app registered with Firebase
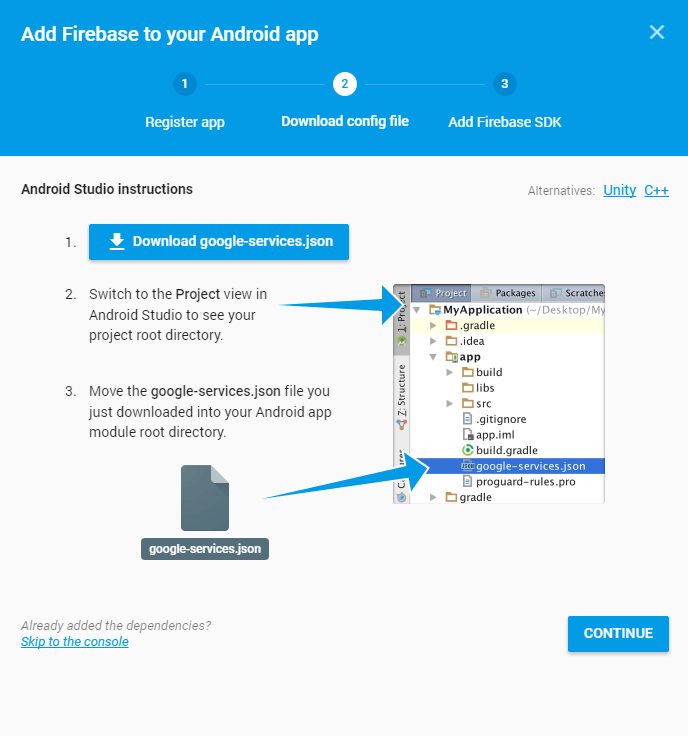
Download Config Files
Hit ‘Download google-services.json’ button to download a JSON file. Save the JSON file under the app directory of your Android Studio project we just recently created.
Add Firebase SDK
After downloading the JSON file under the App Directory of your project hit Continue on Firebase Console Dialog.
In Android Studio, open build.gradle file. You will find it in the project directory, but not the one that is in your app directory. Add the following line of code inside dependencies:
classpath 'com.google.gms:google-services:3.2.0'
After adding the dependencies, your project will look like this:
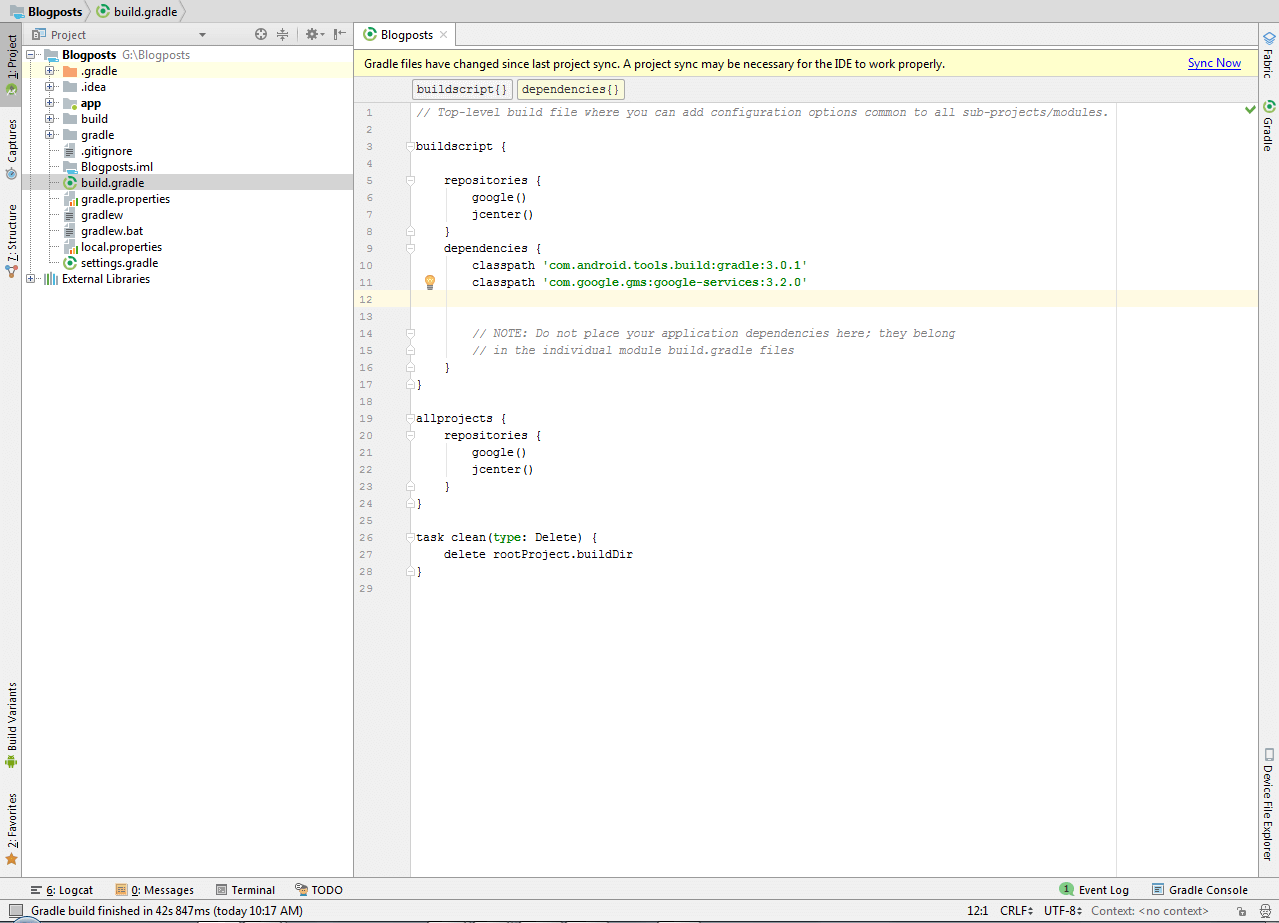
After adding this, you will see a yellow message, asking you to sync the project. You can ignore it at the moment. Now head over to app-level build.gradle file. You will find it under the app directory of your project.
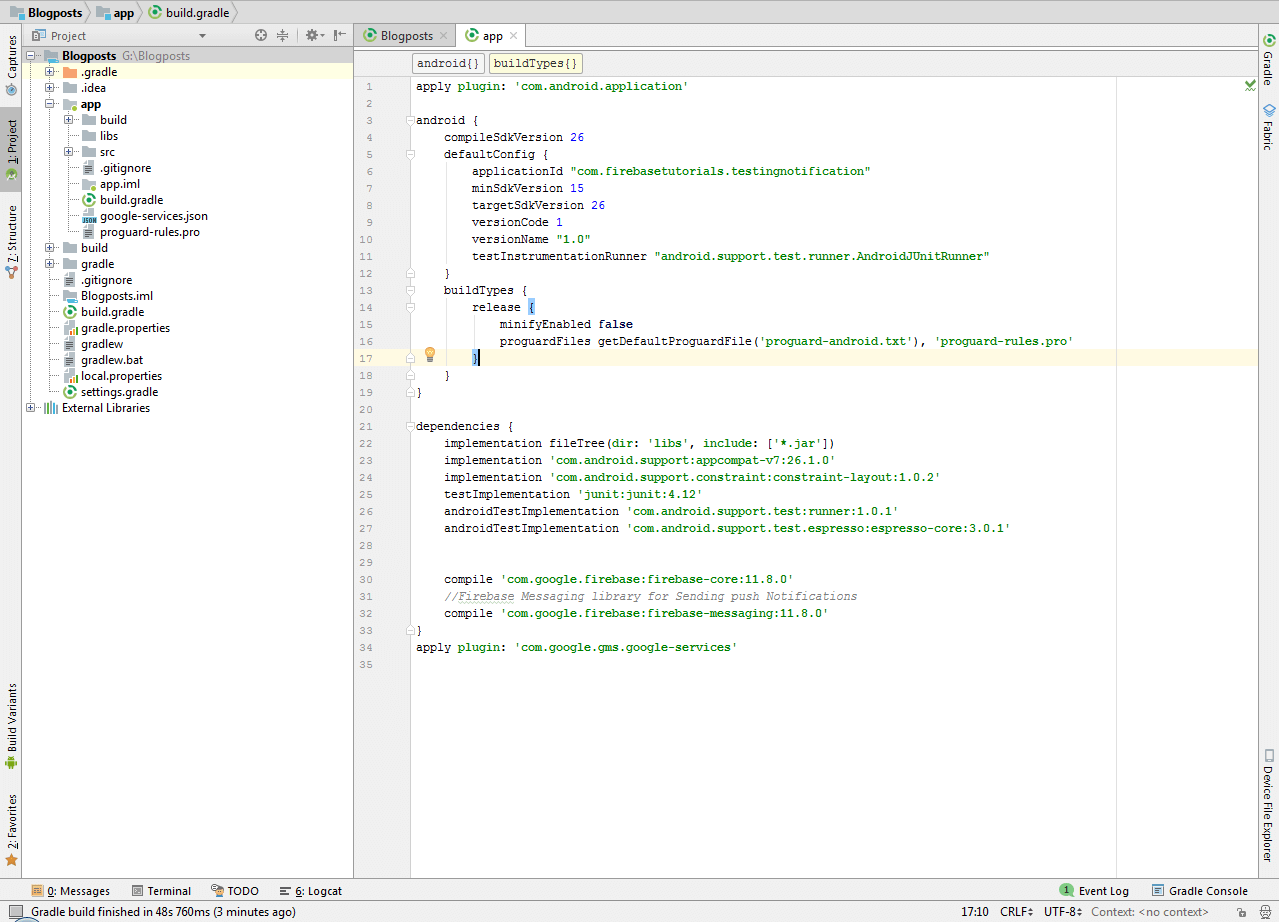
Add the following lines of in dependencies section
compile 'com.google.firebase:firebase-core:11.8.0'
//Firebase Messaging library for sending push notifications
compile 'com.google.firebase:firebase-messaging:11.8.0'
And at the end, outside of the dependencies section, add the following line and hit ‘Sync Now’
apply plugin: 'com.google.gms.google-services'
And your build.gradle file will look like this:
That’s all we need to do in Android Studio.
Send Notification from Firebase Console
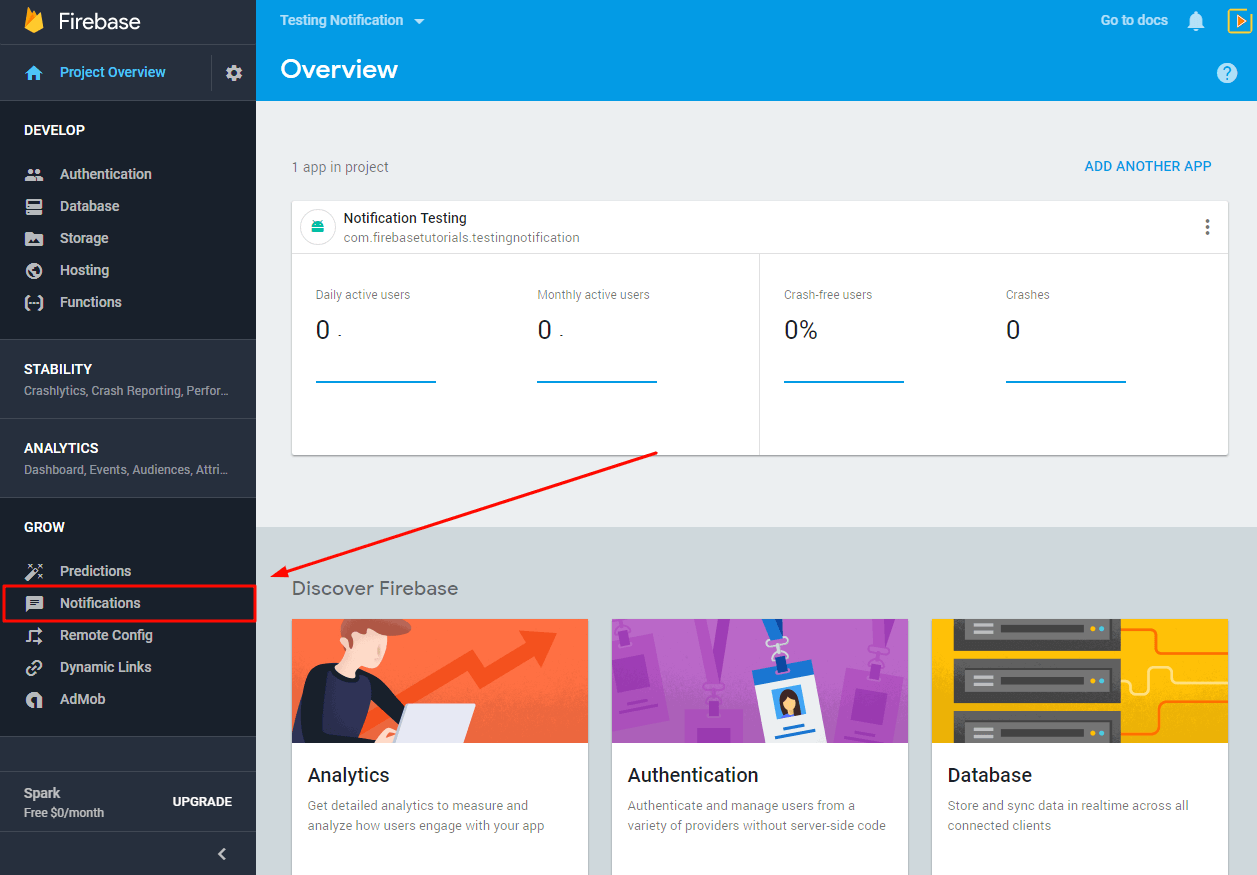
Get back to Firebase Console. Open the Firebase project, on the left pane select ‘Notification’ or click here
Hit ‘SEND YOUR FIRST MESSAGE’

And you’ll see the ‘Compose Message‘ form, where you can enter the details.
In ‘Message Text‘ enter the message that you want to be displayed in the Notification Bar of your Android App
In ‘Message Label‘ you can enter the message nickname, it has to do nothing with the notification at the client-side, it is just for saving purpose in Firebase Console.
In the ‘Delivery Date‘ drop-down, you can select the delivery time. If you select ‘Send Now‘ your message will be sent and displayed instantly. If you select ‘Send Later’ then some more options will be displayed asking for when you want to send the notification to your users.
You can mark the ‘Recipient Time Zone‘ option and your message will be delivered according to the recipient time zone or you can provide any custom timezone.
Recipient Time Zone is very useful because sometimes we want to send notification on some custom events like New Year. Due to timezone differences, your message can be shown to users before New Year and make them feel annoyed. So it’s better to use the ‘Recipient Time Zone‘ option with that kind of notification.
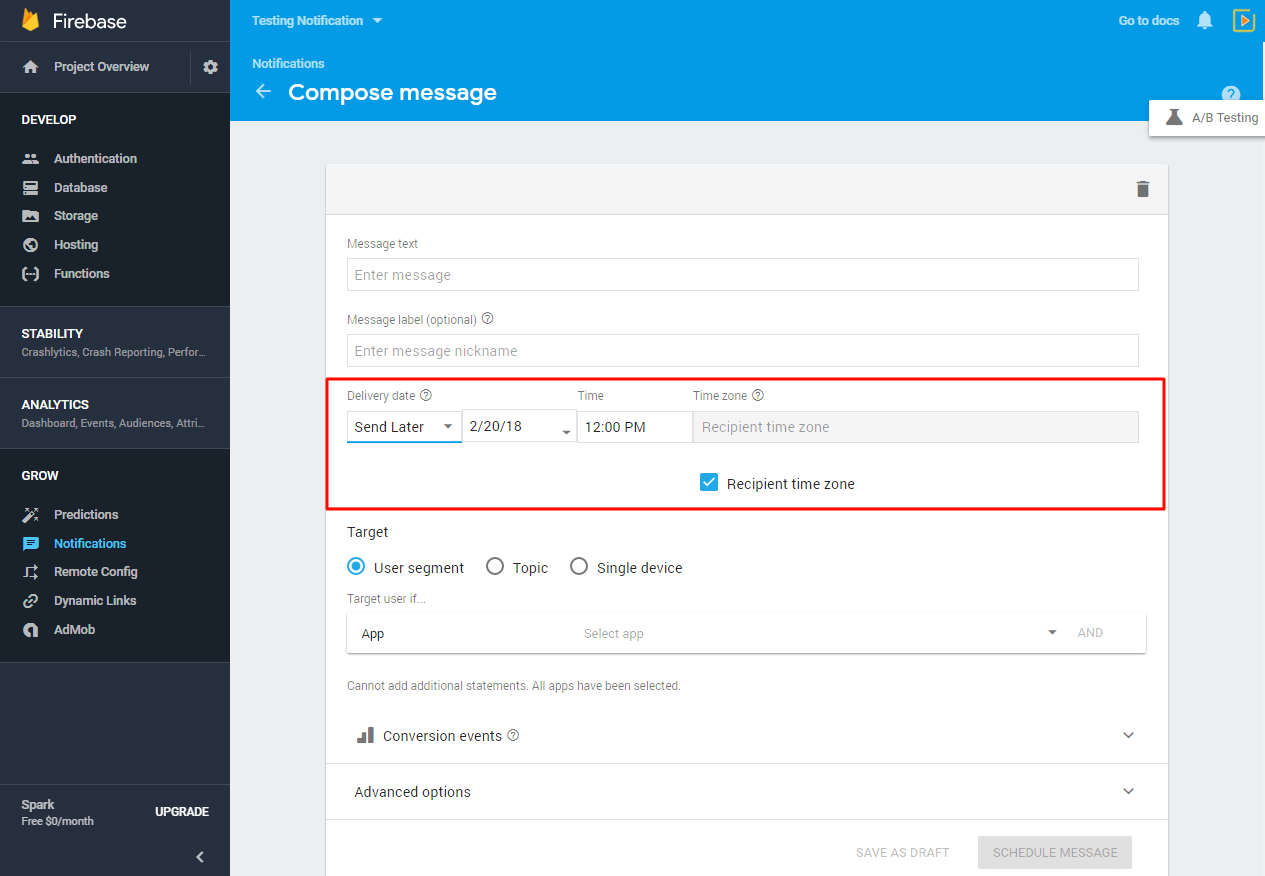
In this tutorial, we will select the ‘Send Now’ option to make the notification sent right now.
In the target section, we can target a custom range of users depending on their behavior and much more. We will be covering that all in a whole new section.
In the next drop-down, select the app package name. You can select multiple apps simultaneously, but they all need to be on the same project.
After that, there are ‘Conversion events’ options, here you can track the analytics data of your notification. The ‘Sent‘ and ‘Opened‘ are added by default, but you can add more.
Sent and Opened are shown in the Notification Section in Firebase to show you how many users received the notification message and how many opened it. We are not adding a conversion event for the sake of this tutorial.
In the end, there are few ‘Advanced Options’, but we will keep the default. Those are for Data Messages; we will cover that all in detail later.
Now hit, ‘Send Message‘ to make the notification sent to the client app.
Your Notification will be displayed on your Android Phone, and if you tap on that notification, it will open the app.
You can watch the video above if you don’t understand the text.
Ask any questions in the comment section below, our experts will be happy to help you at no extra cost.
thanks for detailed step by step tutorial
https://in10stech.com/capability/application-development
Thanks for ones marvelous posting! I actually enjoyed reading it,
you can be a great author. I will ensure that I bookmark
your blog and will come back later in life. I want to encourage you continue your great writing, have
a nice morning!