
Do you want to authenticate with Firebase using email and password on Android?
You’ve come to the right place.
The tutorial would be short and sweet.
Are you a visual learner? Watch this video.
Without any further due, let’s get straight into development.
Here is the content table that we are going to follow:
Quick Jumps
Connecting Firebase and Implementing Firebase Auth
Recommended: Firebase Remote Config – Complete Android Tutorials (with Sample App)
So, first of all, we need to connect our app to Firebase.
There are two methods to do that:
- The Firebase Assistant is just like an Android Studio plugin which assists you in implementing the Firebase products.
- The Manual Method where you’ll do all the stuff yourself like adding the libraries, downloading the JSON file, etc.
We are sticking with the first one, as it is quite simple and hassle-free.
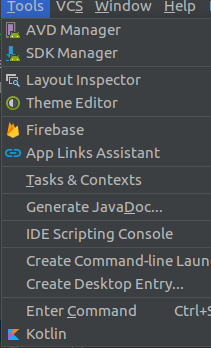
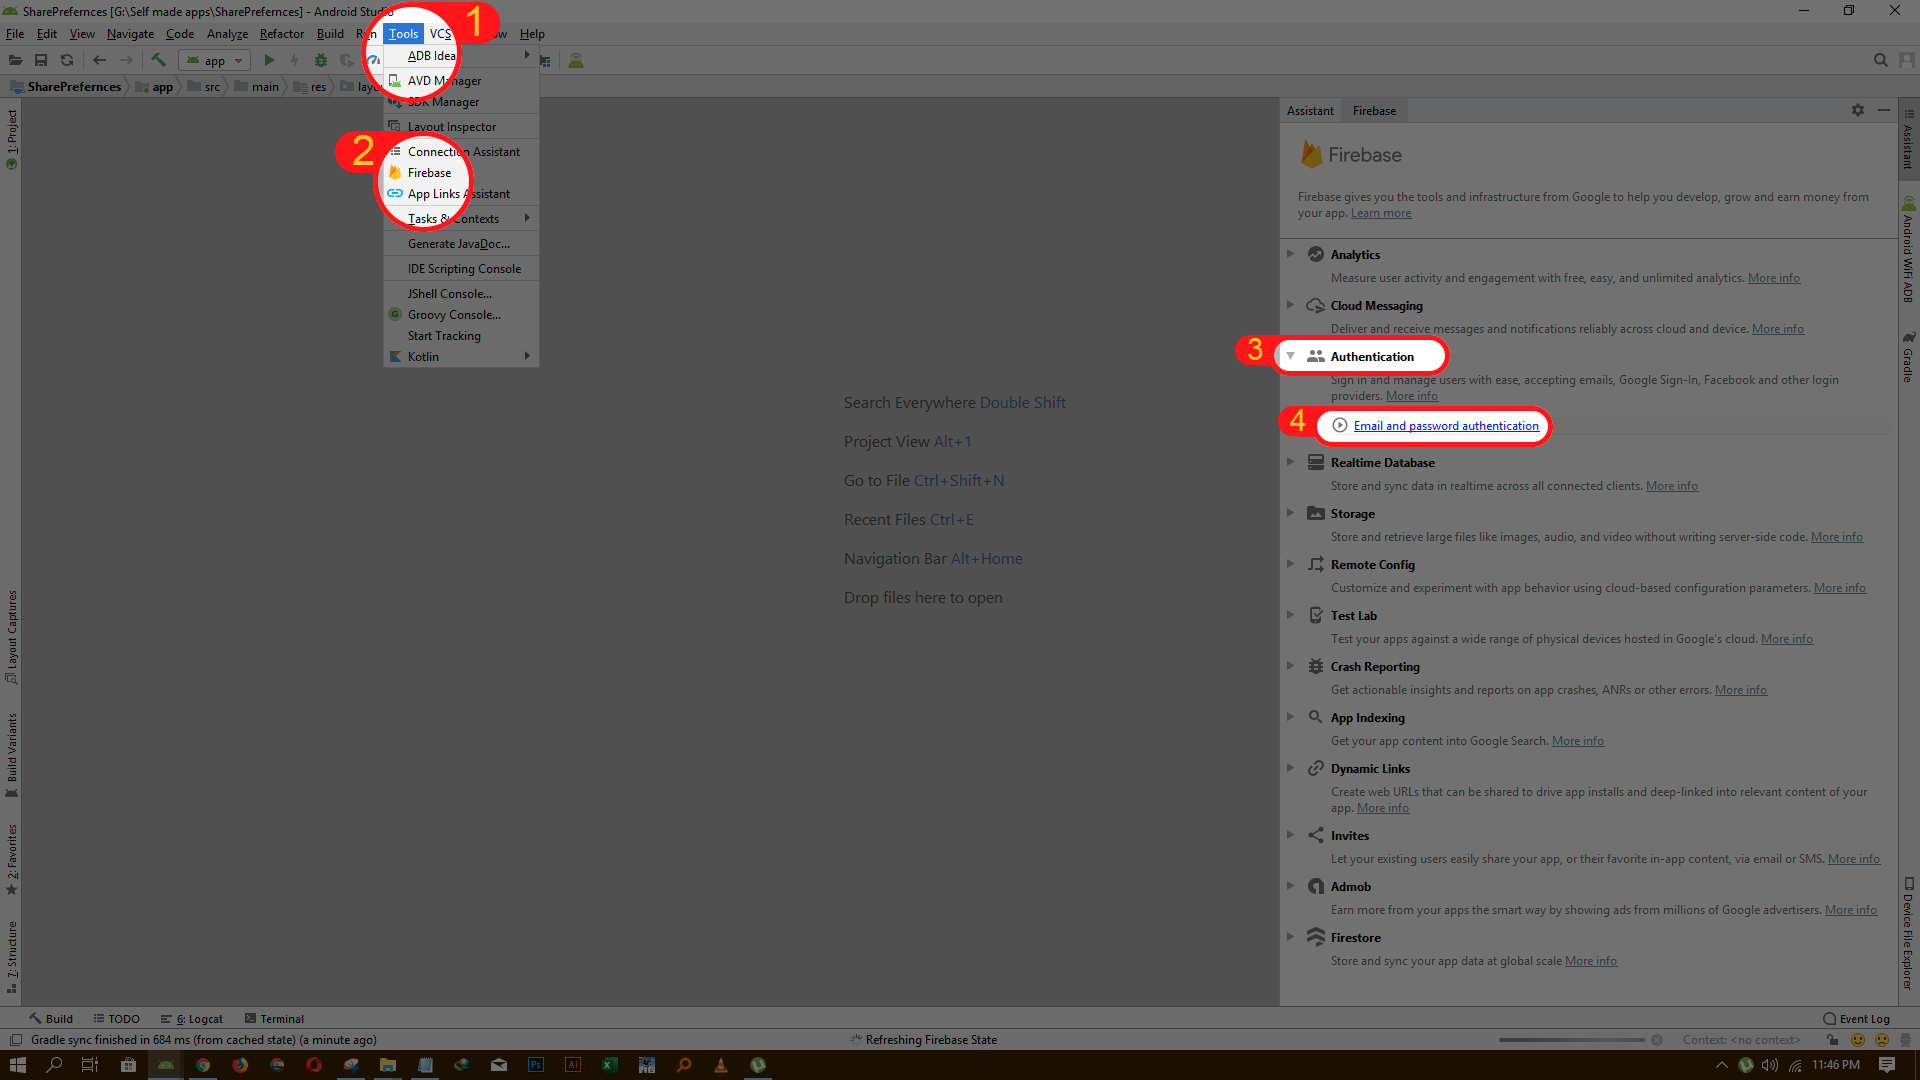
All we need to do is click on Firebase under Tools menu of Android Studio.
Now a pane will appear from the right side, expand the Authentication section, and click on “The email and password authentication.”
NOTE: We’re just going to cover the signup and sign in with email and password only, but you’re interested with other ways, you can read our series on Firebase authentication.
Now you see a bunch of steps in that pane. Just go through the first two to connect the Firebase and implement Firebase Authentication to your app.
- Click “Connect to Firebase“
Make sure you are signed in with your Google account in Android Studio.
If you’re signed in, create a new project if you don’t have any existing projects yet.
I choose the existing project and hit the “Connect to Firebase Button.”
An app, JSON file, and libraries will be added instantly and Gradle will start syncing.
You have to do manually if there is no Firebase Assistant.
Once the Gradle sync is completed, it’s time for the next step.
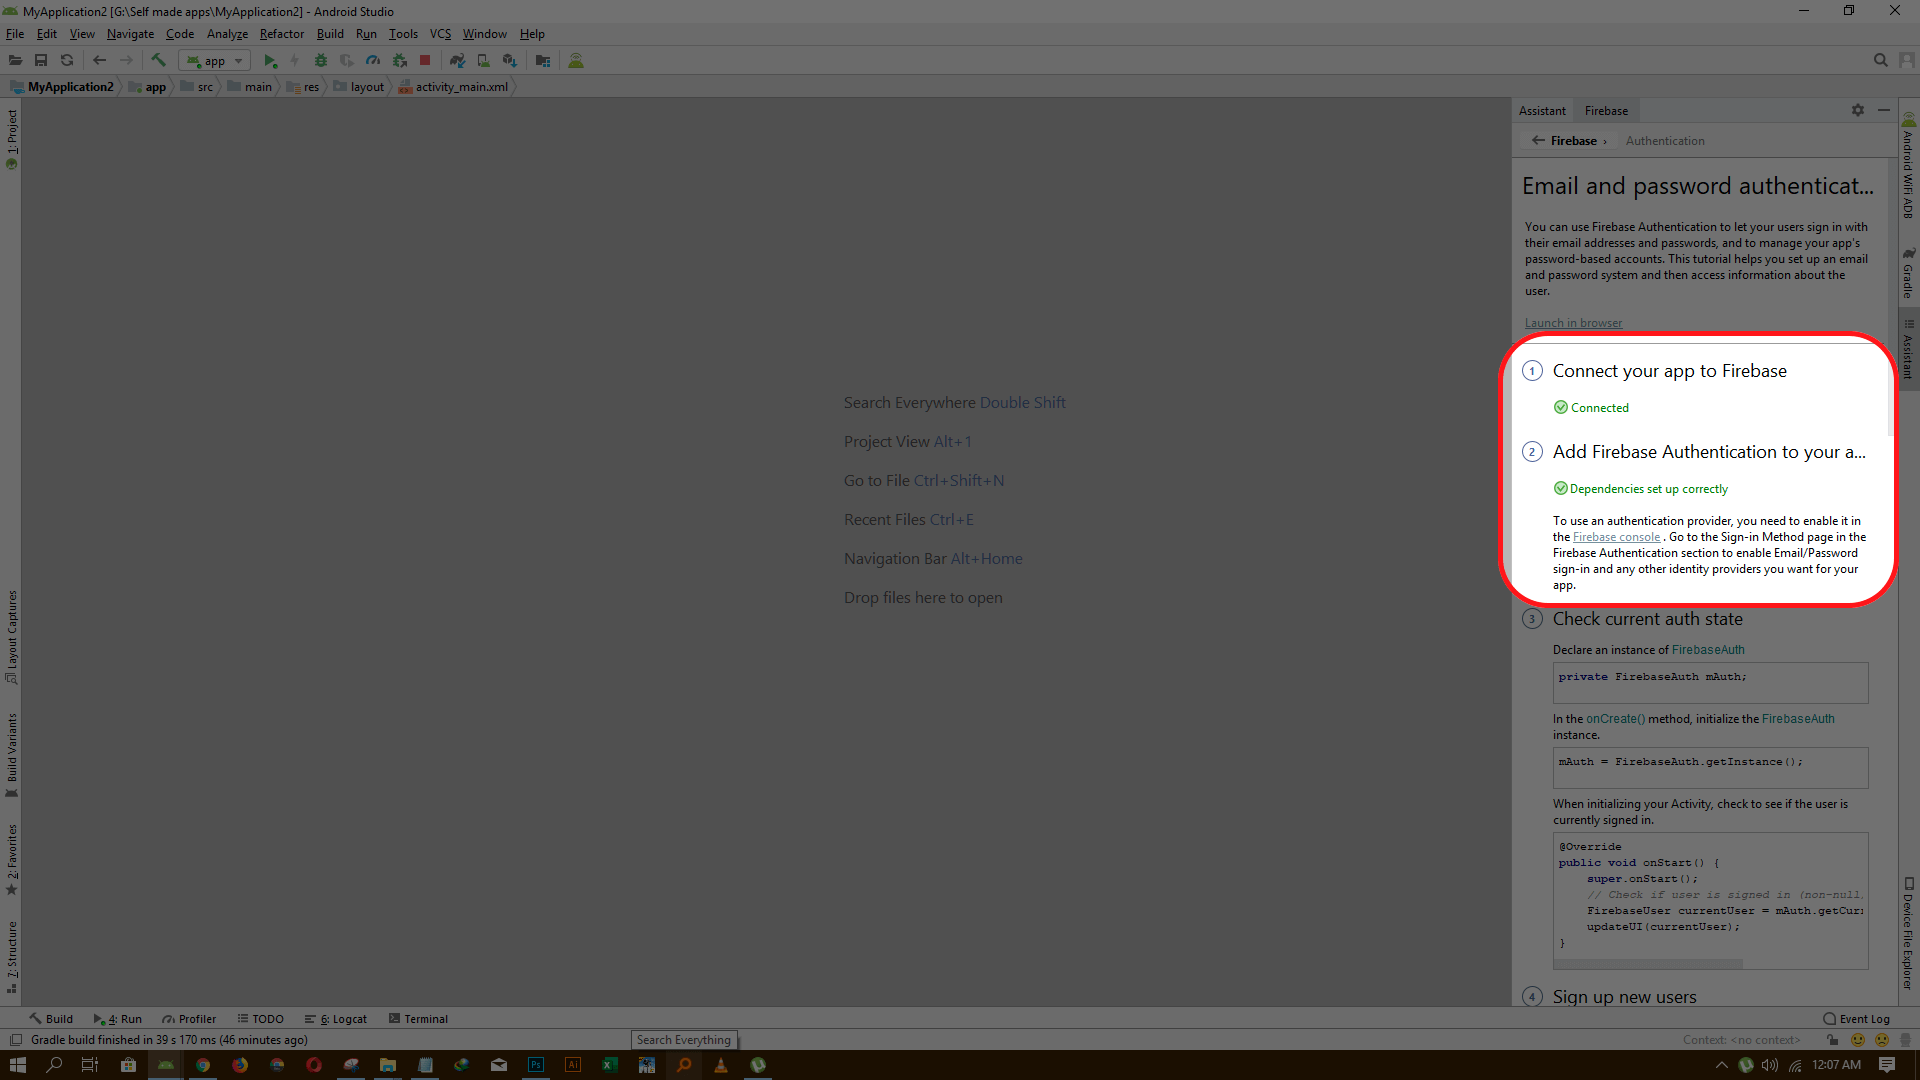
2. Click “Add Firebase Authentication to your app” button
A dialog will appear prompting that these changes are going to be made. Hit the “Accept Changes” button and let it do its stuff.
Here is the visual representation:
When everything is completed safely. It should look like this:
Setting Firebase Console Up
Now the Firebase is connected, and Firebase Authentication is successfully implemented in your app.
As we are going to implement the sign in and sign up with email and password only, so we need to enable it in Firebase Console settings too.
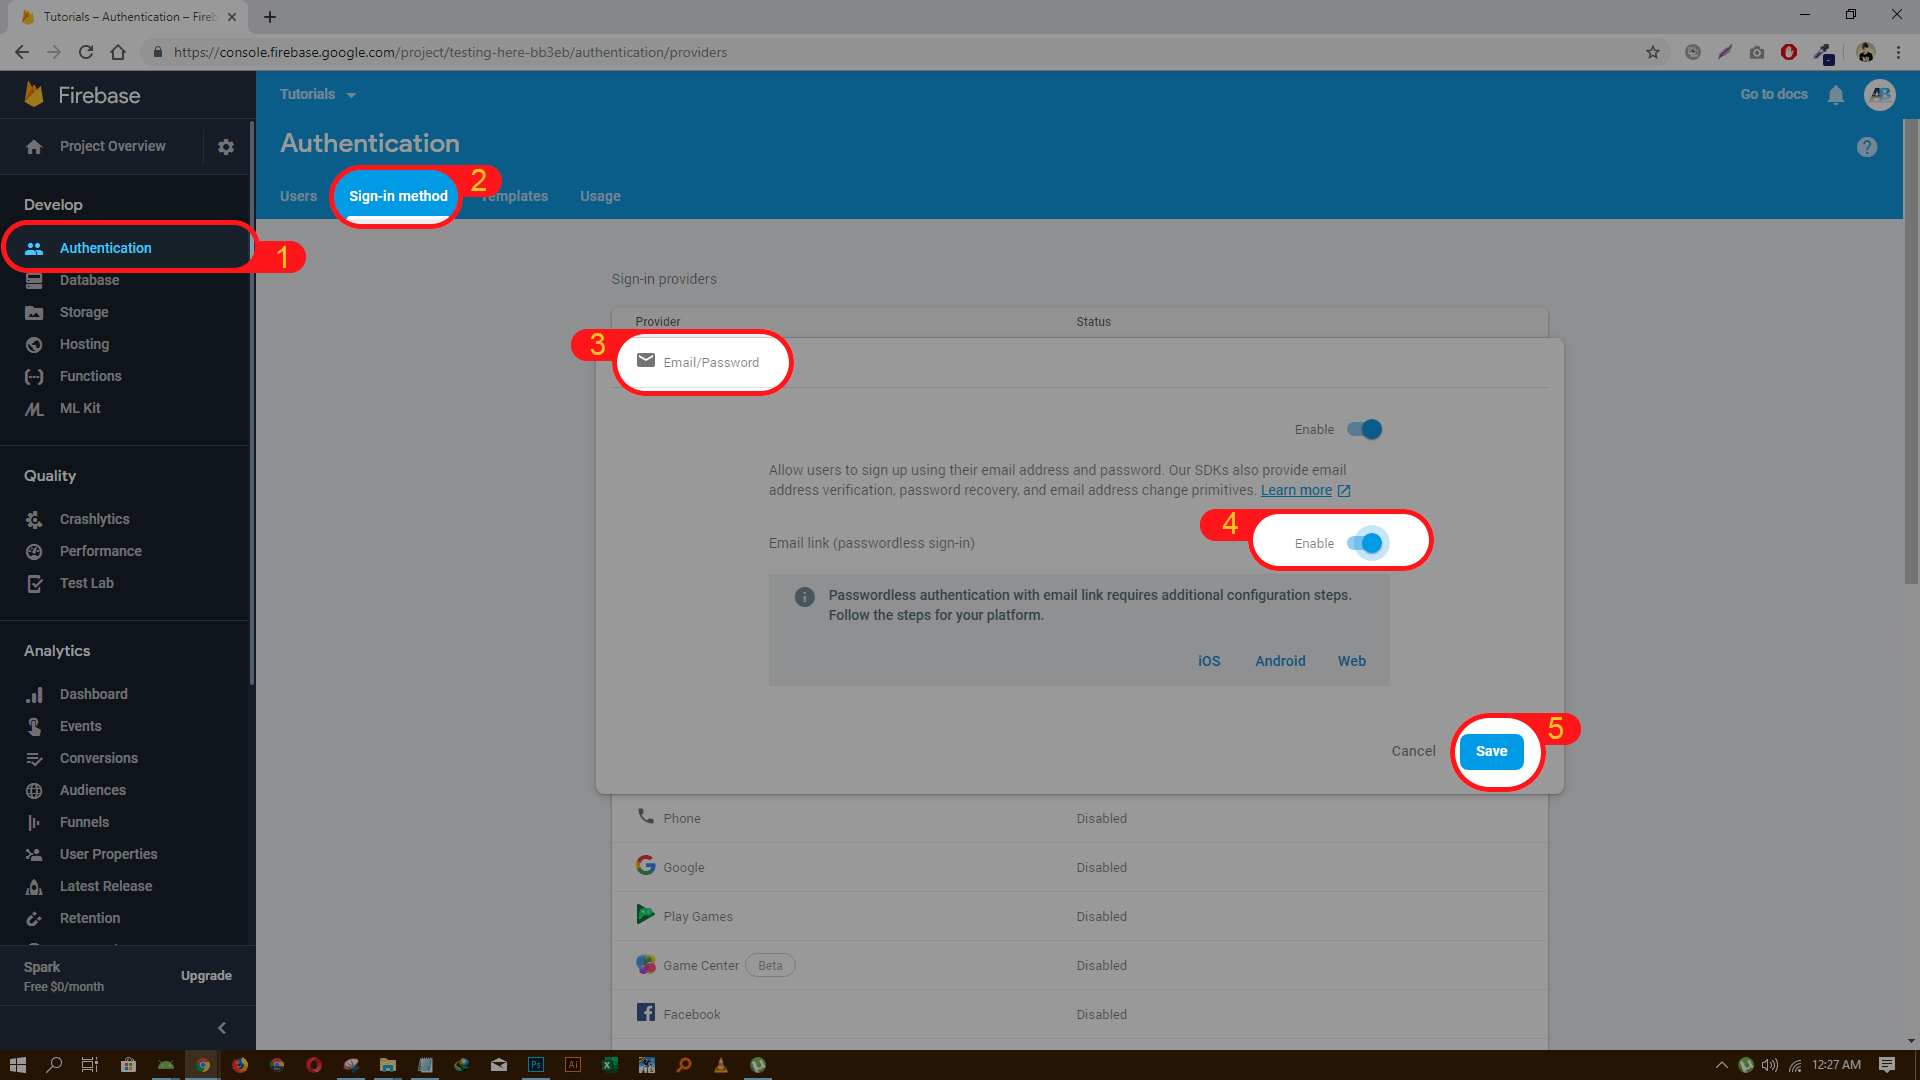
Here are the steps:
- Open Firebase Console and select the project where your app resides.
- Select the Authentication option in the left pane under Develop category.
- Select the Sign In method tab.
- Under Sign In Provides list, edit Email/Password and enable it.
- Hit the Save button
Here is the visual presentation:
The App Workflow
Before going any further, please understand the workflow of the app:
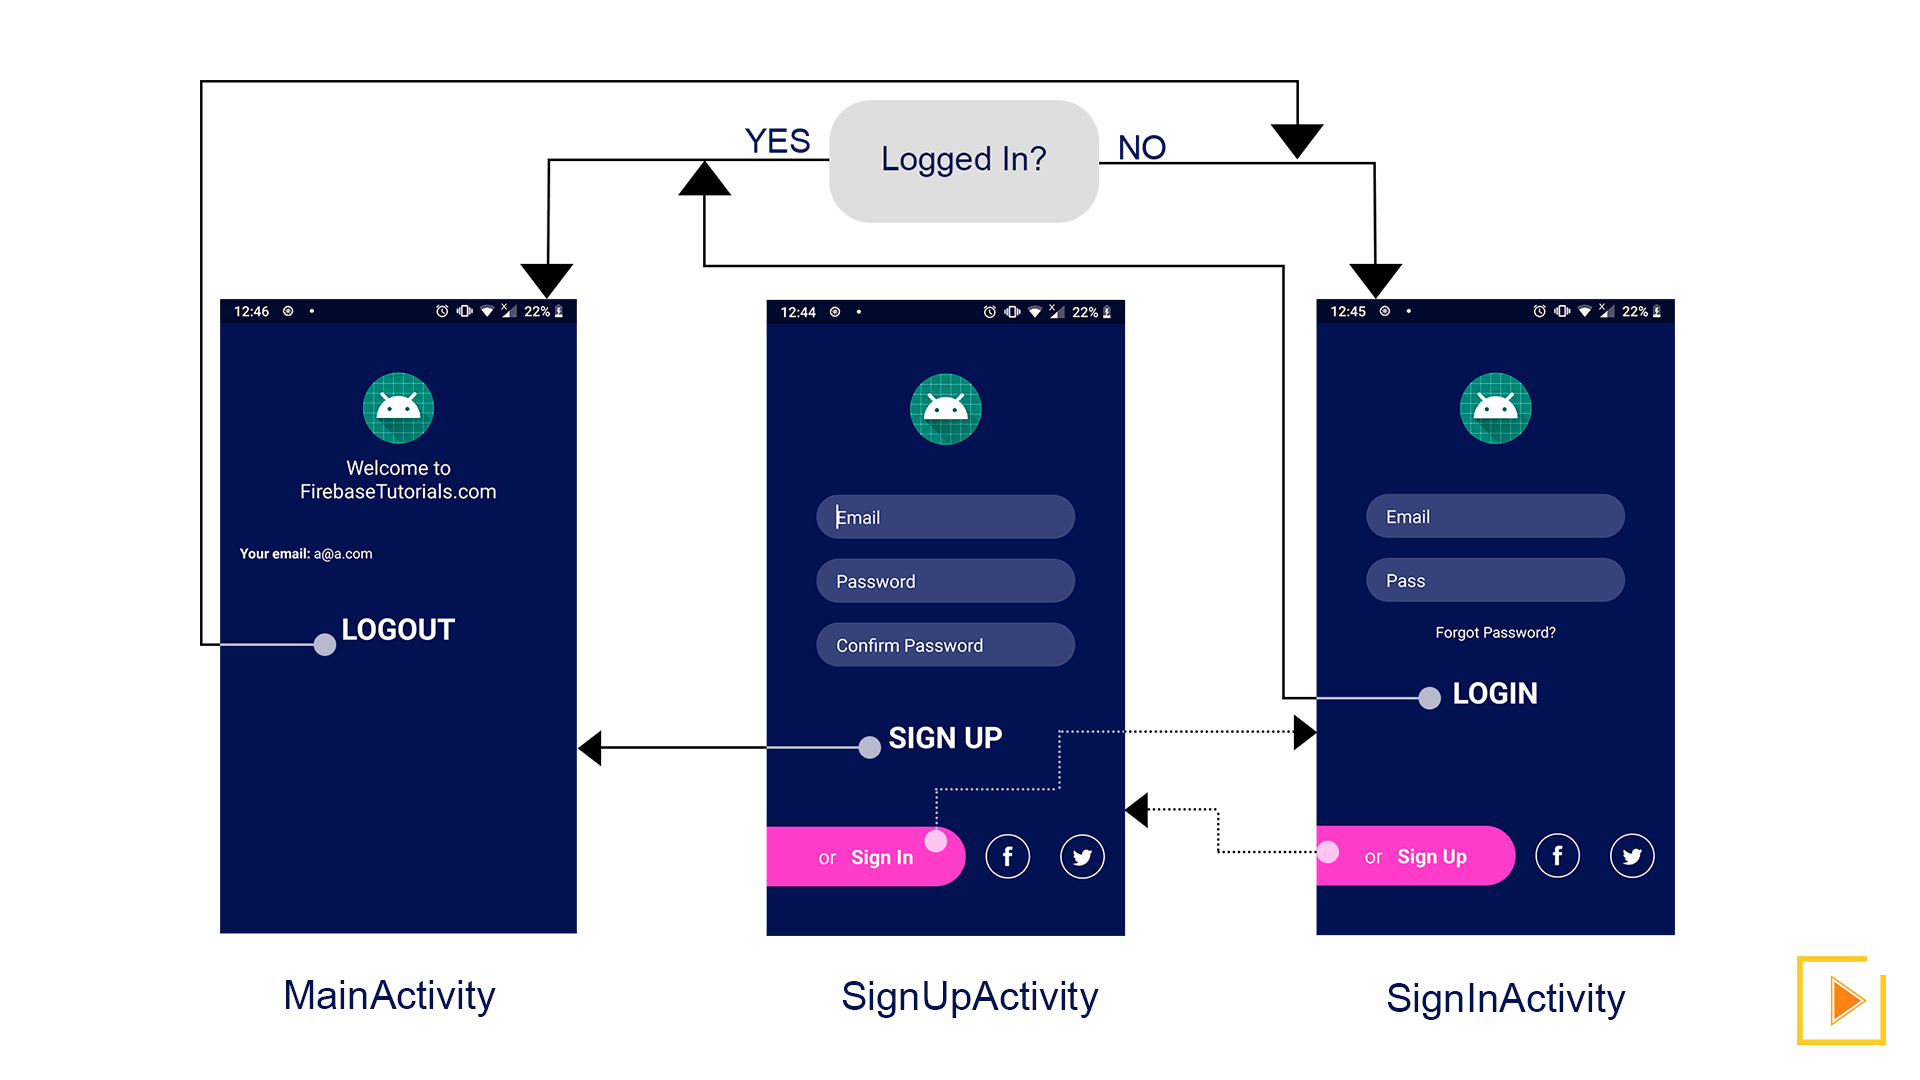
It may look complicated, but it’s not.
Let me explain.
The thing you need to understand is that when the app runs, MainActivity will be launched.
And before it sets any content on the screen, it’ll be checked if the user is logged in or not?
If logged in, then set content to the MainAcitvity and show the user email address.
If not logged in, then start the SignInActivity and finish the MainActivity. That’s all.
Note: I am not going to build the UI, it will make the tutorial a lot longer and boring, If you want then comment below and a new tutorial regarding it will be up soon.
Writing Code for Firebase Auth
MainActivity
Okay, so starting with MainActivity. Here are the objectives:
Check if the user logged in
To perform the first step, we need an instance of FirebaseAuth. We can get it as:
private FirebaseAuth mAuth;
mAuth = FirebaseAuth.getInstance();
Now through this instance, we can check if the user logged in or not.
We will get the current user and check if it null or not. Null means no user logged in and we need to start the SignInActivity.
    FirebaseUser currentUser = mAuth.getCurrentUser();
    if (currentUser == null) {
//No one signed in
      startActivity(new Intent(this, SignInActivity.class));
      this.finish();
    }
Show email if the user logged in
Otherwise, we will just get the email address of the current user and show it. The Firebase Auth provides a function getEmail(), that we can call on currentUser object to get the email address!
else{
//User logged in
      mTvEmail.setText(currentUser.getEmail());
    }
Logout user
User stays logged in until someone performs the log out manually, clears the app data or the user account is disabled/deleted in Firebase Console.
We need to show a button to log out of the user. When pressed, it needs to call signOut() method on FirebaseAuth instance variable. This method/function will perform the signOut mechanism.
After calling the signOut() method, we need to start the SignInActivity so that the new user can perform the sign in. And finish the MainAcivity so that when the back is pressed from SignInActivity, the app should exit instead of showing the MainActivity again and causing some problems.
mTvLogout.setOnClickListener(new OnClickListener() {
      @Override
      public void onClick(View view) {
        mAuth.signOut();
        startActivity(new Intent(MainActivity.this, SignInActivity.class));
        MainActivity.this.finish();

      }
    });
That’s all for the MainActivity.
Here is the complete code for MainActivity.java
import android.content.Intent;
import android.os.Bundle;
import android.support.v7.app.AppCompatActivity;
import android.view.View;
import android.view.View.OnClickListener;
import android.widget.TextView;
import com.google.firebase.auth.FirebaseAuth;
import com.google.firebase.auth.FirebaseUser;

public class MainActivity extends AppCompatActivity {

  private FirebaseAuth mAuth;
  private TextView mTvEmail, mTvLogout;

  @Override
  protected void onCreate(Bundle savedInstanceState) {
    super.onCreate(savedInstanceState);
    setContentView(R.layout.activity_main);

    mAuth = FirebaseAuth.getInstance();


    mTvLogout = findViewById(R.id.txtBtnLogout);
    mTvEmail = findViewById(R.id.tvEmail);


    FirebaseUser currentUser = mAuth.getCurrentUser();
    if (currentUser == null) {
//No one signed in
      startActivity(new Intent(this, SignInActivity.class));
      this.finish();
    }else{
//User logged in
      mTvEmail.setText(currentUser.getEmail());
    }


    mTvLogout.setOnClickListener(new OnClickListener() {
      @Override
      public void onClick(View view) {
        mAuth.signOut();
        startActivity(new Intent(MainActivity.this, SignInActivity.class));
        MainActivity.this.finish();

      }
    });


  }
}
SignInActivity
Recommended: Send push notification in Firebase using Android
Objectives of this activity:
- a) Get email and password from the user,
- b) Authenticate user from Firebase
- c) Keep the user updated
- d) Start MainActivity if login success
- e) Show appropriate message if fails
Getting email and password from the user
Getting email and password from the user is quite easy, just use the EditText in XML and get the text in java using .getText() method.
Authenticate user from Firebase
To authenticate the user from Firebase, we need Firebase an Instance of FirebaseAuth.
private FirebaseAuth mAuth;
mAuth = FirebaseAuth.getInstance();
Firebase provides a method named signInWithEmailAndPassword(), we need to call that method on Firebase Auth instance variable to perform sign-in with email and password.
As this method returns a task, so we can check if it was completed or not. If it was successful, then start the MainActivity and finish the SignInActivity.
If it didn’t then show the message in a SnackBar
FirebaseAuth firebaseAuth = FirebaseAuth.getInstance();
        firebaseAuth.signInWithEmailAndPassword(email, password).addOnCompleteListener(
            new OnCompleteListener<AuthResult>() {
              @Override
              public void onComplete(@NonNull Task<AuthResult> task) {

                if (task.isSuccessful()) {
                  startActivity(new Intent(SignInActivity.this, MainActivity.class));
                  finish();
                } else {
                  Snackbar
                      .make(root, task.getException().getLocalizedMessage(), Snackbar.LENGTH_LONG)
                      .show();
                }
              }
            });
Keep user updated
To keep the user updated, you can use a RelativeLayout, which spreads across the whole screen and on top of that, there is a ProgressBar. So you should set both to invisible as the Activity starts. And will show them as user click the login
The button will hide when there is any response from the task, either successful or not, you need to take off these layouts.
Start MainActivity if login completes
In our sign SignInWithEmailAndPassword() method, we already checked if the task is successful or not. So we can start the MainActivity right from there.
Show message if log in fails
To do so, we are using the SnackBar to show the error message we get from the task object.
Here is the complete SignInActivity code:
import android.content.Intent;
import android.os.Bundle;
import android.support.annotation.NonNull;
import android.support.design.widget.Snackbar;
import android.support.v7.app.AppCompatActivity;
import android.view.View;
import android.view.View.OnClickListener;
import android.widget.EditText;
import android.widget.ProgressBar;
import android.widget.RelativeLayout;
import android.widget.TextView;
import com.google.android.gms.tasks.OnCompleteListener;
import com.google.android.gms.tasks.Task;
import com.google.firebase.auth.AuthResult;
import com.google.firebase.auth.FirebaseAuth;

public class SignInActivity extends AppCompatActivity {

  private TextView mBtnSignIn;
  private EditText mEtEmail, mEtPassword;
  private RelativeLayout root, mRlSignUp, mRlFadingLayout;
  private ProgressBar mProgressBar;

  @Override
  protected void onCreate(Bundle savedInstanceState) {
    super.onCreate(savedInstanceState);
    setContentView(R.layout.activity_sign_in);

    mBtnSignIn = findViewById(R.id.txtBtnLogin);
    mEtPassword = findViewById(R.id.etPass);
    mEtEmail = findViewById(R.id.etEmail);
    root = findViewById(R.id.rlSigInRoot);
    mRlSignUp = findViewById(R.id.rlSignUp);
    mRlFadingLayout = findViewById(R.id.rlFadingLayout);
    mProgressBar = findViewById(R.id.progressBar);

    mRlSignUp.setOnClickListener(new OnClickListener() {
      @Override
      public void onClick(View view) {
        startActivity(new Intent(SignInActivity.this, SignUpActivity.class));
        finish();
      }
    });

    mBtnSignIn.setOnClickListener(new OnClickListener() {
      @Override
      public void onClick(View view) {

        String email = mEtEmail.getText().toString();
        String password = mEtPassword.getText().toString();

        FirebaseAuth firebaseAuth = FirebaseAuth.getInstance();
        firebaseAuth.signInWithEmailAndPassword(email, password).addOnCompleteListener(
            new OnCompleteListener<AuthResult>() {
              @Override
              public void onComplete(@NonNull Task<AuthResult> task) {

                mProgressBar.setVisibility(View.INVISIBLE);
                mRlFadingLayout.setVisibility(View.INVISIBLE);

                if (task.isSuccessful()) {
                  startActivity(new Intent(SignInActivity.this, MainActivity.class));
                  finish();
                } else {
                  Snackbar
                      .make(root, task.getException().getLocalizedMessage(), Snackbar.LENGTH_LONG)
                      .show();
                }
              }
            });

      }
    });

  }
}
SignUpActivity
As you can see from the workflow diagram, we’re getting an email address, password and confirm password form the user.
The password and confirm password are needed to be matched before proceeding further.
We’re not adding any validation to the email address at this point; it means the user can enter any email address and Firebase will accept it as long as it is properly formatted.
Firebase provides a mechanism to validate the email by sending an email to that address and the user has to accept that. We will cover that in some upcoming tutorials.
Objectives of SignUpActivity:
- Get the email address and password from the user.
- Check if both password match
- Create a new account with email address and password
- If it fails, show the appropriate message.
- If done, start the MainActivity.
- Keep the user updated.
Get the email and password from the user
Getting the email address and password from the user is quite easy. Just show to EditText and get the text from the user accordingly. I’m not showing that code here. I hope you know how to do that.
PS: You are getting the complete activity code if you don’t really know.
Check if both passwords match
This is also quite simple. I guess you know how to compare two strings. So I am leaving this too!
PS: You are getting the complete activity code if you don’t really know.
Create a new account with email address and password
Starting with creating an account. Firebase Auth provides us a method named createUserWithEmailAndPassword(String email, String password).
We can pass the email address and password to create an account. This method returns a Task object which we can use to check if the process was successful or not.
To call this method, we need FirebaseAuth instance:
private FirebaseAuth mAuth;
mAuth = FirebaseAuth.getInstance();
Now call that method and pass the details we got from the user.
If the process ends successfully, then start the MainActivity and exit current.
If not, then show the appropriate message again using SnackBar.
firebaseAuth.createUserWithEmailAndPassword(email, pass).addOnCompleteListener(
              new OnCompleteListener<AuthResult>() {
                @Override
                public void onComplete(@NonNull Task<AuthResult> task) {

                  if (task.isSuccessful()) {
                    startActivity(new Intent(SignUpActivity.this, MainActivity.class));
                    finish();
                  } else {
                    Snackbar.make(mRlRoot, task.getException().getMessage(), Snackbar.LENGTH_LONG)
                        .show();
                  }

                }
              });
Yuffie, there was a hell lot to do.
But stills we need to make the final adjustments like showing a ProgressBar so that the user knows something is going on. Again, it is done as earlier.
So here is the complete SingUpActivity.java code:
import android.content.Intent;
import android.os.Bundle;
import android.support.annotation.NonNull;
import android.support.design.widget.Snackbar;
import android.support.v7.app.AppCompatActivity;
import android.view.View;
import android.view.View.OnClickListener;
import android.widget.EditText;
import android.widget.ProgressBar;
import android.widget.RelativeLayout;
import android.widget.TextView;
import android.widget.Toast;
import com.google.android.gms.tasks.OnCompleteListener;
import com.google.android.gms.tasks.Task;
import com.google.firebase.auth.AuthResult;
import com.google.firebase.auth.FirebaseAuth;

public class SignUpActivity extends AppCompatActivity {

  private EditText mEtEmail, mEtPassword, mEtConfirmPassword;
  private TextView mTvSignUp;
  private RelativeLayout mRlRoot, mRlFading;
  private ProgressBar mProgressBar;

  private static final String TAG = "SignUpActivity";

  @Override
  protected void onCreate(Bundle savedInstanceState) {
    super.onCreate(savedInstanceState);
    setContentView(R.layout.activity_sign_up);

    mEtEmail = findViewById(R.id.etEmail);
    mEtPassword = findViewById(R.id.etPass);
    mEtConfirmPassword = findViewById(R.id.etPassConfirm);

    mTvSignUp = findViewById(R.id.txtBtnSignUp);

    mRlFading = findViewById(R.id.rlFadingLayout);
    mRlRoot = findViewById(R.id.rlRoot);

    mProgressBar  = findViewById(R.id.progressBar);

    mTvSignUp.setOnClickListener(new OnClickListener() {
      @Override
      public void onClick(View view) {
        String pass = mEtPassword.getText().toString();
        String confirmPass = mEtConfirmPassword.getText().toString();
        String email = mEtEmail.getText().toString();


        if (!pass.equals(confirmPass)) {
          Snackbar.make(mRlRoot, "Password Doesn't match", Snackbar.LENGTH_LONG).show();
        } else {
          mProgressBar.setVisibility(View.VISIBLE);
          mRlFading.setVisibility(View.VISIBLE);
          FirebaseAuth firebaseAuth = FirebaseAuth.getInstance();
          firebaseAuth.createUserWithEmailAndPassword(email, pass).addOnCompleteListener(
              new OnCompleteListener<AuthResult>() {
                @Override
                public void onComplete(@NonNull Task<AuthResult> task) {

                  if (task.isSuccessful()) {
                    Toast.makeText(SignUpActivity.this, "SignUp Complete", Toast.LENGTH_SHORT)
                        .show();
                    startActivity(new Intent(SignUpActivity.this, MainActivity.class));
                    finish();
                  } else {
                    Snackbar.make(mRlRoot, task.getException().getMessage(), Snackbar.LENGTH_LONG)
                        .show();
                  }

                }
              });
        }


      }
    });


  }
}
Okay, at this point, I assume that you know how to perform the SignIn and SignUp in your Android app using Firebase Auth.
Check out Video Tutorial
If something is still confusing to you then I highly encourage you to watch this whole playlist, where I demonstrated each and everything in detail.
Do you have any questions? Don’t forget to ask, we answer each comment. 🙂
its a nice post but i believe you forgot to share the xml code!
Hey, thanks for your comment. You can find the complete source code here: https://github.com/Waqas334/FirebaseAuthenticationUsingEmailPassword
Thank You