
Do you want to make your users register with your app with a phone number?
It means your users can sign up and sign in with a mere phone number instead of email that might be complicated to many users.
I know it’s a fantastic feature you can get using Firebase in Android Studio.
You might be thinking about how it’s possible. Firebase authentication SDK is capable of providing this robust feature.
You can also check out the other ways that I described in details
- Signup user with Email And Password using Firebase Authentication
- Login with Google using Firebase Authentication in Android
TL;DR
- You can collect an authentic phone number form the user.
- Generate OTP (one-time-password) if you are using secure payment type application
- You can completely register a user with his/her phone number only [no need of email address]
Here is the table of content that we are going to follow:
How Does It Work? (Video)
Authenticate with Firebase Using a Phone Number (Step by Step)
Without any further due, let’s get straight into Coding & development.
Step 1 – Create a New Android Studio Project
Create a new project by clicking on File -> New -> New Project
Step 2 – Connect Your App to Firebase
- Once the project is created, you need to add Firebase Auth to your project.
- Click on Tools –> Firebase it will open a new window on the right side in which you can see all the services that are provided by Firebase.
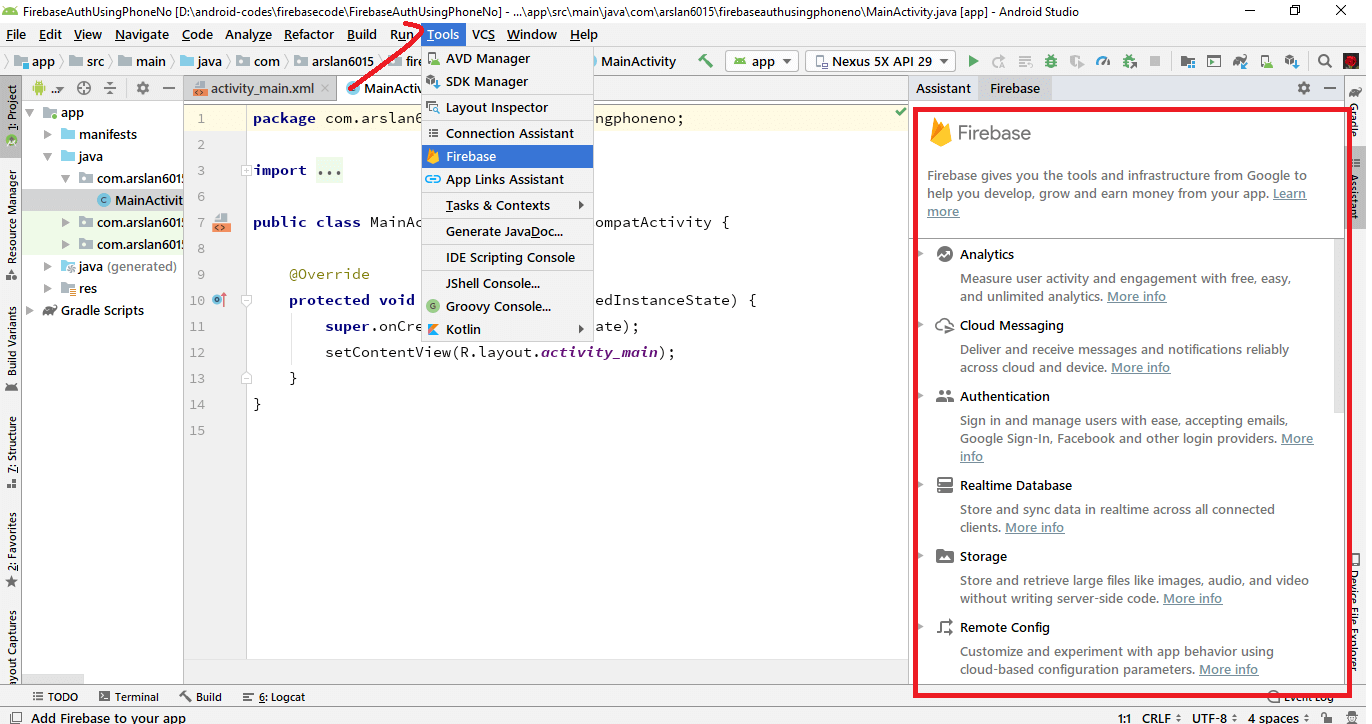
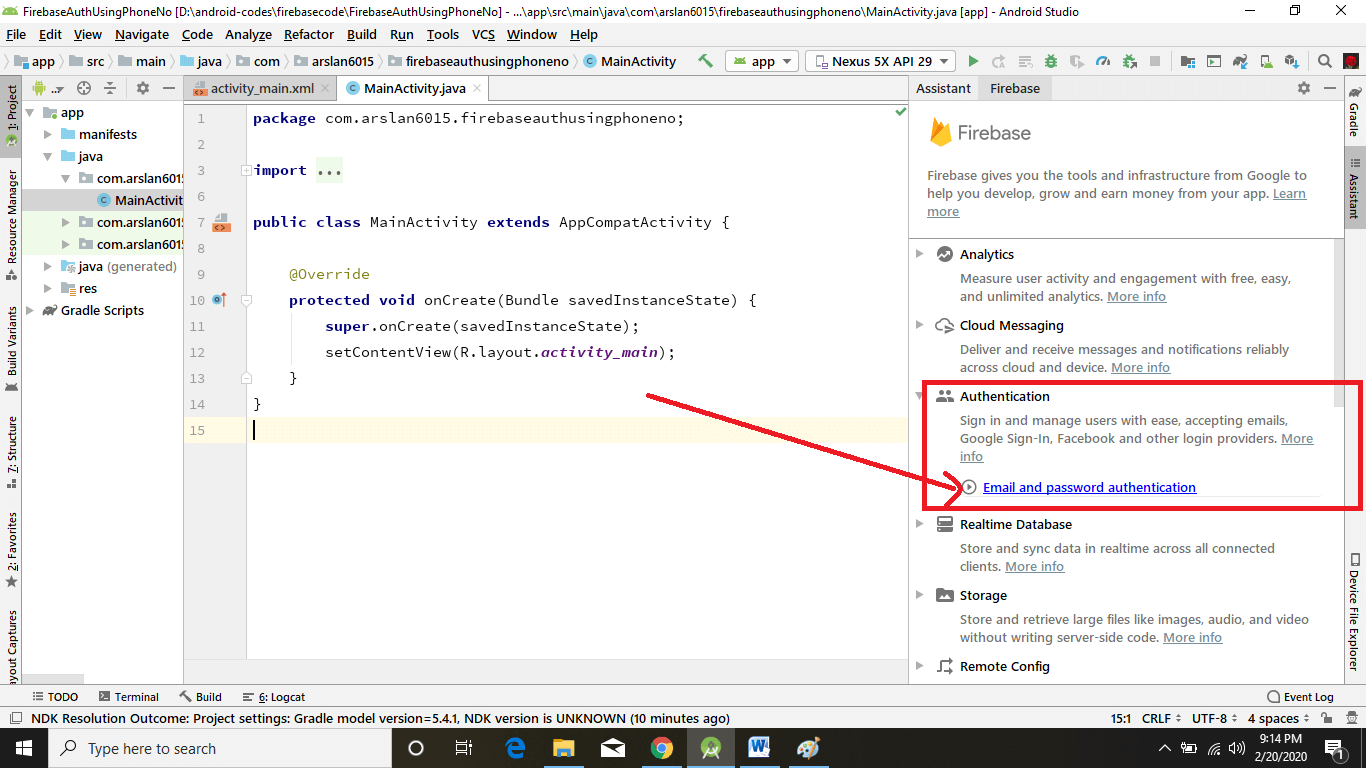
- As we are interested in Firebase Authentication only, so we will go for that. Click on Authentication -> Email and Password Authentication
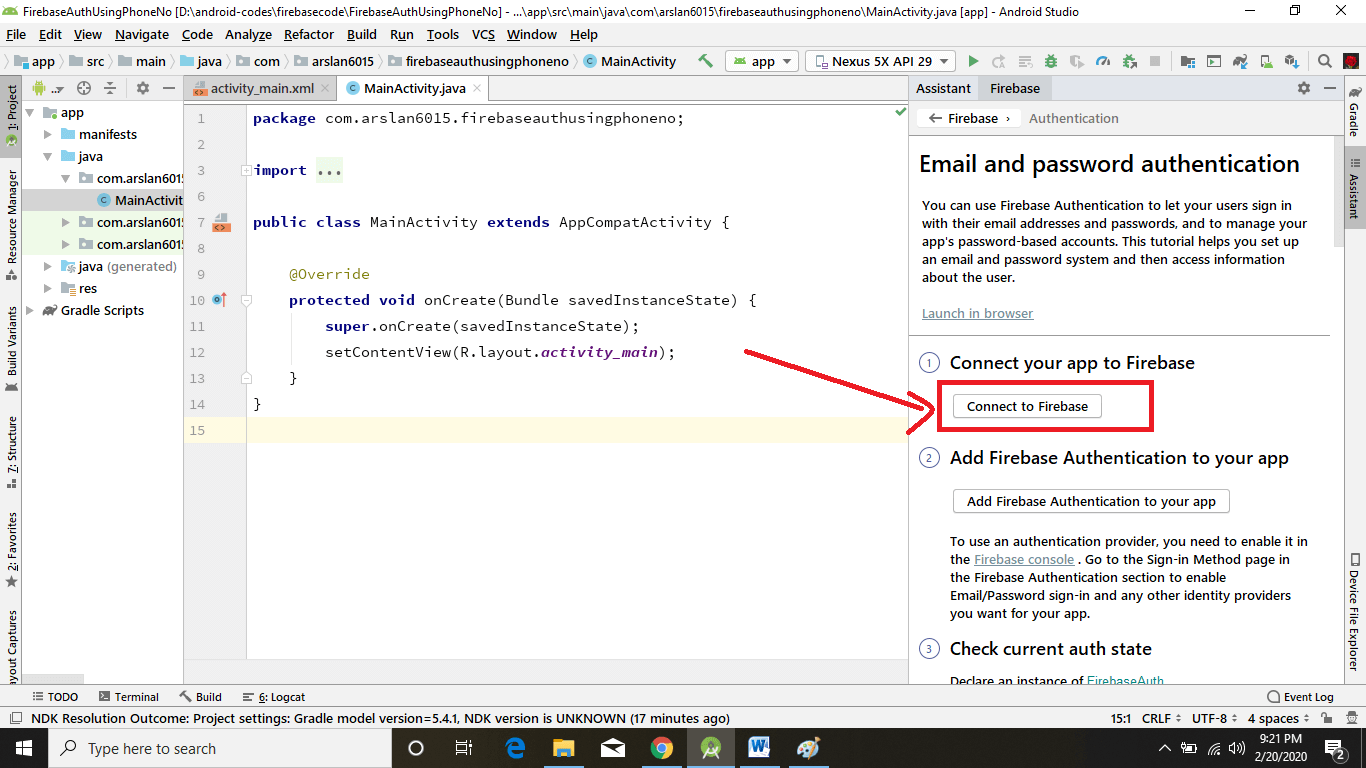
- Before adding the Firebase Authentication dependencies to our Android app, we need to first connect to Firebase. Click on Connect to Firebase.
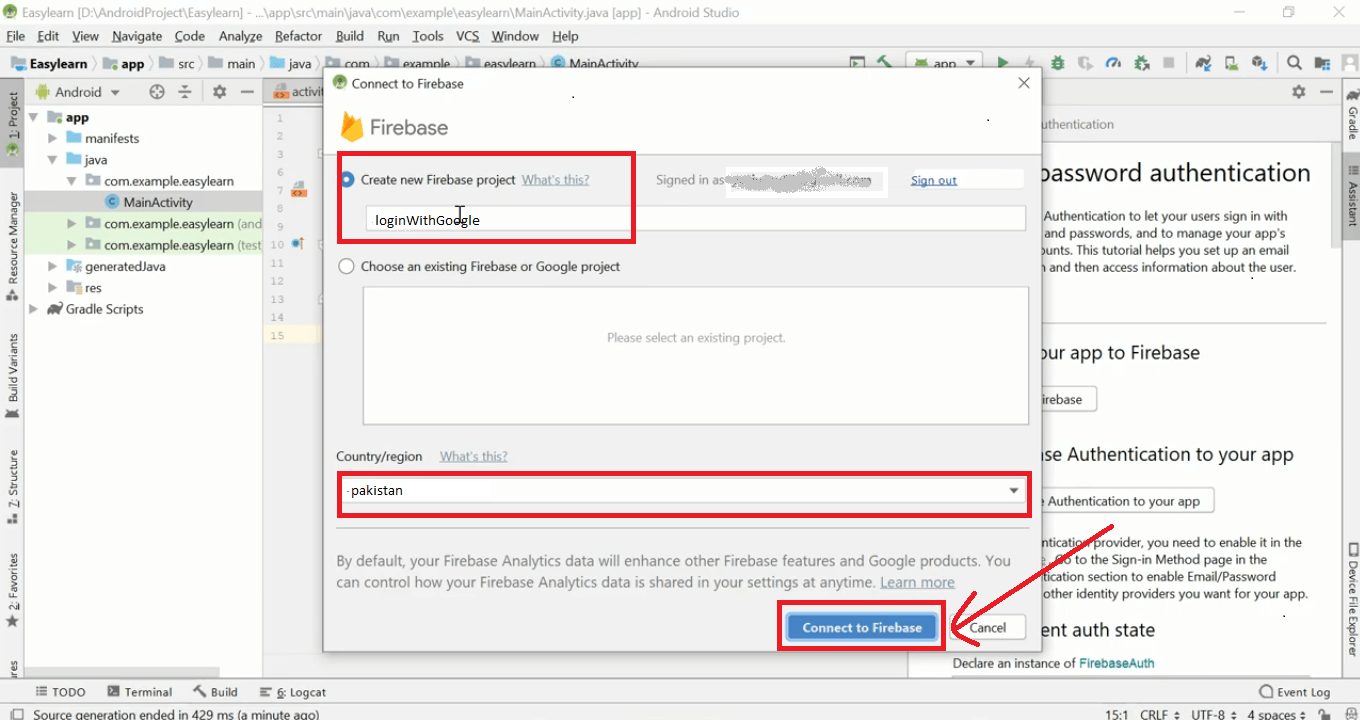
If you are not logged into to Android Studio using your Google account then it will ask you to log in, otherwise, it will show you windows to choose an existing Firebase project or create a new one
I am creating a new Firebase Project so I will enter the project name, select Country and click Connect to Firebase.
That’s it, our app is now connected to Firebase.
Step 3 – Add Firebase Authentication to Your Project
- It’s simple as before, just click the button saying Add Firebase Authentication to your app
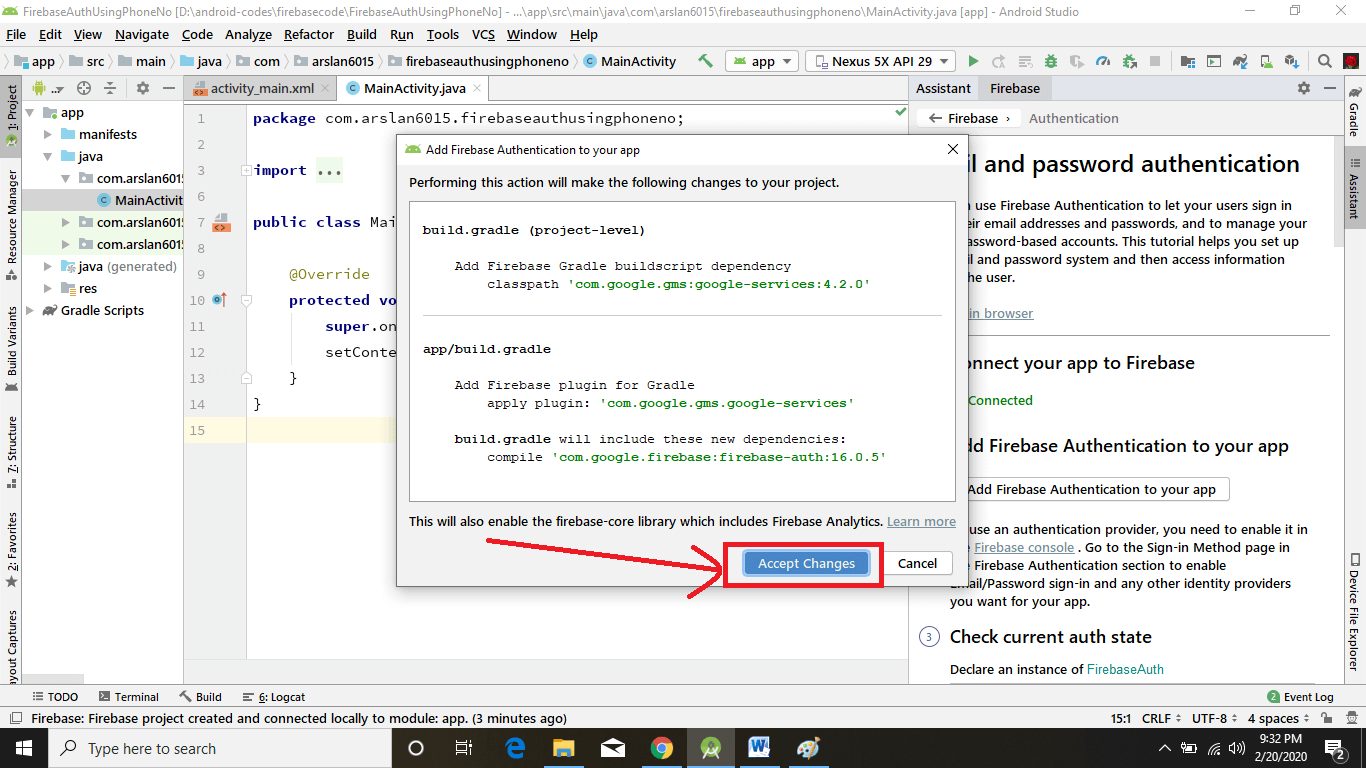

- Click Apply Changes, after some time you can see all the dependencies set up correctly.
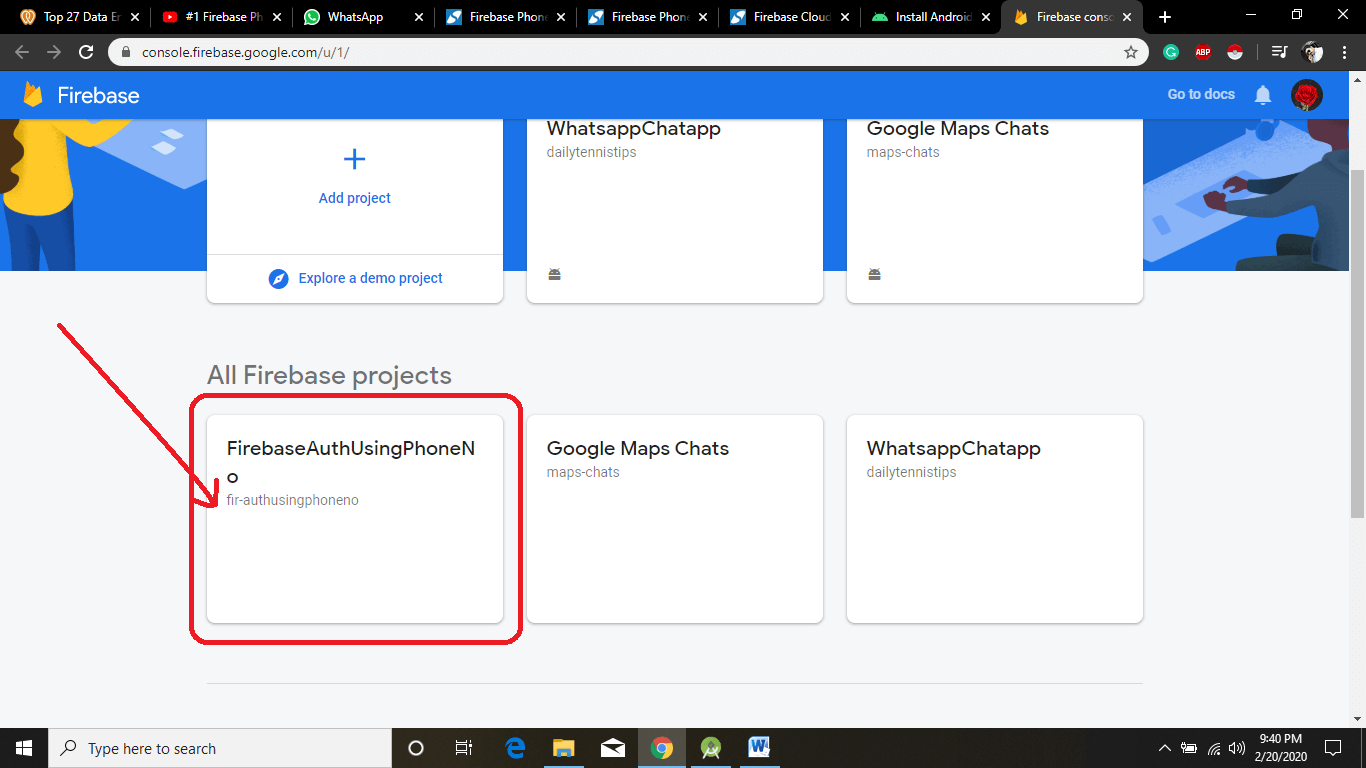
Step 4 – Enable Registration with Phone Number in Firebase Console
Go to http://console.firebase.google.com/ and login to with the same ID that is logged in to Android Studio.
You can see our project is added successfully. Now click on it.
- Select Authentication from the left pane
- Switch to Sign-in method tab
- Select Phone and click to toggle button
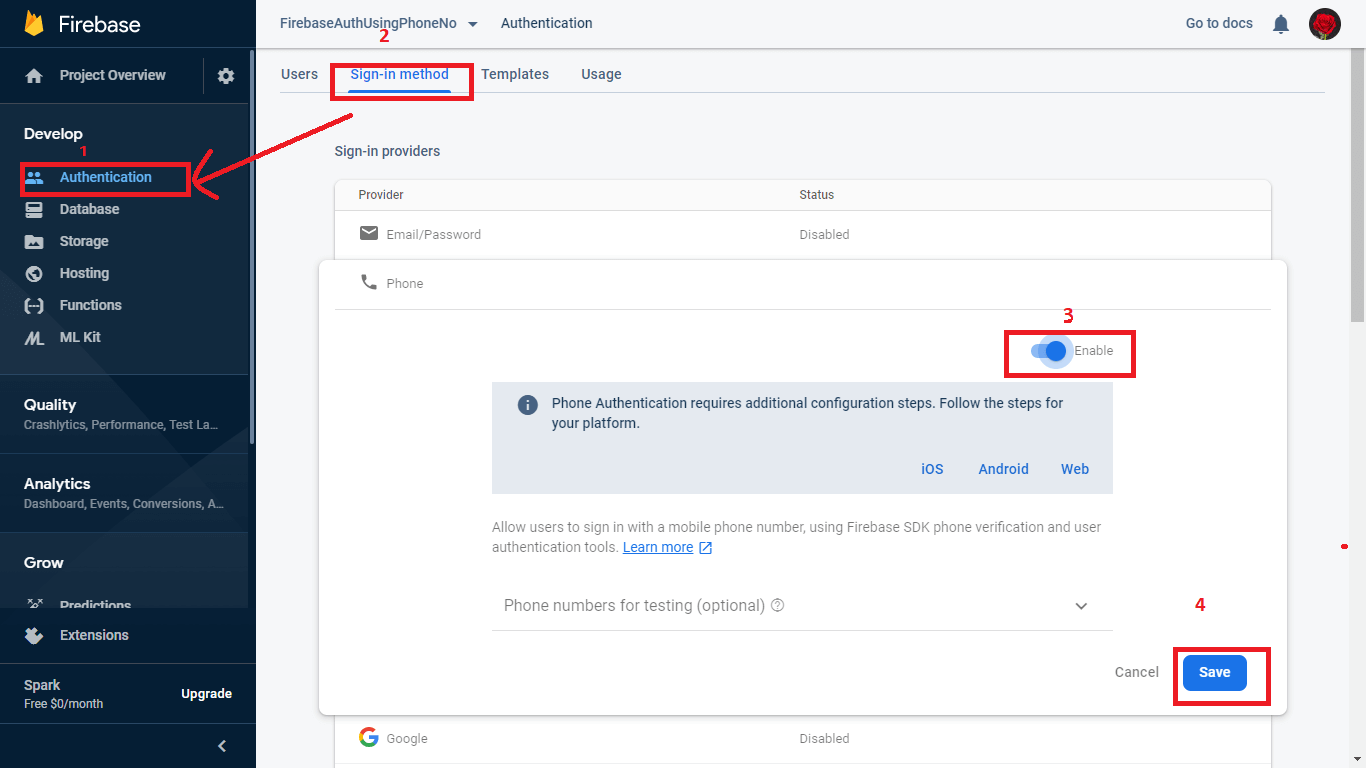
And Firebase work is done. Now is the time that we start writing code in Android Studio.
Step 5: Structuring the Application
The application contains three activities:
1. MainActivity
MainActivity.java with activity_main.xml layout files; this will be the first activity that will be executed when the user launches the app.
So we need to check if any user is already logged in or not if logged in then redirect the user to ProfileActivity.java
If not logged in then ask the user to provide a phone number to log in!
2. VerifyPhoneActivity
VerifyPhoneActivity.java with activity_verify_phone.xml layout file; it will be executed when the user has provided the phone number and verification code has been sent to that number.
So it will be asking the user to provide that verification code to complete the sign-in process.
3. ProfileActivity
ProfileActivity.java with activity_profile.xml layout files; this activity will be executed when the user is logged in.
Hence it will be responsible for showing the welcome message and performing the Logout Operation.
So please go ahead and create these three activities in Android Studio, so that we can start coding each of them!
Step 5 – Coding the Application
Here is the coding part.
A) Checking If Someone Already Logged In?
The very first thing that we need to perform – as soon as the app starts – is to check if someone is already logged in or not?
As the MainActivity will be executed at the very start so we code it in MainActivity.java.
So if someone logged in then redirect them to another activity where their profile will be shown along with an option to sign out, otherwise, let them provide the phone number to sign in.
We can check the current user with an instance of FirebaseAuth:
        //check whether the user is logged in
        if (currentUser != null) {
            //if logged in the start the Profile activity
            Intent intent = new Intent(MainActivity.this, ProfileActivity.class);
            startActivity(intent);
            finish();
        }
B) Getting the Phone Number from Users
If not logged in then we need to prompt the user to provide a phone number and perform the login.
And for that we need:
- A TextView asking the user to provide their phone number
- An EditText to get that phone number
- A Button to perform that operation
We create these three items inside our activity_main.xml because that is responsible for it.
Here is the complete code of activity_main.xml:
<?xml version="1.0" encoding="utf-8"?>
    <androidx.constraintlayout.widget.ConstraintLayout xmlns:android="http://schemas.android.com/apk/res/android"
        xmlns:app="http://schemas.android.com/apk/res-auto"
        xmlns:tools="http://schemas.android.com/tools"
        android:layout_width="match_parent"
        android:layout_height="match_parent"
        tools:context=".MainActivity">

        <!--  TextView asking for phone number -->
        <TextView
            android:id="@+id/textView"
            android:layout_width="wrap_content"
            android:layout_height="wrap_content"
            android:layout_centerHorizontal="true"
            android:layout_marginTop="168dp"
            android:text="May I ask your phone number?"
            android:textAppearance="@style/Base.TextAppearance.AppCompat.Headline"
            android:textColor="@color/colorPrimary"
            app:layout_constraintEnd_toEndOf="parent"
            app:layout_constraintHorizontal_bias="0.367"
            app:layout_constraintStart_toStartOf="parent"
            app:layout_constraintTop_toTopOf="parent" />

        <!--  EditText where user can write phone number-->
        <EditText
            android:id="@+id/editTextMobile"
            android:layout_width="0dp"
            android:layout_height="wrap_content"
            android:layout_margin="32dp"
            android:layout_marginTop="284dp"
            android:digits="0123456789"
            android:hint="enter your mobile number"
            android:inputType="phone"
            android:maxLength="12"
            app:layout_constraintEnd_toEndOf="parent"
            app:layout_constraintHorizontal_bias="0.25"
            app:layout_constraintStart_toStartOf="parent"
            app:layout_constraintTop_toBottomOf="@id/textView" />

        <!--  Button to continue the process -->
        <Button
            android:id="@+id/buttonContinue"
            android:layout_width="wrap_content"
            android:layout_height="wrap_content"
            android:layout_centerHorizontal="true"
            android:layout_marginTop="324dp"
            android:background="@color/colorPrimaryDark"
            android:text="Continue"
            android:textAllCaps="false"
            android:textColor="#cdd8f1"
            app:layout_constraintEnd_toEndOf="parent"
            app:layout_constraintHorizontal_bias="0.498"
            app:layout_constraintStart_toStartOf="parent"
            app:layout_constraintTop_toTopOf="parent" />

    </androidx.constraintlayout.widget.ConstraintLayout>
And we need to get the phone number from that EditText in MainActivity.java when the Continue button is clicked.
We all know how to do that; creating an instance of EditText, then initializing it using findViewById and providing the ID. And then calling .getText().toString() functions. That’s pretty easy and straight-forward, so I will not be explaining that whole thing here cause it will get this article too lengthy.
But you can always check out the complete source code in our Github repository.
C) Sending Verification Code
Once we have the phone number – and of course after performing the small checks like if the phone number is valid, not empty, etc – we need to send a verification code from Firebase.
There is a method named verifyPhoneNumber() that we can call and provide the relevant argument and it will send a verification code to the phone number we provided. Here is how:
        //the method is sending verification code
        //the country id is concatenated
        //you can take the country id as user input as well
        private void sendVerificationCode(String mobile) {
            PhoneAuthProvider.getInstance().verifyPhoneNumber(
                    "+" + mobile,                 //phoneNo that is given by user
                    60,                             //Timeout Duration
                    TimeUnit.SECONDS,                   //Unit of Timeout
                    TaskExecutors.MAIN_THREAD,          //Work done on main Thread
                    mCallbacks);                       // OnVerificationStateChangedCallbacks
        }
D) Handling the Callbacks
The above method will send the verification code to provide a number, but we need to keep track of this operation and in the end, we also need to verify it.
And for those, check out the last argument mCallbacks. We need to provide an instance of PhoneAuthProvider.OnVerificationStateChangedCallbacks class to handle the callback functions.
We can override the callback methods like onVerificationCompleted, onVerificationFailed and onCodeSent.
- onVerificationCompleted method will be called in two situations (basically when the verification has been completed)
- a. Instant Verification, in some cases phone number can be instantly verified without needing to send or enter a verification code.
- b. Auto-retrieval. On some devices, Google Play services can automatically detect the incoming verification SMS and perform verification without user action.
- onVerificationFailed method is called when something went wrong like making an invalid request (phone number not valid) or the quota of free SMS has been exceeded.
- onCodeSent method is called when the SMS code has been sent to the provided phone number.
Here is how we will be handling the callbacks
        //the callback to detect the verification status
        private PhoneAuthProvider.OnVerificationStateChangedCallbacks mCallbacks =
                new PhoneAuthProvider.OnVerificationStateChangedCallbacks() {
            @Override
            public void onVerificationCompleted(PhoneAuthCredential phoneAuthCredential) {
                //Getting the code sent by SMS
                String code = phoneAuthCredential.getSmsCode();

                //sometime the code is not detected automatically
                //in this case the code will be null
                //so user has to manually enter the code
                if (code != null) {
                    editTextCode.setText(code);
                    //verifying the code
                    verifyVerificationCode(code);
                }
            }

            @Override
            public void onVerificationFailed(FirebaseException e) {
                Toast.makeText(VerifyPhoneActivity.this, e.getMessage(), Toast.LENGTH_LONG).show();
                Log.i(TAG, "onVerificationFailed: " + e.getLocalizedMessage());
            }

            //when the code is generated then this method will receive the code.
            @Override
            public void onCodeSent(String s, PhoneAuthProvider.ForceResendingToken forceResendingToken) {
//                super.onCodeSent(s, forceResendingToken);

                //storing the verification id that is sent to the user
                mVerificationId = s;
            }
        };

        private void verifyVerificationCode(String code) {
            //creating the credential
            PhoneAuthCredential credential = PhoneAuthProvider.getCredential(mVerificationId, code);
            signInWithPhoneAuthCredential(credential);
        }
E) Signing In with Phone Auth Credentials:
Now the last step is to sign in user using that phone credentials. This method is the same as sign-in with email and password using Firebase also having similar callback functions:
        //used for signing the user
        private void signInWithPhoneAuthCredential(PhoneAuthCredential credential) {
            mAuth.signInWithCredential(credential)
                    .addOnCompleteListener(VerifyPhoneActivity.this,
                            new OnCompleteListener<AuthResult>() {

                        @Override
                        public void onComplete(@NonNull Task<AuthResult> task) {
                            if (task.isSuccessful()) {
                                //verification successful we will start the profile activity
                                Intent intent = new Intent(VerifyPhoneActivity.this, ProfileActivity.class);
                                intent.setFlags(Intent.FLAG_ACTIVITY_NEW_TASK | Intent.FLAG_ACTIVITY_CLEAR_TASK);
                                startActivity(intent);

                            } else {

                                //verification unsuccessful.. display an error message

                                String message = "Somthing is wrong, we will fix it soon...";

                                if (task.getException() instanceof FirebaseAuthInvalidCredentialsException) {
                                    message = "Invalid code entered...";
                                }
                                Toast.makeText(VerifyPhoneActivity.this,message,Toast.LENGTH_SHORT).show();
                            }
                        }
                    });
        }
That’s it, we have successfully logged in the user using phone number only.
Now comes the reverse part:
F) Loggin out the User
As you migh remember, we said that the ProfileActivity will be responsible for showing the welcome message and also signing out the user.
Firebase provided quite a simple method to perform a sign out the operation; you just need to get the FirebaseAuth instance and call signOut method
So we do that when sign out button is clicked:
        firebaseAuth = FirebaseAuth.getInstance();

        button.setOnClickListener(new View.OnClickListener() {
            @Override
            public void onClick(View v) {

                firebaseAuth.signOut();
                Intent intent = new Intent(ProfileActivity.this,MainActivity.class);
                startActivity(intent);
            }
        });
That’s it. Now you have a complete understanding of how Firebase Authentication works with phone number.
You can also check out the previous tutorials to perform:
- Sign in with Google using Firebase Authentication
- Sign in with Facebook using Firebase Authentication
- Sign in with Email and Password using Firebase Authentication
Below is the code for all the activities and XML Files.
Moreover, you can also get the complete source code right to your Android Studio using my GitHub repository.
activity_verify_phone.xml
<?xml version="1.0" encoding="utf-8"?>
<androidx.constraintlayout.widget.ConstraintLayout xmlns:android="http://schemas.android.com/apk/res/android"
    xmlns:app="http://schemas.android.com/apk/res-auto"
    xmlns:tools="http://schemas.android.com/tools"
    android:layout_width="match_parent"
    android:layout_height="match_parent"
    tools:context=".VerifyPhoneActivity">


    <TextView
        android:id="@+id/textView"
        android:layout_width="wrap_content"
        android:layout_height="wrap_content"
        android:layout_centerHorizontal="true"
        android:layout_marginStart="56dp"
        android:layout_marginTop="172dp"
        android:text="Wait for the code"
        android:textAppearance="@style/Base.TextAppearance.AppCompat.Headline"
        android:textColor="@color/colorPrimary"
        app:layout_constraintEnd_toEndOf="parent"
        app:layout_constraintHorizontal_bias="0.145"
        app:layout_constraintStart_toStartOf="parent"
        app:layout_constraintTop_toTopOf="parent" />

    <ProgressBar
        android:id="@+id/progressbar"
        android:layout_width="wrap_content"
        android:layout_height="wrap_content"
        android:layout_marginTop="16dp"
        app:layout_constraintEnd_toEndOf="parent"
        app:layout_constraintHorizontal_bias="0.498"
        app:layout_constraintStart_toStartOf="parent"
        app:layout_constraintTop_toBottomOf="@id/textView" />

    <EditText
        android:id="@+id/editTextCode"
        android:layout_width="200dp"
        android:layout_height="wrap_content"
        android:layout_centerHorizontal="true"
        android:layout_marginTop="20dp"
        android:digits="0123456789"
        android:drawablePadding="10dp"
        android:hint="enter verification code"
        android:inputType="phone"
        android:maxLength="10"
        app:layout_constraintEnd_toEndOf="parent"
        app:layout_constraintHorizontal_bias="0.497"
        app:layout_constraintStart_toStartOf="parent"
        app:layout_constraintTop_toBottomOf="@id/progressbar" />

    <Button
        android:id="@+id/buttonSignIn"
        android:layout_width="wrap_content"
        android:layout_height="wrap_content"
        android:layout_below="@id/editTextCode"
        android:layout_centerHorizontal="true"
        android:layout_marginTop="32dp"
        android:background="@color/colorPrimaryDark"
        android:text="Sign In"
        android:textAllCaps="false"
        android:textColor="#cdd8f1"
        app:layout_constraintEnd_toEndOf="parent"
        app:layout_constraintHorizontal_bias="0.498"
        app:layout_constraintStart_toStartOf="parent"
        app:layout_constraintTop_toBottomOf="@id/editTextCode" />


</androidx.constraintlayout.widget.ConstraintLayout>
activity_profile.xml
<?xml version="1.0" encoding="utf-8"?>
<androidx.constraintlayout.widget.ConstraintLayout xmlns:android="http://schemas.android.com/apk/res/android"
    xmlns:app="http://schemas.android.com/apk/res-auto"
    xmlns:tools="http://schemas.android.com/tools"
    android:layout_width="match_parent"
    android:layout_height="match_parent"
    tools:context=".ProfileActivity">


    <TextView
        android:id="@+id/textView2"
        android:layout_width="wrap_content"
        android:layout_height="wrap_content"
        android:text="Welcome"
        android:textSize="35dp"
        app:layout_constraintBottom_toBottomOf="parent"
        app:layout_constraintEnd_toEndOf="parent"
        app:layout_constraintStart_toStartOf="parent"
        app:layout_constraintTop_toTopOf="parent" />

    <Button
        android:id="@+id/SignOut"
        android:layout_width="wrap_content"
        android:layout_height="wrap_content"
        android:layout_marginTop="21dp"
        android:text="Sign Out"
        android:textAllCaps="false"
        android:textSize="30sp"
        app:layout_constraintStart_toStartOf="@+id/textView2"
        app:layout_constraintTop_toBottomOf="@+id/textView2" />

</androidx.constraintlayout.widget.ConstraintLayout>
Insert JAVA codes
MainActivity.java
package com.arslan6015.firebaseauthusingphoneno;

import android.content.Intent;
import android.os.Bundle;
import android.view.View;
import android.widget.Button;
import android.widget.EditText;
import androidx.appcompat.app.AppCompatActivity;
import com.google.firebase.auth.FirebaseAuth;
import com.google.firebase.auth.FirebaseUser;

public class MainActivity extends AppCompatActivity {
        private EditText editTextMobile;
        Button btnContinue;
        FirebaseUser currentUser;

        @Override
        protected void onCreate(Bundle savedInstanceState) {
            super.onCreate(savedInstanceState);
            setContentView(R.layout.activity_main);

            //initialize fields
            editTextMobile = findViewById(R.id.editTextMobile);
            btnContinue = findViewById(R.id.buttonContinue);
            currentUser = FirebaseAuth.getInstance().getCurrentUser();

            //check whether the user is logged in
            if (currentUser != null) {
                Intent intent = new Intent(MainActivity.this, ProfileActivity.class);
                startActivity(intent);
                finish();
            } else {
                btnContinue.setOnClickListener(new View.OnClickListener() {
                    @Override
                    public void onClick(View v) {

                        String mobileNo = editTextMobile.getText().toString().trim();

                        if (mobileNo.isEmpty() || mobileNo.length() < 12) {
                            editTextMobile.setError("Enter a valid mobile");
                            editTextMobile.requestFocus();
                            return;
                        }

                        Intent intent = new Intent(MainActivity.this, VerifyPhoneActivity.class);
                        intent.putExtra("mobile", mobileNo);
                        startActivity(intent);
                    }
                });
            }
        }
}
VerifyPhoneActivity.java
package com.arslan6015.firebaseauthusingphoneno;


import android.content.Intent;
import android.nfc.Tag;
import android.os.Bundle;
import android.util.Log;
import android.view.View;
import android.widget.Button;
import android.widget.EditText;
import android.widget.Toast;

import androidx.annotation.NonNull;
import androidx.appcompat.app.AppCompatActivity;

import com.google.android.gms.tasks.OnCompleteListener;
import com.google.android.gms.tasks.Task;
import com.google.android.gms.tasks.TaskExecutors;
import com.google.firebase.FirebaseException;
import com.google.firebase.auth.AuthResult;
import com.google.firebase.auth.FirebaseAuth;
import com.google.firebase.auth.FirebaseAuthInvalidCredentialsException;
import com.google.firebase.auth.PhoneAuthCredential;
import com.google.firebase.auth.PhoneAuthProvider;

import java.util.concurrent.TimeUnit;

public class VerifyPhoneActivity extends AppCompatActivity {

        //three objects needed
        //this is the verification id that will be sent to the user
        private String mVerificationId;

        //ditText to input the code
        private EditText editTextCode;

        //fireBase authentication object
        private FirebaseAuth mAuth;
        Button btnSignIn;


        @Override
    protected void onCreate(Bundle savedInstanceState) {
        super.onCreate(savedInstanceState);
        setContentView(R.layout.activity_verify_phone);

            //initializing objects
            mAuth = FirebaseAuth.getInstance();
            editTextCode = findViewById(R.id.editTextCode);
            btnSignIn = findViewById(R.id.buttonSignIn);

            //getting mobile number from the previous activity
            //and sending the verification code to the number
            Intent intent = getIntent();
            String mobile = intent.getStringExtra("mobile");
            sendVerificationCode(mobile);


            //if the automatic sms detection did not work, user can also enter the code manually
            //so adding a click listener to the button
            btnSignIn.setOnClickListener(new View.OnClickListener() {
                @Override
                public void onClick(View v) {
                    String code = editTextCode.getText().toString().trim();
                    if (code.isEmpty() || code.length() < 6) {
                        editTextCode.setError("Enter valid code");
                        editTextCode.requestFocus();
                        return;
                    }

                    //verifying the code entered manually
                    verifyVerificationCode(code);
                }
            });

        }

        //the method is sending verification code
        //the country id is concatenated
        //you can take the country id as user input as well
        private void sendVerificationCode(String mobile) {
            PhoneAuthProvider.getInstance().verifyPhoneNumber(
                    "+" + mobile,                 //phoneNo that is given by user
                    60,                             //Timeout Duration
                    TimeUnit.SECONDS,                   //Unit of Timeout
                    TaskExecutors.MAIN_THREAD,          //Work done on main Thread
                    mCallbacks);                       // OnVerificationStateChangedCallbacks
        }


        //the callback to detect the verification status
        private PhoneAuthProvider.OnVerificationStateChangedCallbacks mCallbacks =
                new PhoneAuthProvider.OnVerificationStateChangedCallbacks() {
            @Override
            public void onVerificationCompleted(PhoneAuthCredential phoneAuthCredential) {

                //Getting the code sent by SMS
                String code = phoneAuthCredential.getSmsCode();

                //sometime the code is not detected automatically
                //in this case the code will be null
                //so user has to manually enter the code
                if (code != null) {
                    editTextCode.setText(code);
                    //verifying the code
                    verifyVerificationCode(code);
                }
            }

            @Override
            public void onVerificationFailed(FirebaseException e) {
                Toast.makeText(VerifyPhoneActivity.this, e.getMessage(), Toast.LENGTH_LONG).show();
                Log.e("TAG",e.getMessage() );
            }

            //when the code is generated then this method will receive the code.
            @Override
            public void onCodeSent(String s, PhoneAuthProvider.ForceResendingToken forceResendingToken) {
//                super.onCodeSent(s, forceResendingToken);

                //storing the verification id that is sent to the user
                mVerificationId = s;
            }
        };

        private void verifyVerificationCode(String code) {
            //creating the credential
            PhoneAuthCredential credential = PhoneAuthProvider.getCredential(mVerificationId, code);
            signInWithPhoneAuthCredential(credential);
        }

        //used for signing the user
        private void signInWithPhoneAuthCredential(PhoneAuthCredential credential) {
            mAuth.signInWithCredential(credential)
                    .addOnCompleteListener(VerifyPhoneActivity.this,
                            new OnCompleteListener<AuthResult>() {

                        @Override
                        public void onComplete(@NonNull Task<AuthResult> task) {
                            if (task.isSuccessful()) {
                                //verification successful we will start the profile activity
                                Intent intent = new Intent(VerifyPhoneActivity.this, ProfileActivity.class);
                                intent.setFlags(Intent.FLAG_ACTIVITY_NEW_TASK | Intent.FLAG_ACTIVITY_CLEAR_TASK);
                                startActivity(intent);

                            } else {

                                //verification unsuccessful.. display an error message

                                String message = "Somthing is wrong, we will fix it soon...";

                                if (task.getException() instanceof FirebaseAuthInvalidCredentialsException) {
                                    message = "Invalid code entered...";
                                }
                                Toast.makeText(VerifyPhoneActivity.this,message,Toast.LENGTH_SHORT).show();
                            }
                        }
                    });
        }

}
ProfileActivity.java
package com.arslan6015.firebaseauthusingphoneno;

import androidx.appcompat.app.AppCompatActivity;

import android.content.Intent;
import android.os.Bundle;
import android.view.View;
import android.widget.Button;

import com.google.firebase.auth.FirebaseAuth;

public class ProfileActivity extends AppCompatActivity {

    FirebaseAuth firebaseAuth;
    Button button;

    @Override
    protected void onCreate(Bundle savedInstanceState) {
        super.onCreate(savedInstanceState);
        setContentView(R.layout.activity_profile);

        firebaseAuth = FirebaseAuth.getInstance();
        button = findViewById(R.id.SignOut);

        button.setOnClickListener(new View.OnClickListener() {
            @Override
            public void onClick(View v) {

                firebaseAuth.signOut();
                Intent intent = new Intent(ProfileActivity.this,MainActivity.class);
                startActivity(intent);
            }
        });
    }
}
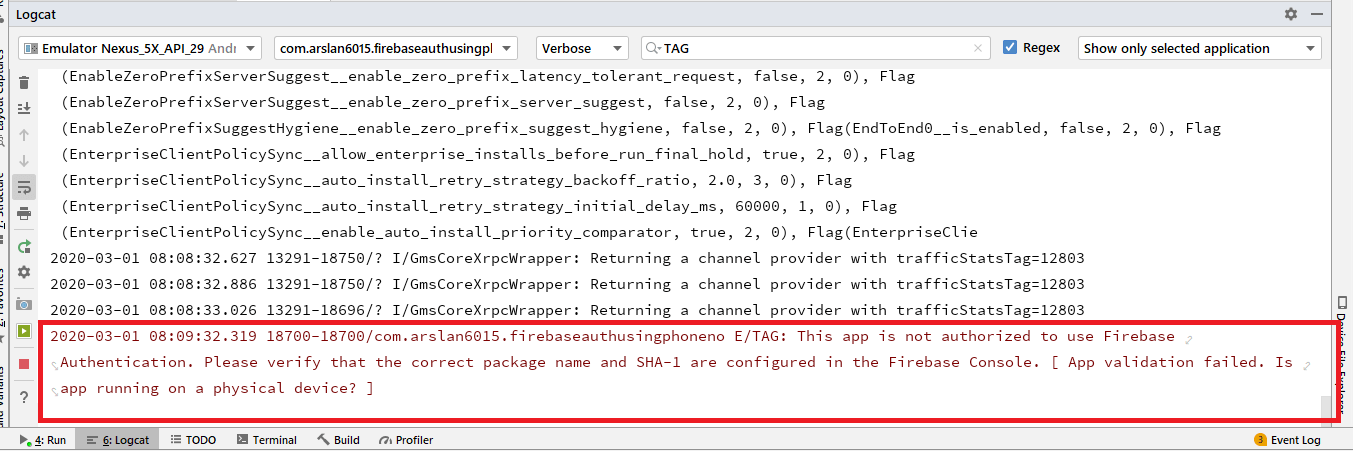
TIP: Run-on Physical Device
Note: This will run only on Physical device. Do not run on the emulator.
If you run on emulator the following error occurs.
Github Source Code
if you are facing any problem then you can download my source code and run the app.
Don’t forget to ask a question. I understand many people feel being an idiot in asking a question, please don’t feel hesitation. I’ll be delighted to answer your simplest or hardest question.
app crashes in the initial stage itself
The app opens, shows the “”May I ask your phone number?”,If we enter an invalid phone number, it shows even message.But when we enter a valid mobile number, THE APP REPORTS AN ERROR,& CLOSES
Thanks for your comment
Kindly send me your logcat error so that i can analyze your error.
You can also download my source code from here (https://github.com/FirebaseTutorials/FirebaseAuthUsingPhoneNO)