
Wait. I’m not gonna teach you how to login to the NASA servers anonymously and use its 91Gbps internet (It’s a hoax). 😂 But will teach you about Firebase Anonymous Login on Android.
However, why do we use it?
It lets users sign up with your app who haven’t signed up yet.
The best part?
It’s protected by security rules and you get high security at no extra cost to you.
I know you might be thinking, what if an anonymous user wants to sign up with your app?
You can easily link the sign-in credentials to the anonymous account.
Moreover, you can easily continue to work in future sessions with complete protection of data.
It’s extremely helpful if you want to create an e-commerce app like Amazon.

Alternatively, if you’ve ever worked with Firebase Database then you know that you can’t access the database without authentication unless you subject rules to the public which itself is risky and not-recommended by Firebase.
You guys thinking how it’s feasible? It’s because Firebase Authentication SDK is capable of providing this robust feature.
You can also check out the other articles that I described in details:
- Signup user with Email And Password using Firebase Authentication
- Login with Google using Firebase Authentication in Android
- Signup/ SignIn with phone No Using Firebase Authentication in Android
Here is the table of content that you are going to follow:
How Does It Work? (Video)
You don’t want to read this long article, you can watch the video instead.
Firebase Anonymous Login Android (Step by Step)
Here are the simple steps:
Step 1- Connecting to Firebase Auth
First thing first, you need to have an Android studio project to complete this tutorial.
Creating a New App in Android Studio
Create a new project by clicking on File > New > New Project
Connect Your App to Firebase
- Once the project is created, you need to add Firebase Auth to your project.
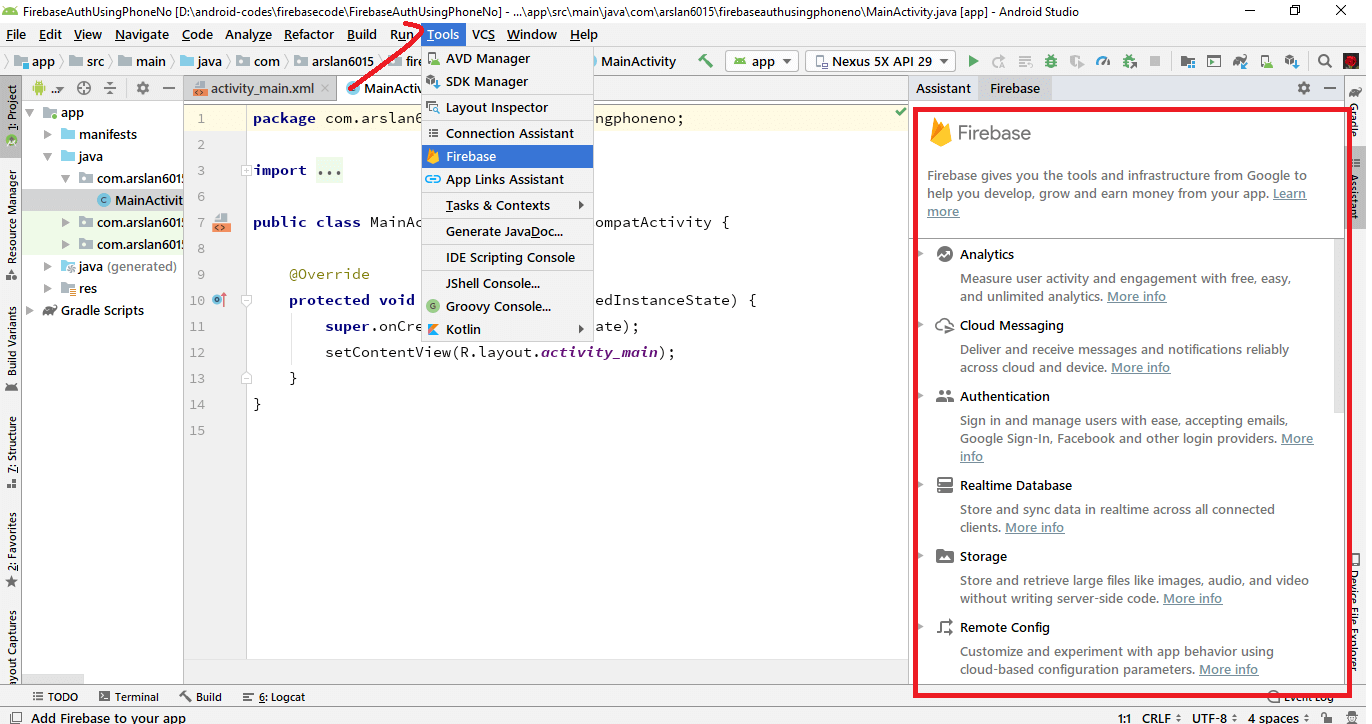
- Click on Tools > Firebase, It’ll open a new window on the right side in which you can see all the services that are provided by Firebase.
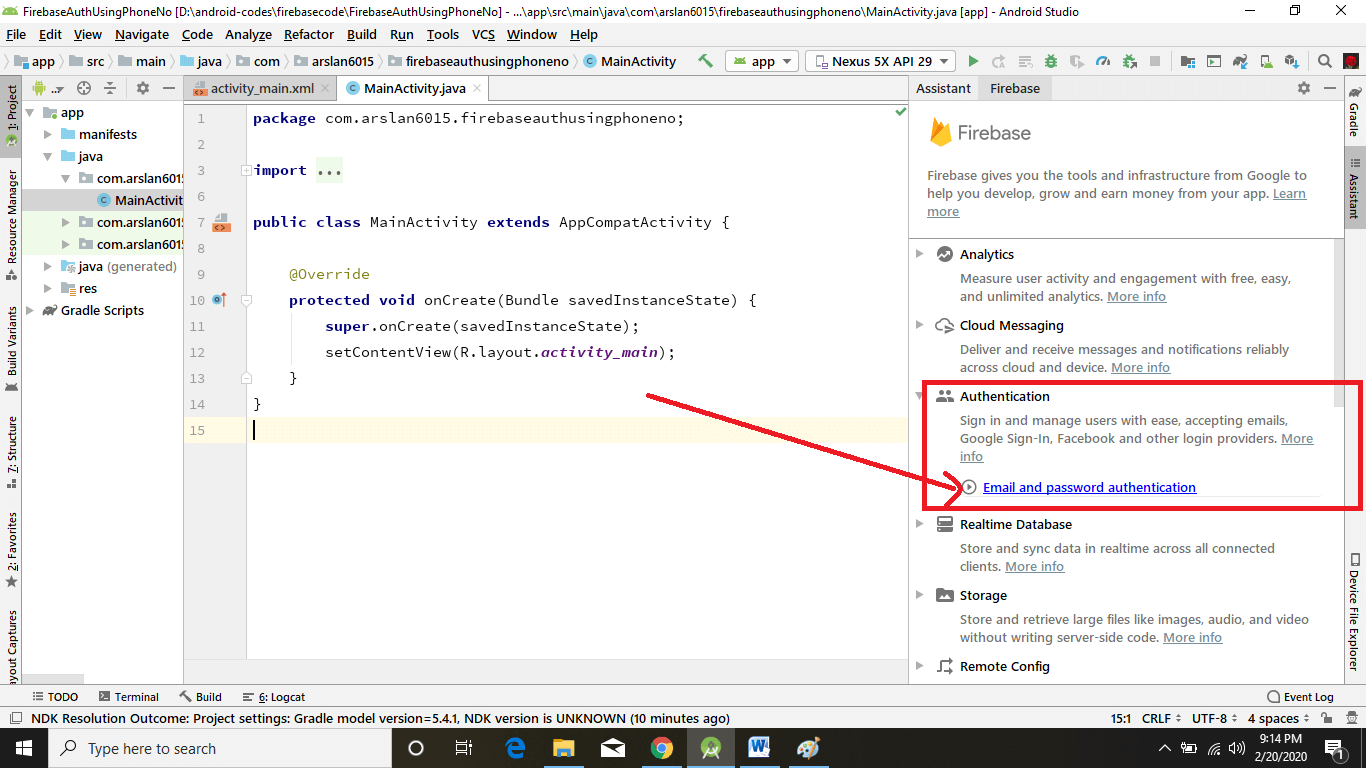
- As you’re interested in Firebase Authentication only, so you will go for that. Click on Authentication -> Email and Password Authentication.
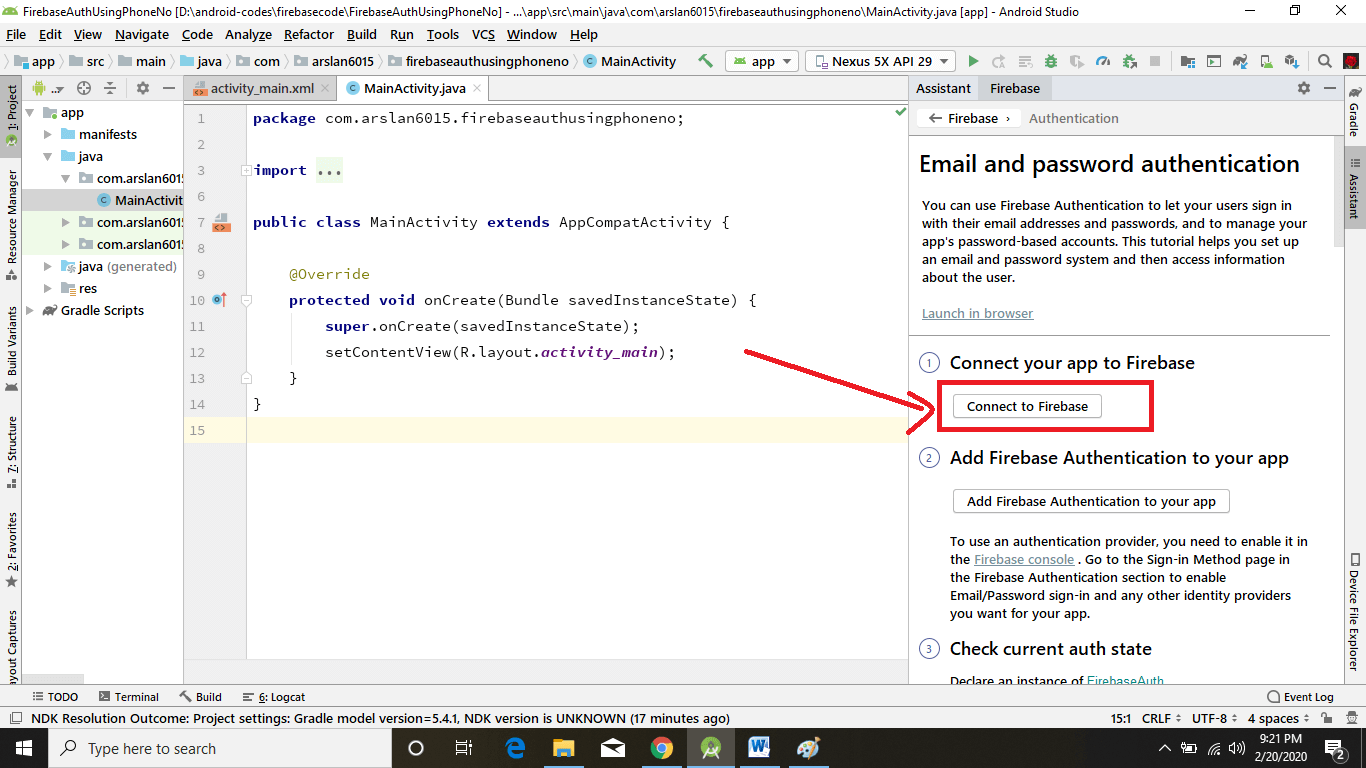
- Before adding the Firebase Authentication dependencies to our Android app, you need to first connect to Firebase. Click on Connect to Firebase.
If you are not logged into Android Studio using your Google account then it will ask you to log in.
You can create a new Firebase project or open an existing project.
But I’m creating a new Firebase Project so I will enter the project name, select Country and click Connect to Firebase.
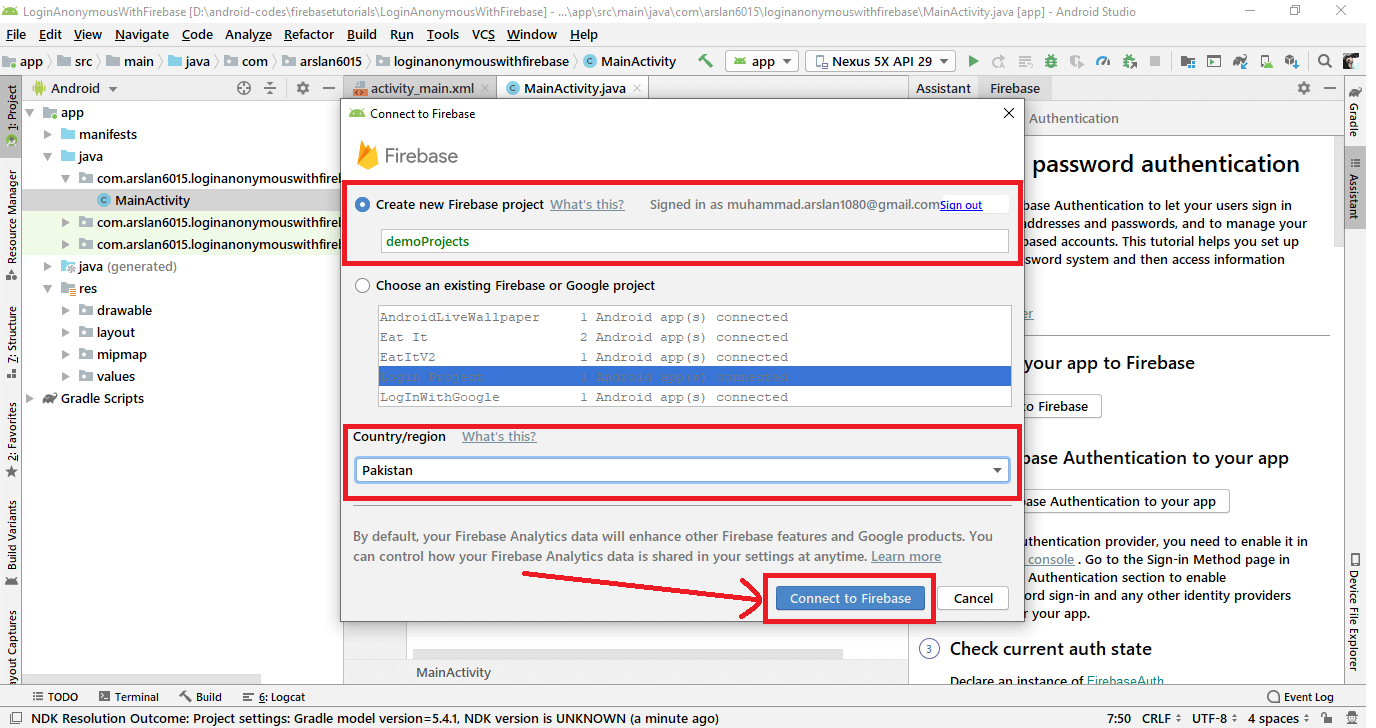
That’s it, the app is now connected to Firebase.
Add Firebase Authentication Dependencies to Your Project
- It’s simple as before, just click the button saying Add Firebase Authentication to your app
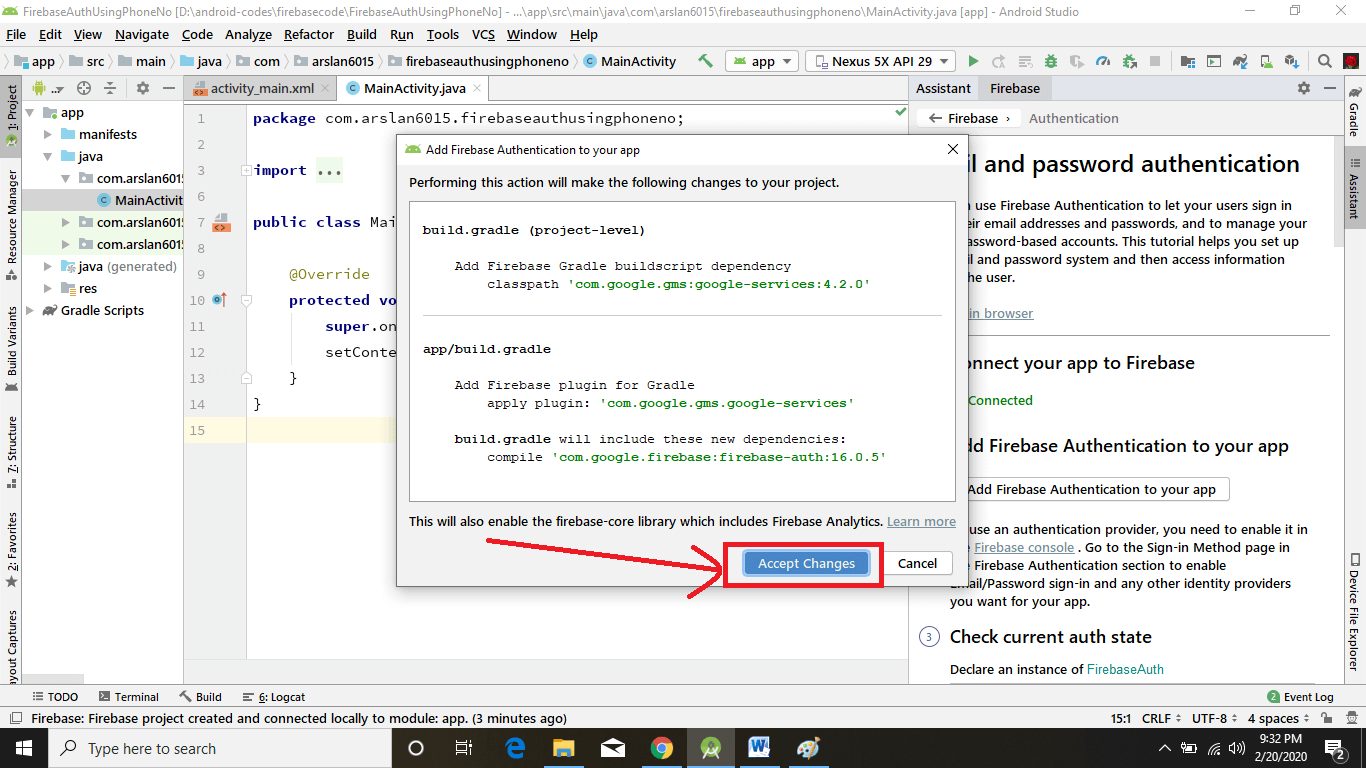

- Click Apply Changes, after some time you can see all the dependencies set up correctly.

Enable Anonymous Authentication in Firebase Console
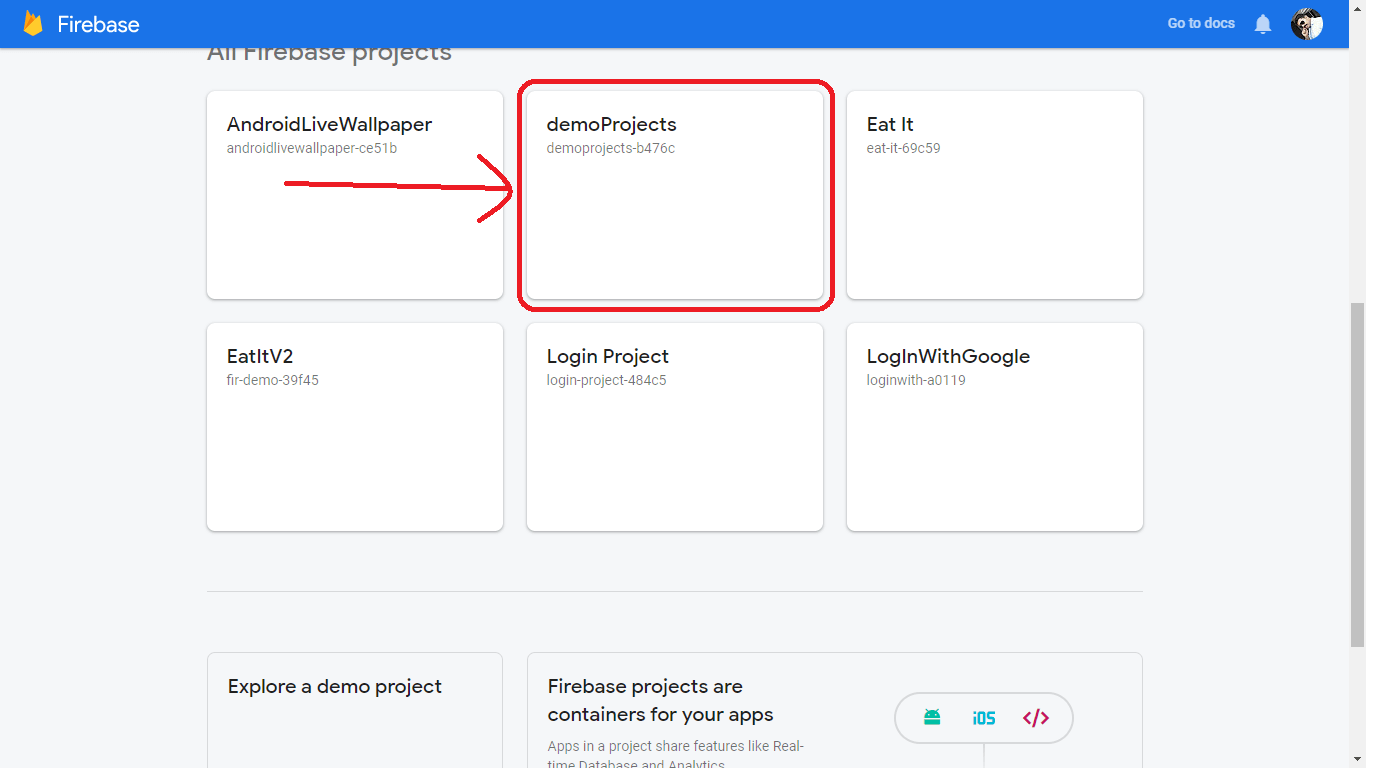
Go to http://console.firebase.google.com/ and login to with the same ID that is logged in to Android Studio.
You can see our project is added successfully. Now click on it.
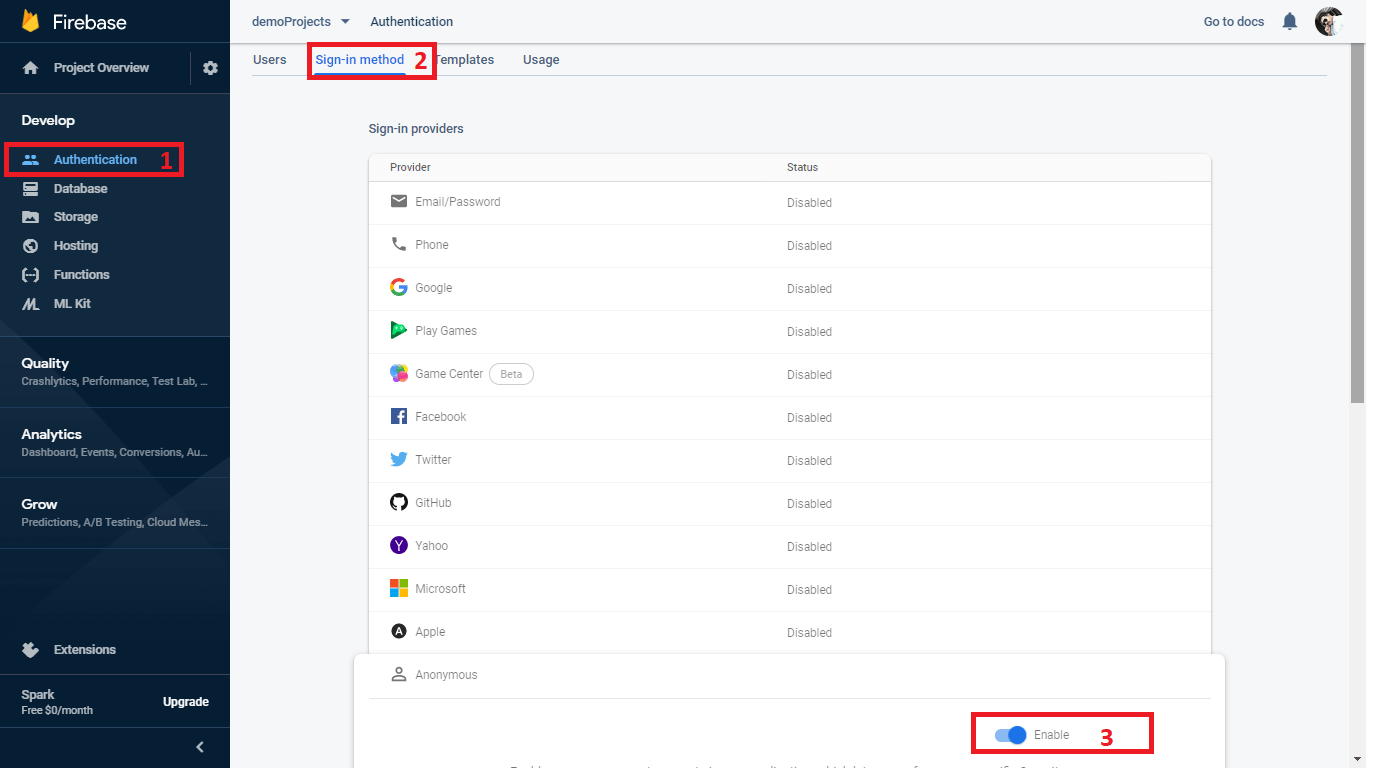
- Select Authentication from the left pane
- Switch to Sign-in method tab
- Select Anonymous and click to toggle button
- And click Save button
And Firebase work is done. Now is the time that you start writing code in Android Studio.
Step 2 – Log in Anonymously
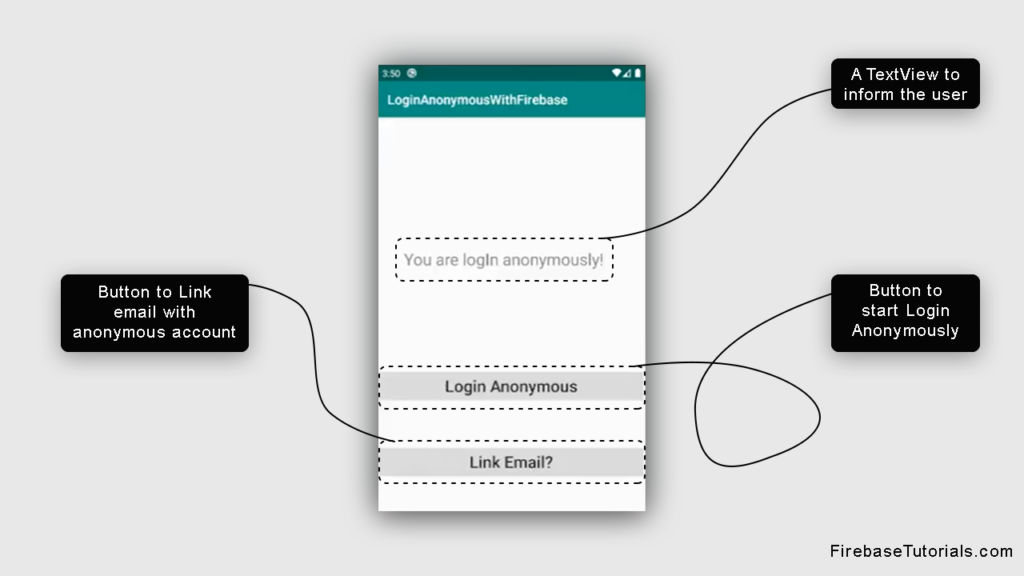
To login user anonymously, you need a button to start the process and a text view to inform the user about the progress. And a button for later use!
This is the interface we need to build for logging in users anonymously.
Coding UI for Logging in Anonymously
MainActivity.java with activity_main.xml layout files; This will be the first activity that’ll be executed when a user launches the app.
Here you implement (as shown above):
- TextView: To display the output to the user.
- Progressbar: To show the progress bar when some background process is running.
- Login Anonymous Button: To add a trigger with the anonymous login.
- Link Email Button: To start another activity where we will ask for email and password and link it to the existing account.
Below is the complete activity_main.xml code
<?xml version="1.0" encoding="utf-8"?>
<androidx.constraintlayout.widget.ConstraintLayout xmlns:android="http://schemas.android.com/apk/res/android"
    xmlns:app="http://schemas.android.com/apk/res-auto"
    xmlns:tools="http://schemas.android.com/tools"
    android:layout_width="match_parent"
    android:layout_height="match_parent"
    tools:context=".MainActivity">

    <TextView
        android:id="@+id/loginMessage"
        android:layout_width="wrap_content"
        android:layout_height="wrap_content"
        android:text="You are logIn anonymously!"
        android:textSize="25sp"
        android:visibility="invisible"
        app:layout_constraintBottom_toBottomOf="parent"
        app:layout_constraintHorizontal_bias="0.392"
        app:layout_constraintLeft_toLeftOf="parent"
        app:layout_constraintRight_toRightOf="parent"
        app:layout_constraintTop_toTopOf="parent"
        app:layout_constraintVertical_bias="0.35" />

    <ProgressBar
        android:id="@+id/progressBar"
        android:layout_width="wrap_content"
        android:layout_height="wrap_content"
        android:visibility="invisible"
        app:layout_constraintBottom_toBottomOf="parent"
        app:layout_constraintEnd_toEndOf="parent"
        app:layout_constraintHorizontal_bias="0.462"
        app:layout_constraintStart_toStartOf="parent"
        app:layout_constraintTop_toTopOf="parent"
        app:layout_constraintVertical_bias="0.459" />

    <Button
        android:id="@+id/loginAnonymousbutton"
        android:layout_width="0dp"
        android:layout_height="wrap_content"
        android:layout_marginTop="384dp"
        android:text="Login Anonymous"
        android:textAllCaps="false"
        android:textSize="25sp"
        app:layout_constraintEnd_toEndOf="parent"
        app:layout_constraintHorizontal_bias="1.0"
        app:layout_constraintStart_toStartOf="parent"
        app:layout_constraintTop_toTopOf="parent" />


    <Button
        android:id="@+id/linkAccountButton"
        android:layout_width="0dp"
        android:layout_height="wrap_content"
        android:layout_marginTop="500dp"
        android:text="Link Email?"
        android:textAllCaps="false"
        android:textSize="25sp"
        app:layout_constraintEnd_toEndOf="parent"
        app:layout_constraintHorizontal_bias="1.0"
        app:layout_constraintStart_toStartOf="parent"
        app:layout_constraintTop_toTopOf="parent" />

</androidx.constraintlayout.widget.ConstraintLayout>
Initializing the instances
First of all, we need to create the instance of TextView and Buttons and initialize them with the tags that we already created in XML.
Then, just like other Firebase Authentications, we need an instance of FirebaseAuth and FirebaseUser – to get the information of logged in users; so create that in onCreate() method.
        // Initialize Firebase Auth
        mAuth = FirebaseAuth.getInstance();
        currentUser = mAuth.getCurrentUser();
        //initialization
        loginMessage = findViewById(R.id.loginMessage);
        progressBar = findViewById(R.id.progressBar);
        loginAnonymousbutton = findViewById(R.id.loginAnonymousbutton);
        linkAccountButton = findViewById(R.id.linkAccountButton);
Performing Anonymous Login
Now when the user clicks the “Login in Anonymously” button, you need to call a method named signInAnonymously on the FirebaseAuth instance that we created above.
But before that, you also need to check if the user is already logged into the app or not.
Let me explain.
When you make the user logged into the app using any method provided by Firebase Auth, the user will be stayed logged in until logged out manually or the app data is cleared from setting.
This functionality is provided by default in Firebase SDK.
Now before we begin the login process, we need to check if the user is already logged in or not.
If not then you go for signInAnonymously() method. This method is provided by Firebase itself and provides the following callback functions:
- addOnCompleteListener: As the name suggests, this method is called when the sign-in process is completed. Remember COMPLETED, not successful. There could be some cases when the sign-in process was completed but not successfully. So we need to check if it was successful or not.
- addOnFailureListener: This method is called when something went wrong while signing in, it could be because of the internet or anything else. You can get the error message from the exception.
 if (currentUser == null){                                       //check if the user is new then signIn anonymously
                mAuth.signInAnonymously().                                 //.signInAnonymously is a method provided by Firebase
                    addOnCompleteListener(new OnCompleteListener<AuthResult>() {        //insert a Listener that listen
                        @Override
                        public void onComplete(@NonNull Task<AuthResult> task)          // insert a method that will executes when the process is completed
                        {
                            if (task.isSuccessful())                    // check the required task is completed successfully
                            {
                                loginMessage.setVisibility(View.VISIBLE);       //visible the text
                                progressBar.setVisibility(View.INVISIBLE);       //inVisible the progressBar
                            }
                        }
                    })
                        .addOnFailureListener(new OnFailureListener() {         //if the signin failed
                            @Override
                            public void onFailure(@NonNull Exception e) {
                                Log.e("TAG",e.getMessage());            //return error in logs
                            }
                        });
                }
Here is the full code of the MainActivity.java
package com.arslan6015.loginanonymouswithfirebase;

import androidx.annotation.NonNull;
import androidx.appcompat.app.AppCompatActivity;

import android.content.Intent;
import android.os.Bundle;
import android.util.Log;
import android.view.View;
import android.widget.Button;
import android.widget.EditText;
import android.widget.ProgressBar;
import android.widget.TextView;

import com.google.android.gms.tasks.OnCompleteListener;
import com.google.android.gms.tasks.OnFailureListener;
import com.google.android.gms.tasks.Task;
import com.google.firebase.auth.AuthResult;
import com.google.firebase.auth.FirebaseAuth;
import com.google.firebase.auth.FirebaseUser;

public class MainActivity extends AppCompatActivity {

    private FirebaseAuth mAuth;
    private FirebaseUser currentUser;
    private TextView loginMessage;
    private ProgressBar progressBar;
    private Button loginAnonymousbutton, linkAccountButton;

    @Override
    protected void onCreate(Bundle savedInstanceState) {
        super.onCreate(savedInstanceState);
        setContentView(R.layout.activity_main);

        // Initialize Firebase Auth
        mAuth = FirebaseAuth.getInstance();
        currentUser = mAuth.getCurrentUser();
        //initialization
        loginMessage = findViewById(R.id.loginMessage);
        progressBar = findViewById(R.id.progressBar);
        loginAnonymousbutton = findViewById(R.id.loginAnonymousbutton);
        linkAccountButton = findViewById(R.id.linkAccountButton);

loginAnonymousbutton.setOnClickListener(new View.OnClickListener() {        //insert a listener on button that checks whether the button is clicked
        @Override
    public void onClick(View v) {
        progressBar.setVisibility(View.VISIBLE);

        if (currentUser == null){                                       //check if the user is new then signIn anonymously
                mAuth.signInAnonymously().                                 //.signInAnonymously is a method provided by Firebase
                    addOnCompleteListener(new OnCompleteListener<AuthResult>() {        //insert a Listener that listen
                        @Override
                        public void onComplete(@NonNull Task<AuthResult> task)          // insert a method that will executes when the process is completed
                        {
                            if (task.isSuccessful())                    // check the required task is completed successfully
                            {
                                loginMessage.setVisibility(View.VISIBLE);       //visible the text
                                progressBar.setVisibility(View.INVISIBLE);       //inVisible the progressBar
                            }
                        }
                    })
                        .addOnFailureListener(new OnFailureListener() {         //if the signin failed
                            @Override
                            public void onFailure(@NonNull Exception e) {
                                Log.e("TAG",e.getMessage());            //return error in logs
                            }
                        });
                }
                else                                            //check if the user is not new
                {
                    progressBar.setVisibility(View.INVISIBLE);          //invisible the progress bar
                    loginMessage.setVisibility(View.VISIBLE);           //visible the Text
                    loginMessage.setText("you are already login anonymously!!!");           //set the text
                }
            }
        });

        linkAccountButton.setOnClickListener(new View.OnClickListener() {
            @Override
            public void onClick(View v) {
                Intent intent = new Intent(MainActivity.this,LinkAccount.class); //use intent to send the user to LinkAccount activity
                startActivity(intent);
            }
        });

    }
}
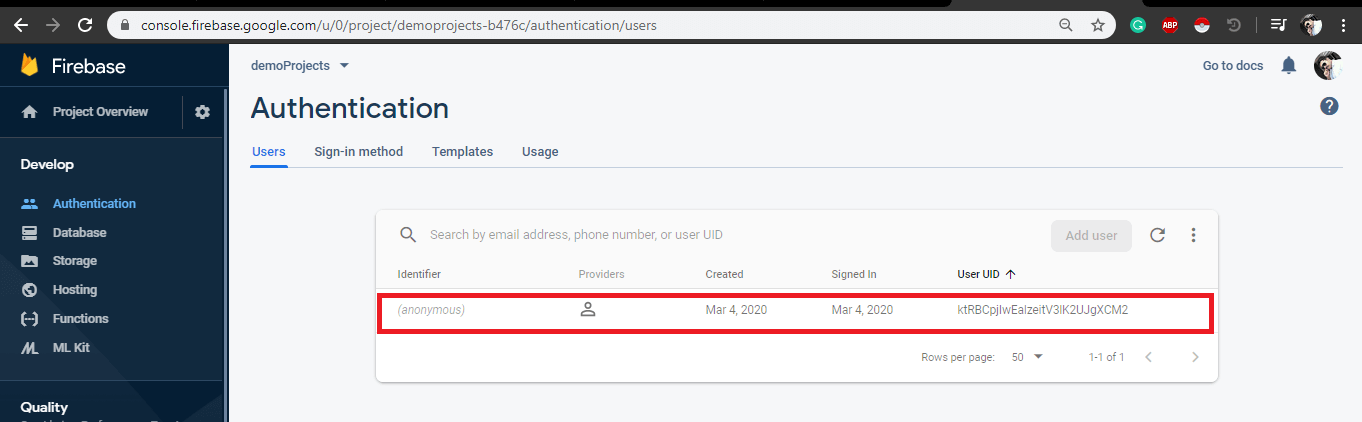
Running application
After running the application you can see in the console window an anonymous account is added with a unique User ID.
For better understanding, you can see the output video that is listed above.
After logged in anonymously, the user can use your app.
And if the user wants to perform some more operation (like purchasing some item from the shopping cart), then you can ask the user to register with email, the password for further use of the app.
So the question here is “How to link the anonymous user with your email authentication account?”
Linking Anonymous Account with Email and Password
Remember the “Link Email” that was created in Main Activity; when a user clicks that, it will start this activity.
Actually linking is quite easy, all you need to do is ask the user for email and password, and then call linkWithCredentials method to perform the linking.
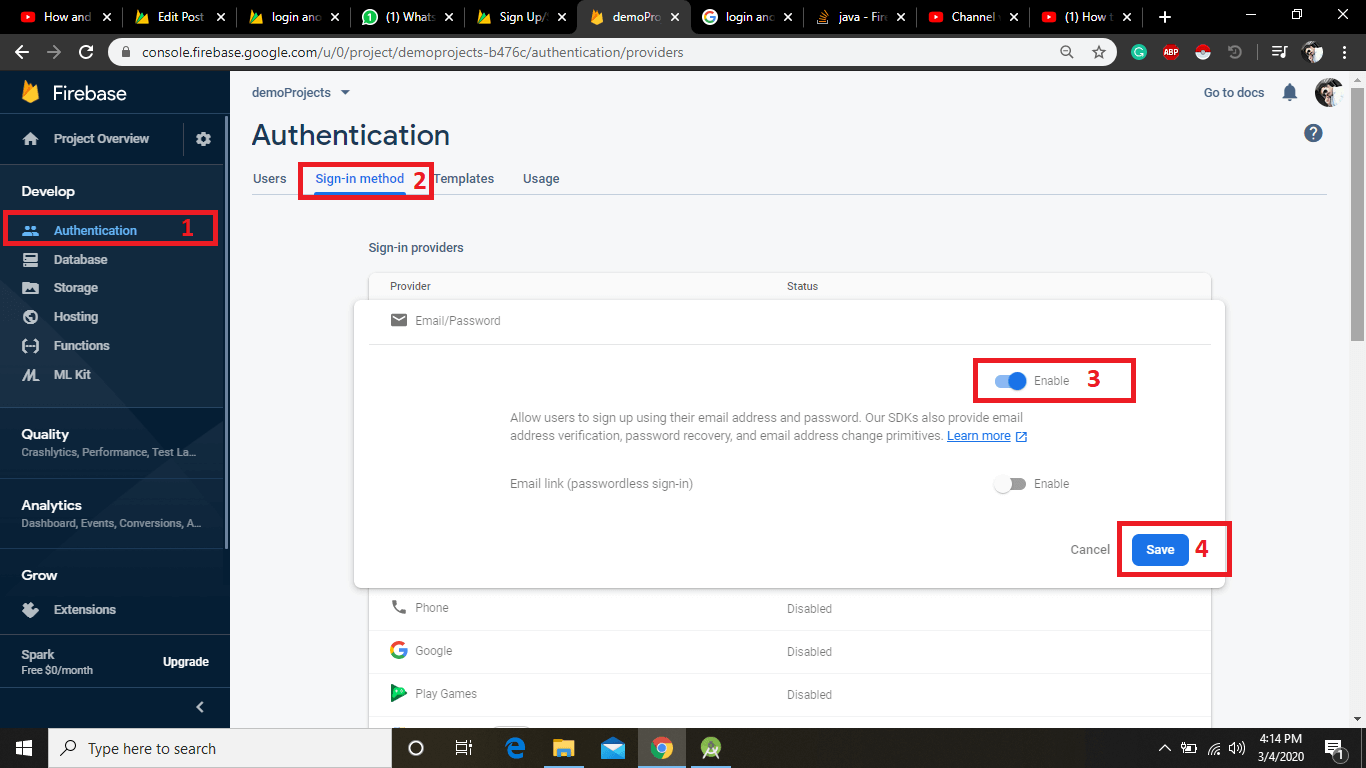
Enable Email-Password Sign-In method in Firebase Console.
That’s a very important task to do (and the highly forgettable task too).
You need to enable Sign-in with Email and password in Firebase Console just like you did for Anonymous login. Here is how:
- Go to Firebase Console, and select the project where your app resides
- Select Authentication from the left pane
- Switch to Sign-in method tab
- Select Email-Password and click the toggle button
- And click Save button
Getting details from User
As I said above, you need to get the username and password from the user.
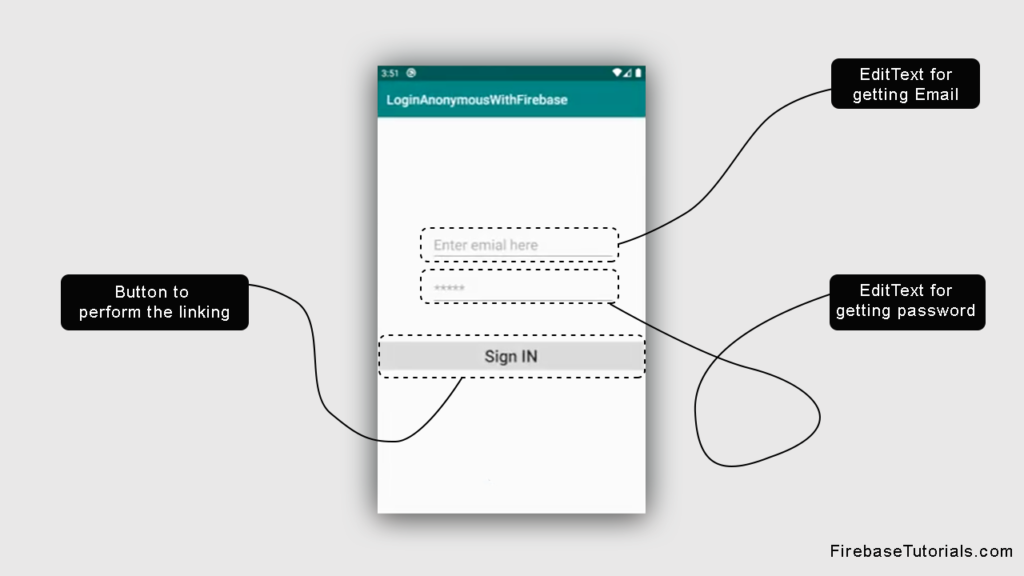
For that, you need to create an activity having LinkAccount.java and activity_link_account.xml
This activity will be called when the user clicks the “Link Email” button from Main Activity.
Here you need to implement:
- EmailEditText: This is used to get the email from the user.
- PasswordEditText: This is used to get the password from the user.
- SignIn Button: This is used to sign in the user.
Below is the complete activity_link_account.xml code:
<?xml version="1.0" encoding="utf-8"?>
<androidx.constraintlayout.widget.ConstraintLayout xmlns:android="http://schemas.android.com/apk/res/android"
    xmlns:app="http://schemas.android.com/apk/res-auto"
    xmlns:tools="http://schemas.android.com/tools"
    android:layout_width="match_parent"
    android:layout_height="match_parent"
    tools:context=".LinkAccount">


    <EditText
        android:id="@+id/email_id"
        android:layout_width="280dp"
        android:layout_height="wrap_content"
        android:layout_marginStart="36dp"
        android:layout_marginTop="168dp"
        android:hint="Enter emial here"
        android:textSize="22sp"
        app:layout_constraintEnd_toEndOf="parent"
        app:layout_constraintStart_toStartOf="parent"
        app:layout_constraintTop_toTopOf="parent" />

    <EditText
        android:id="@+id/password"
        android:layout_width="280dp"
        android:layout_height="wrap_content"
        android:layout_marginStart="36dp"
        android:layout_marginTop="236dp"
        android:hint="*****"
        android:textSize="22sp"
        android:inputType="textPassword"
        app:layout_constraintEnd_toEndOf="parent"
        app:layout_constraintHorizontal_bias="0.505"
        app:layout_constraintStart_toStartOf="parent"
        app:layout_constraintTop_toTopOf="parent" />

    <Button
        android:id="@+id/signInButton"
        android:layout_width="0dp"
        android:layout_height="wrap_content"
        android:layout_marginTop="336dp"
        android:text="Sign IN"
        android:textAllCaps="false"
        android:textSize="25sp"
        app:layout_constraintEnd_toEndOf="parent"
        app:layout_constraintHorizontal_bias="1.0"
        app:layout_constraintStart_toStartOf="parent"
        app:layout_constraintTop_toTopOf="parent" />

</androidx.constraintlayout.widget.ConstraintLayout>
Initializing instances
Now is the time we start linking the anonymous account to email and password provided by the user.
Just like before, create an instance of EditText and Button to get the input from the user.
And then create an instance of FirebaseUser and initialize it with the current user just like below:
        //initialization
        email = findViewById(R.id.email_id);
        password = findViewById(R.id.password);
        signInButton = findViewById(R.id.signInButton);
        currentUser = FirebaseAuth.getInstance().getCurrentUser();
Performing the linking of Anonymous account with email and password
Now you need to check if currentUser is not null.
Remember, you can link the account only when it is already anonymously logged in.
After that there is a static function named getCredential of EmailAuthProvided class, call that function and provide email and password that we just inputted from the user.
This method will return an instance of AuthCredential that you can use to link the account by calling linkWithCredential method on FirebaseUser class instance.
NOTE: You can also link an anonymous account with Facebook, Google, or even Phone Number. Check out here
You can also override the call back functions on linkWithCredential, few of them are:
- addOnCompleteListener: This will further @overide a method onComplete that will check whether the process is completed. If completed then you need to check if it was successful or not.
- addOnFailureListener: This will further @overide a method onFailure that will check whether the process is failed. Then you can show errors in the logcat window.
    if (currentUser!= null)
    {
        if (!mEmail.isEmpty() || !mPassword.isEmpty())  //checking email,password editText are not empty
        {
            AuthCredential credential = EmailAuthProvider.getCredential(mEmail,mPassword);
            currentUser.linkWithCredential(credential)              //linkWithCredential is a method provided by Firebase just to link the credentials
                    .addOnCompleteListener(new OnCompleteListener<AuthResult>()
                    {
                        @Override
                        public void onComplete(@NonNull Task<AuthResult> task)
                        {
                            if (task.isSuccessful())
                                {
                                    Toast.makeText(LinkAccount.this,"account linked",Toast.LENGTH_SHORT).show();
                                }
                        }
                    })
                    .addOnFailureListener(new OnFailureListener() {
                        @Override
                        public void onFailure(@NonNull Exception e) {
                            Log.e("TAG2",e.getMessage());
                        }
                    });
        }
    }
Here is the complete code of the LinkAccount.java
package com.arslan6015.loginanonymouswithfirebase;

import androidx.annotation.NonNull;
import androidx.appcompat.app.AppCompatActivity;

import android.os.Bundle;
import android.util.Log;
import android.view.View;
import android.widget.Button;
import android.widget.EditText;
import android.widget.Toast;

import com.google.android.gms.tasks.OnCompleteListener;
import com.google.android.gms.tasks.OnFailureListener;
import com.google.android.gms.tasks.Task;
import com.google.firebase.auth.AuthCredential;
import com.google.firebase.auth.AuthResult;
import com.google.firebase.auth.EmailAuthProvider;
import com.google.firebase.auth.FirebaseAuth;
import com.google.firebase.auth.FirebaseUser;

public class LinkAccount extends AppCompatActivity {

    private EditText email,password;
    private Button signInButton;
    private FirebaseUser currentUser;
    @Override
    protected void onCreate(Bundle savedInstanceState) {
        super.onCreate(savedInstanceState);
        setContentView(R.layout.activity_link_account);

        //initialization
        email = findViewById(R.id.email_id);
        password = findViewById(R.id.password);
        signInButton = findViewById(R.id.signInButton);
        currentUser = FirebaseAuth.getInstance().getCurrentUser();

        signInButton.setOnClickListener(new View.OnClickListener() {
            @Override
            public void onClick(View v) {
                String mEmail = email.getText().toString();
                String mPassword = password.getText().toString();

    if (currentUser!= null)
    {
        if (!mEmail.isEmpty() || !mPassword.isEmpty())  //checking email,password editText are not empty
        {
            AuthCredential credential = EmailAuthProvider.getCredential(mEmail,mPassword);
            currentUser.linkWithCredential(credential)              //linkWithCredential is a method provided by Firebase just to link the credentials
                    .addOnCompleteListener(new OnCompleteListener<AuthResult>()
                    {
                        @Override
                        public void onComplete(@NonNull Task<AuthResult> task)
                        {
                            if (task.isSuccessful())
                                {
                                    Toast.makeText(LinkAccount.this,"account linked",Toast.LENGTH_SHORT).show();
                                }
                        }
                    })
                    .addOnFailureListener(new OnFailureListener() {
                        @Override
                        public void onFailure(@NonNull Exception e) {
                            Log.e("TAG2",e.getMessage());
                        }
                    });
        }
    }

    }
    });
    }
}
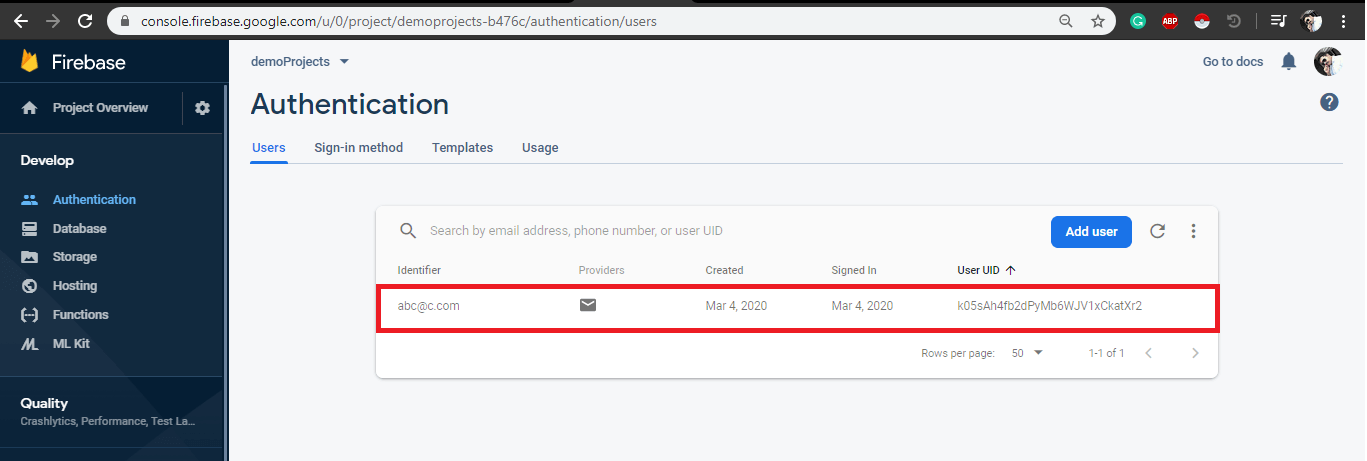
Running the App and Checking Results in Firebase Console
After running the application you can see in the console window an anonymous account is replaced with a unique EmailID that you provide in the application.
And you can see that UID stays the same. For better understanding, you can see the output video that is listed above.
Get the Complete Source Code for Anonymous Login and Linking!
I’ve tried my best to explain the working of Anonymous login in Android, why anonymous login is required, and how you can link the email and password with existing accounts.
Moreover, you can always get the complete source code here.
Are you curious? Learn more:
- Sign up with Facebook using Firebase Authentication
- Sign up with phone number using Firebase Authentication
Ask any questions in the comment section below, our experts will be happy to help you at no extra cost.
1 thought on “Firebase Anonymous Login on Android (Easy Tutorial)”
Comments are closed.