Do you want to learn how to authenticate Facebook login using Firebase?
You’ve come to the right place.
As you know authentication is crucial nowadays; you always need to make sure that some real person is logging into your app and generating the content, not a bot or a script.
Apart from that, you also need to provide a familiar and personalized experience to each user. So you need first to identify them.
As a matter of fact, Firebase Authentication helps you with that too.
Further, Firebase provides easy to use SDK and ready-made UI libraries to use and provide the best experience to your app users.
Let alone, its SDK provides a bunch of options to signup/login. Like using email and password, phone number, or any other federated identity providers including Facebook and Twitter.
Here we will be implementing a federated identity provider with Firebase to authenticate the user. Or in simple words, we can say that we will be using Facebook to sign up on Android!
This means that users who are already signed up on Facebook can now login to your app with just a button tap! How seamless it is ❤️.
For those who want to learn more: How to sign up the user using email and password with Firebase?
Here is what we will be getting at the end of this tutorial:
I will share and explain the whole code here, and you can also check out this repository for the complete project.
Structure of the Tutorial for Android Facebook Login with Firebase
To sign up users with their Facebook accounts, we actually need to implement two SDKs:
- Firebase Auth SDK
- Facebook Login SDK
First, we will register our app with Facebook and then implement their Facebook Login SDK according to their documentation.
After login with Facebook, we will use that token to authenticate our users to Firebase.
Moreover, you can always get the complete code from my GitHub account!
So let the code begin!
Connecting Your Project to Firebase!
It is quite obvious that if you are working with Firebase, you need your project to be connected with Firebase.
Here is how you can do that using Firebase Plugin already available in Android Studio:
- Create an Android Project in Android Studio
- Go to Tools and click “Firebase”
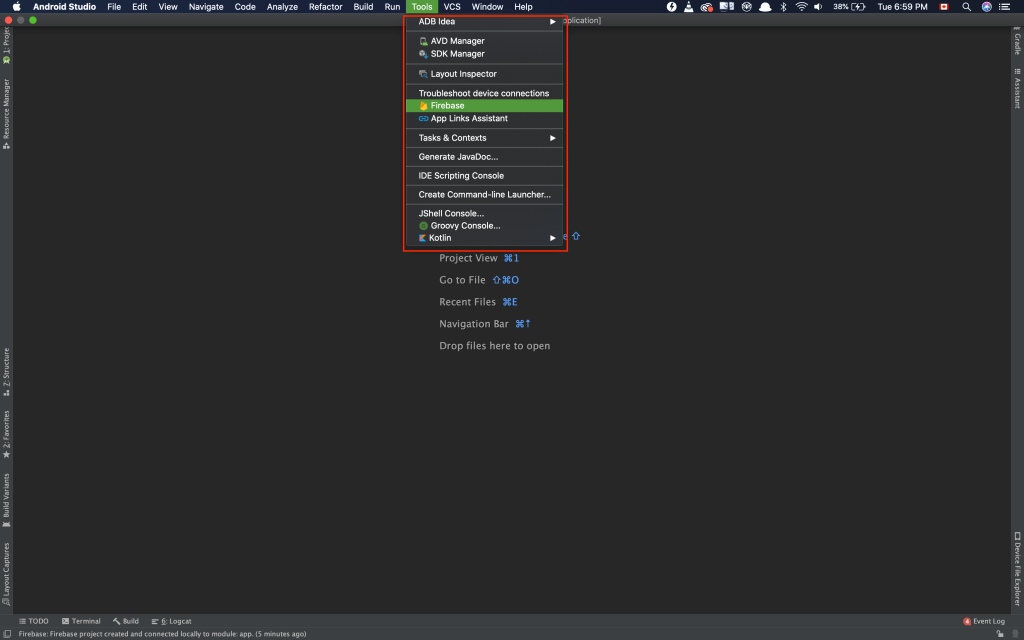

- It will open an assistant pane on the right side. Search for Authentication there:
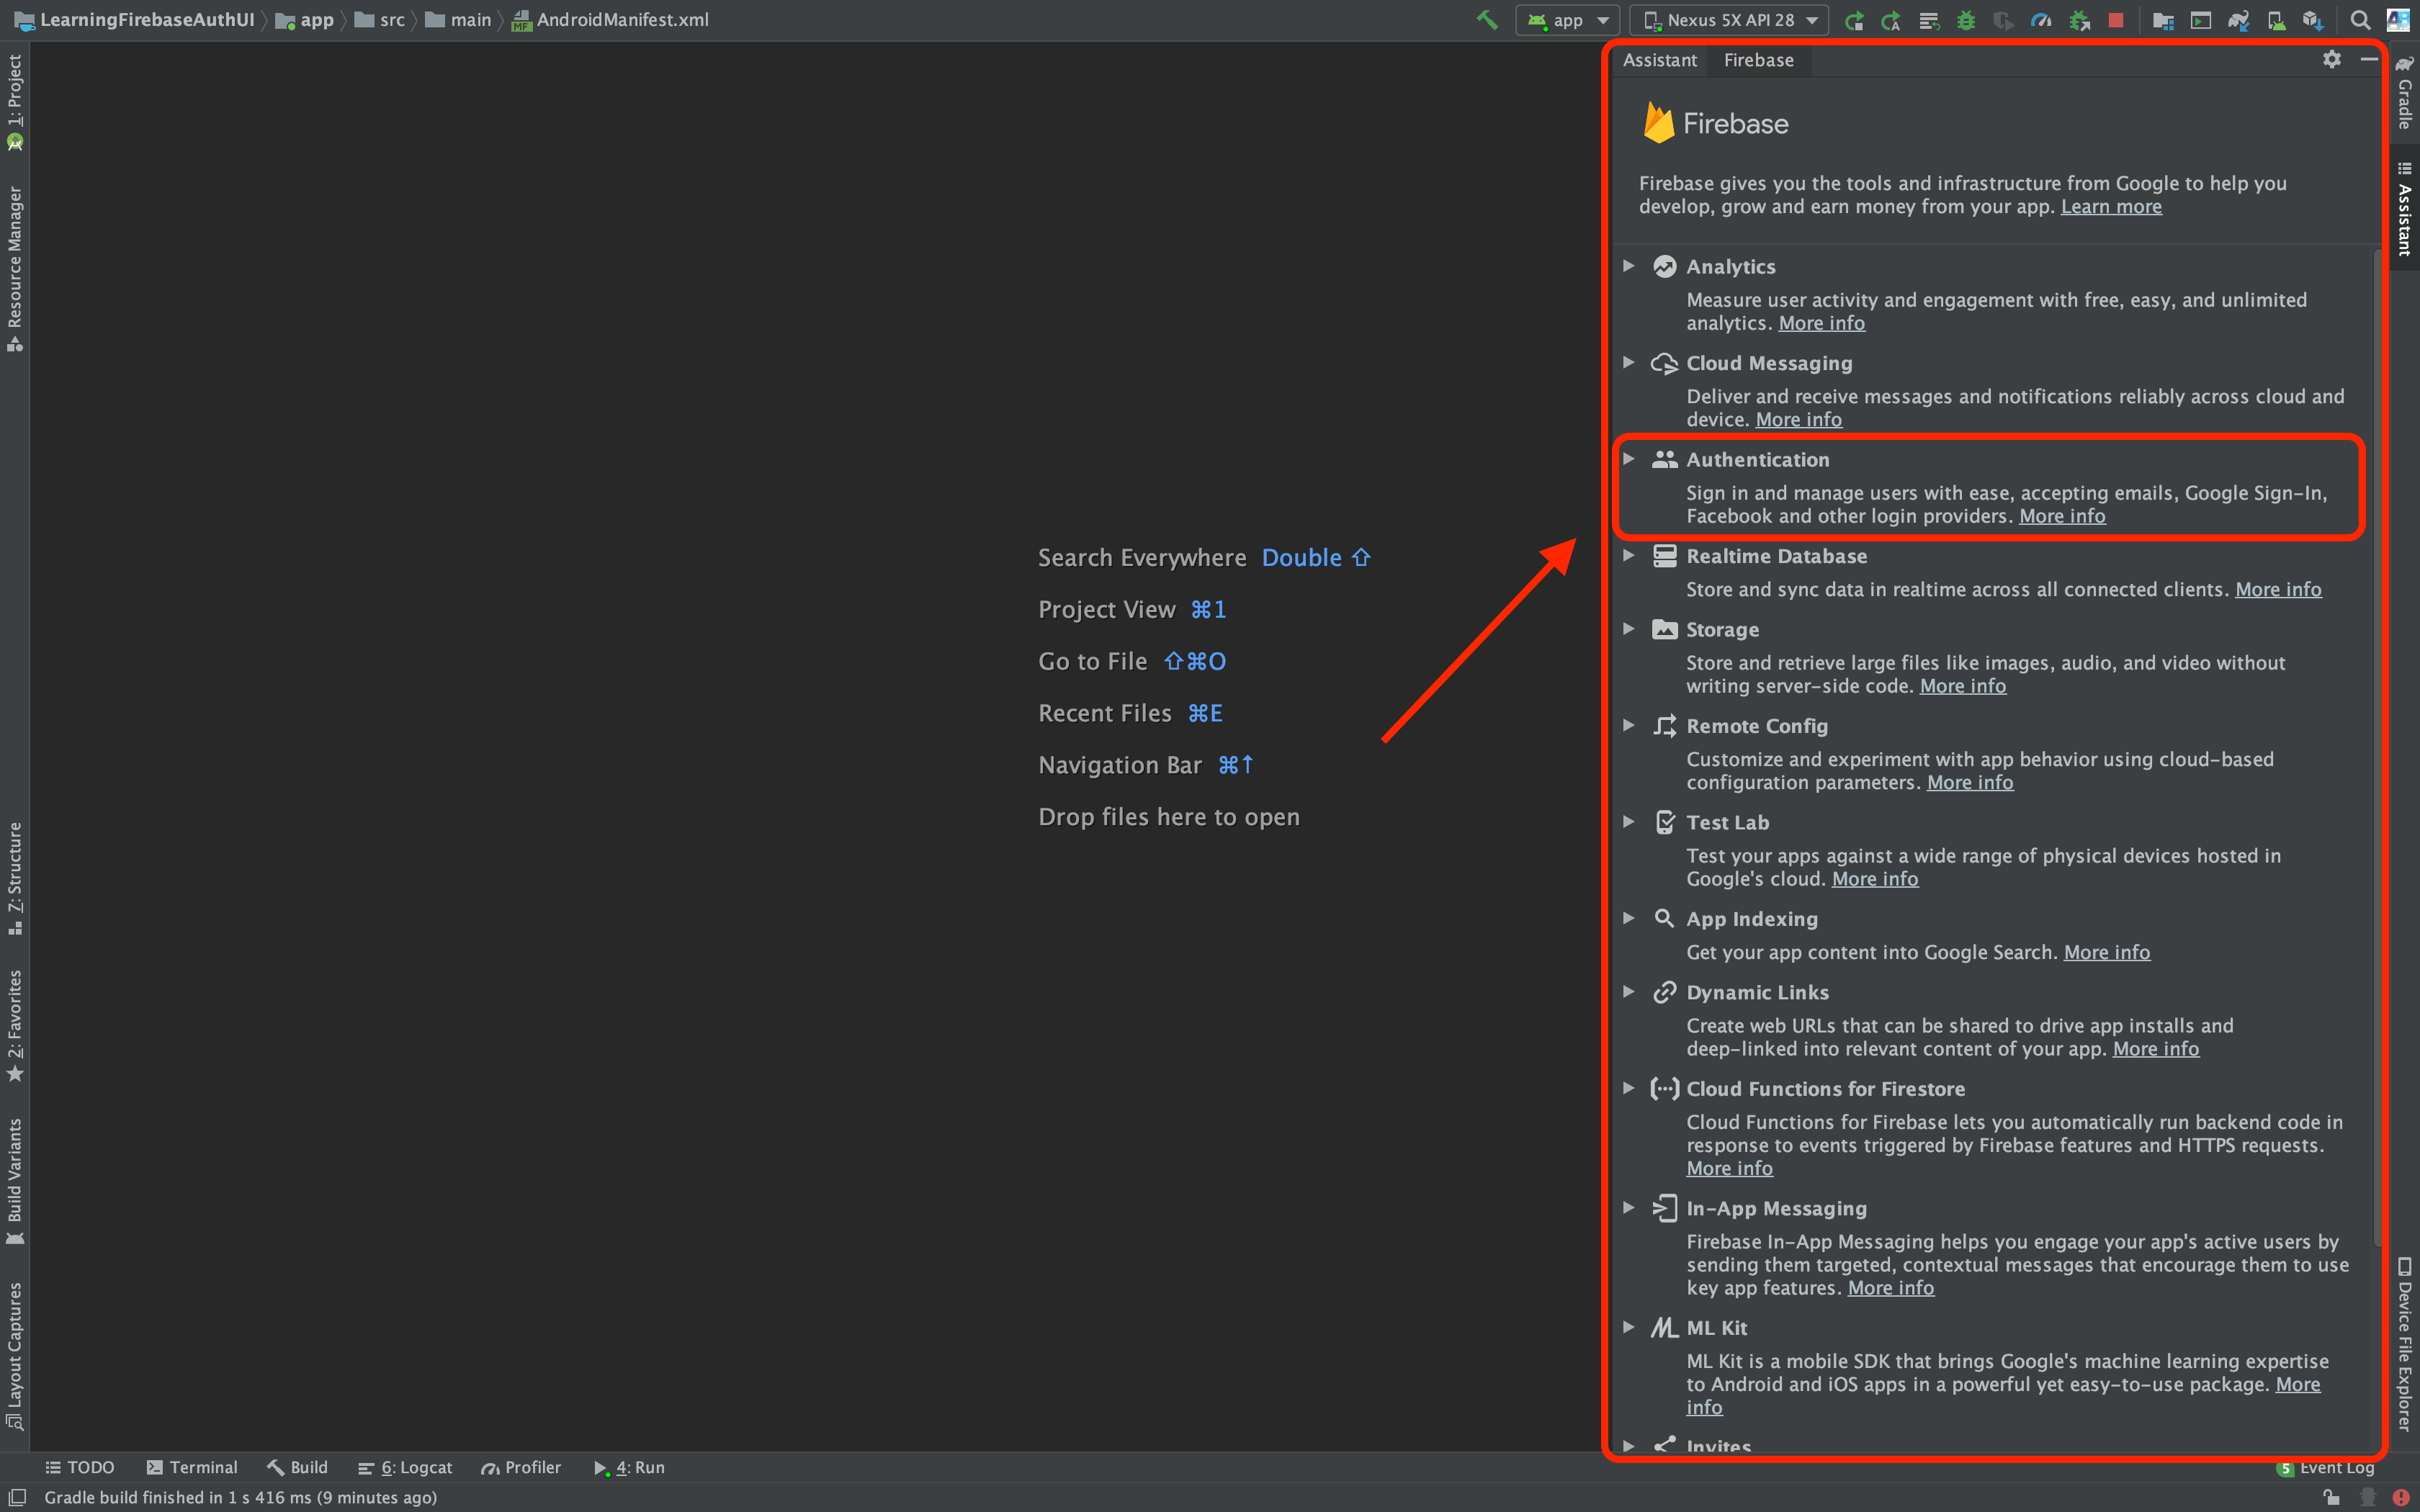

Adding Firebase to Android app in Android Studio screenshot - Expand the Authentication option and click on “Email and Password Authentication“. And now you see a button saying “Connect to Firebase“, click that:
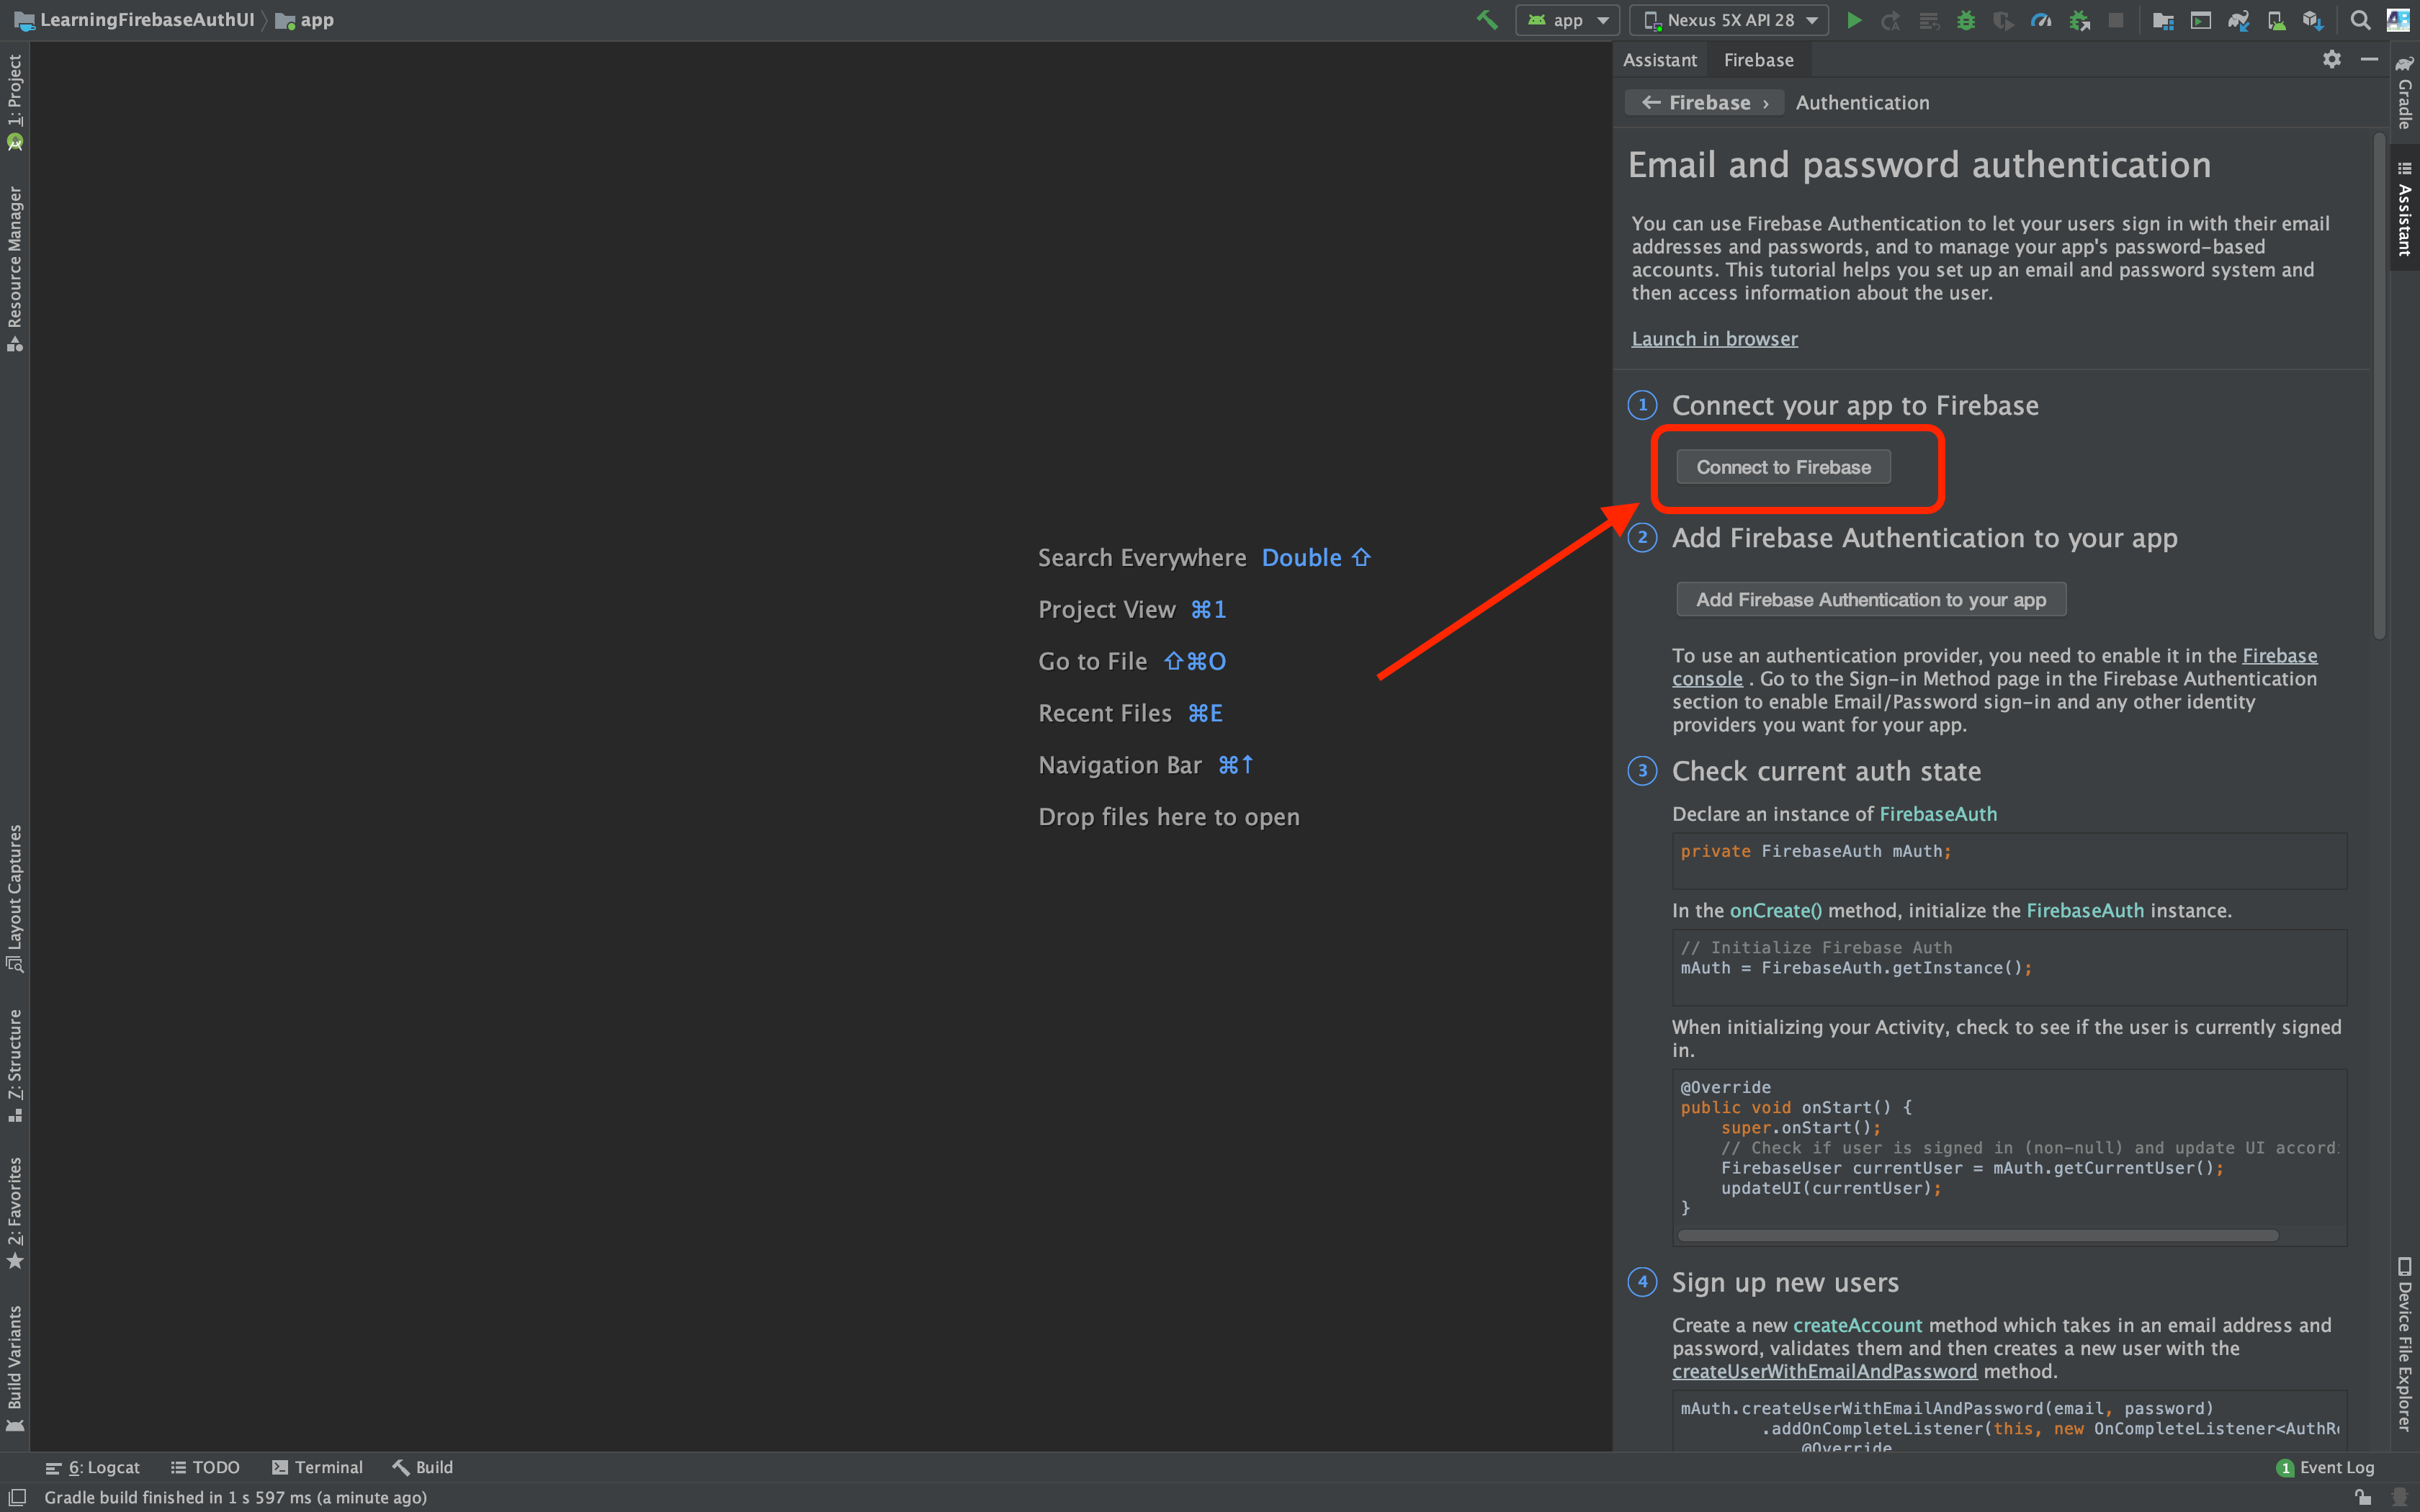
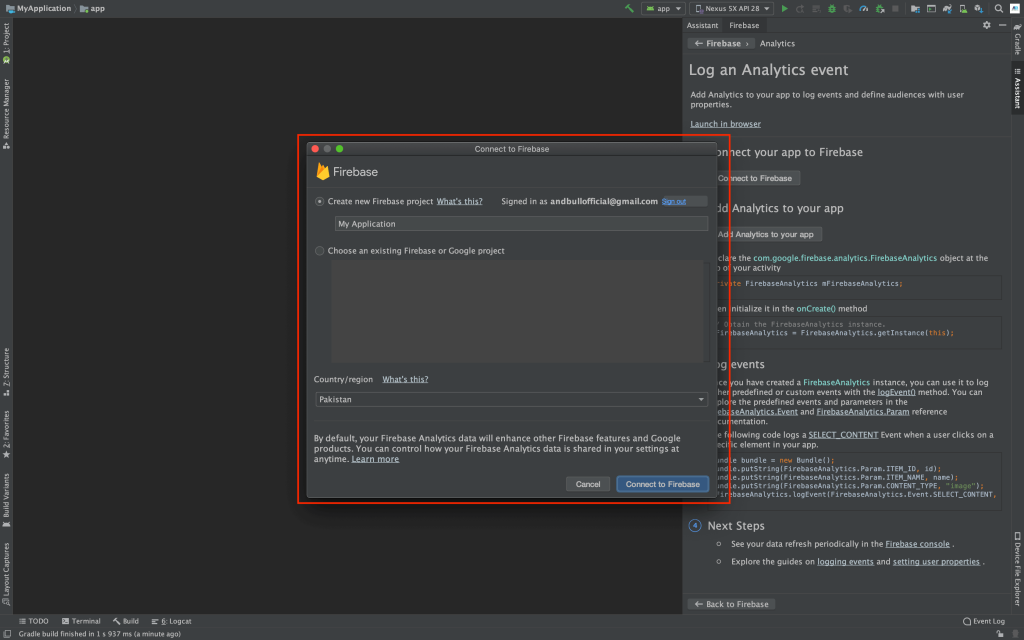
Showing Connect to Firebase in Android Studio Screenshot - Now that Android Studio will connect to Firebase and will ask you to log in to Google account if not already. Once completed, it will ask you to choose an existing Firebase Project or Create a new one. Go with anyone you like, and hit accept changes!
- Now your Project is connected to Firebase, let’s implement the Firebase Authentication to our app, there will be another button right under “Connect to Firebase” button (which would be turned to “Connected” by now) named “Add Firebase Authentication to your App” click that, and accept the changes from new dialog:
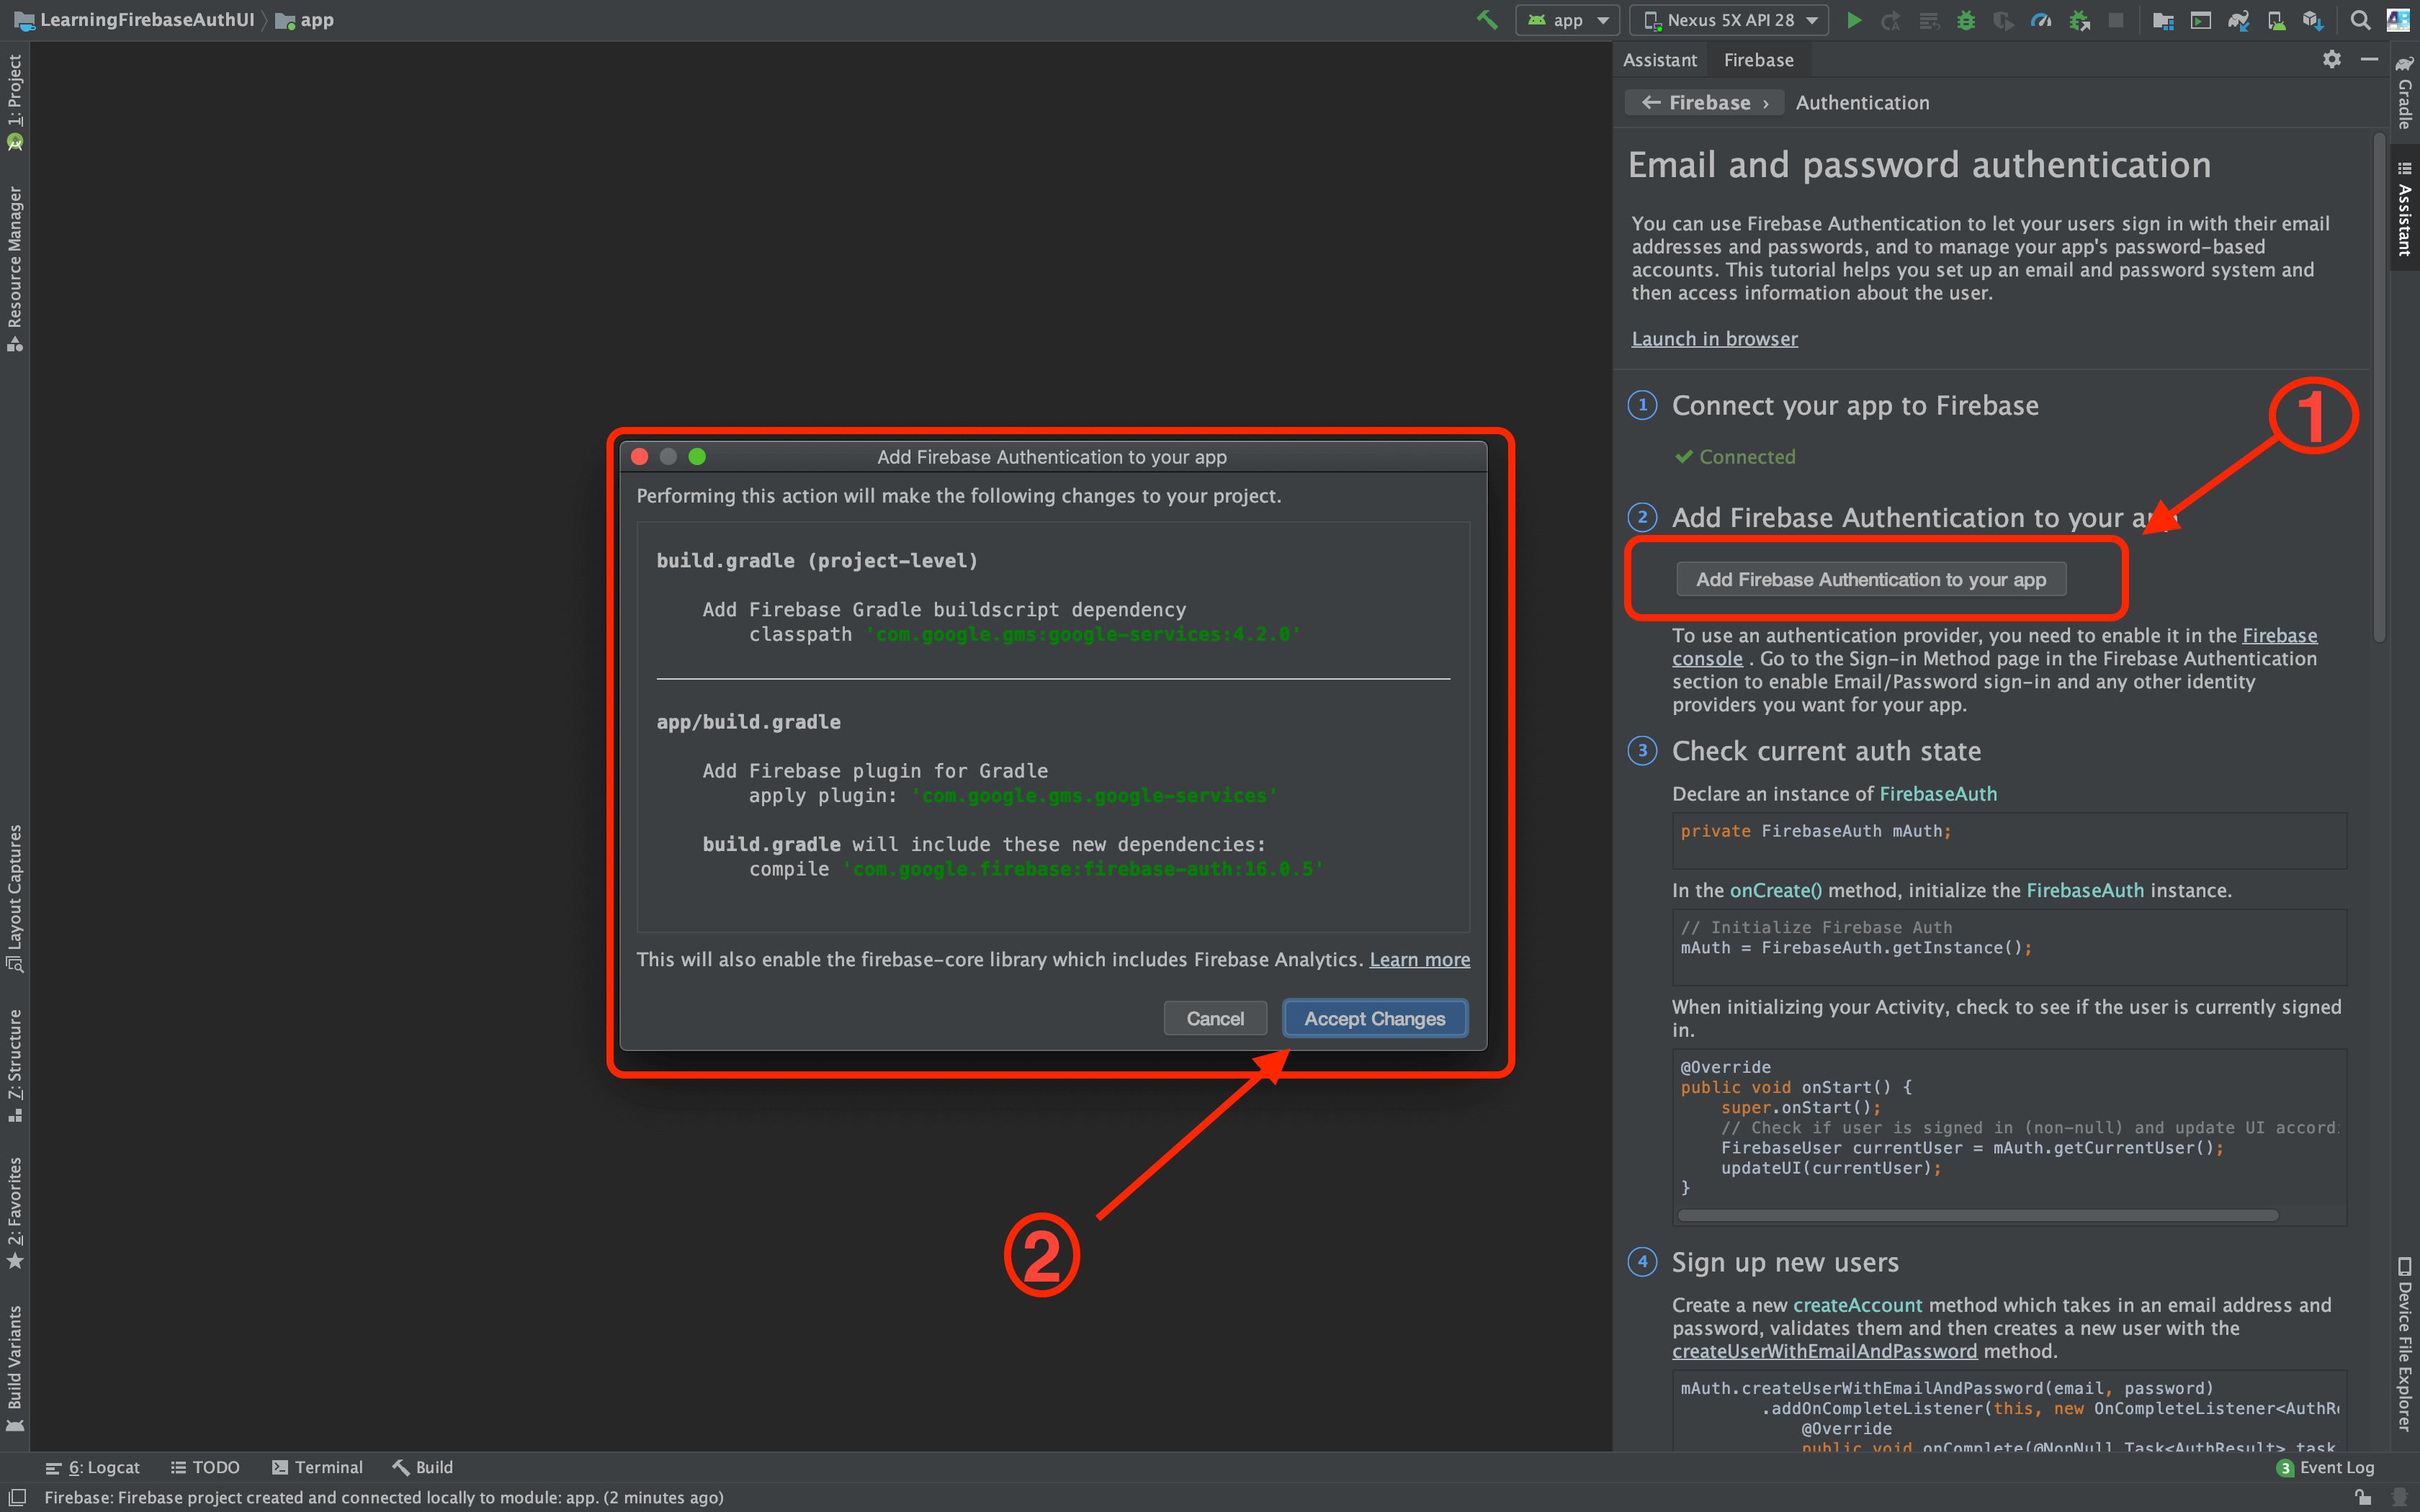
Adding Firebase Authentication SDK to Android Studio Screenshot
Now your project is connected to Firebase, and the Firebase Auth SDK is implemented successfully. Let’s move toward implementing Facebook SDK to our Android App!
Adding Facebook Login SDK to your Android App.
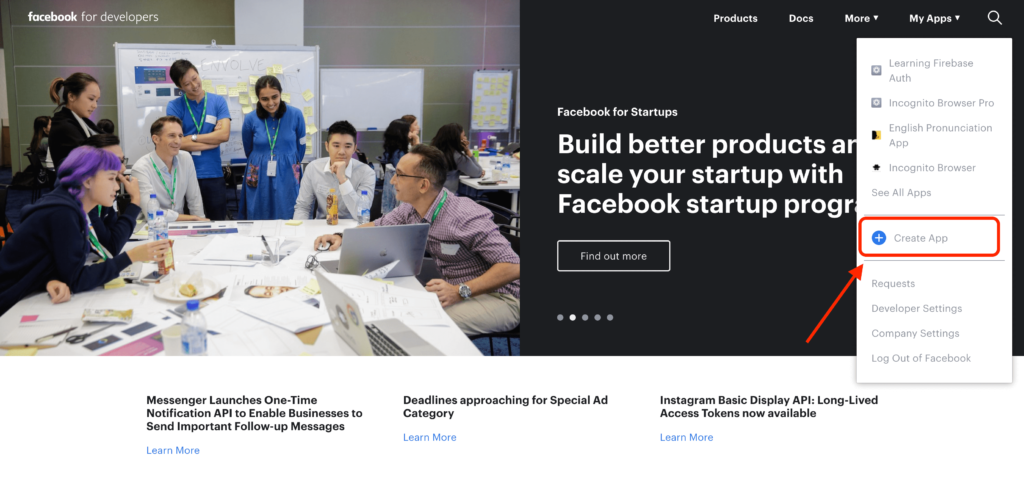
- Go to developer.facebook.com and click “Create an app”

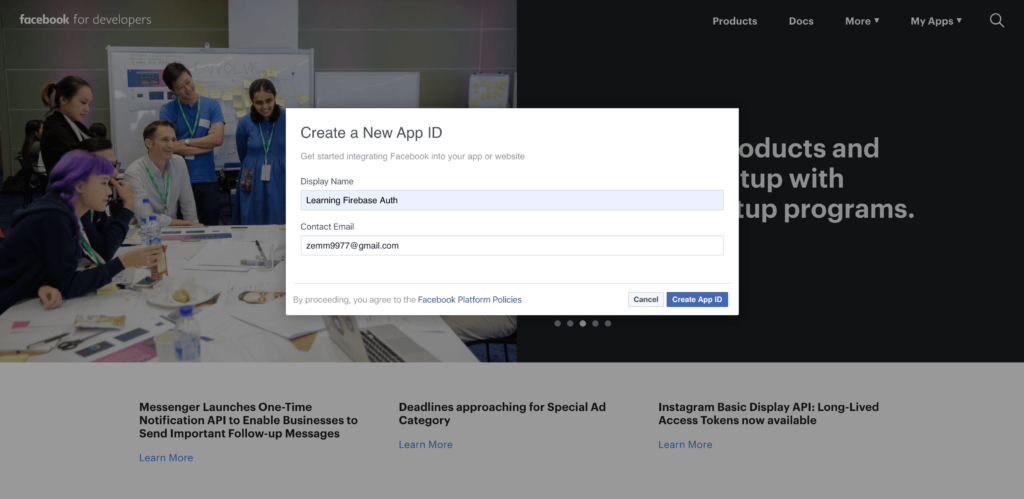
Creating an App on Facebook Developers page screenshot - Enter “App Name” and “Contact Email”

Providing details for creating an app on the Facebook screenshot - You will see a bunch of products Facebook, select “Facebook Login” and click “Set up”
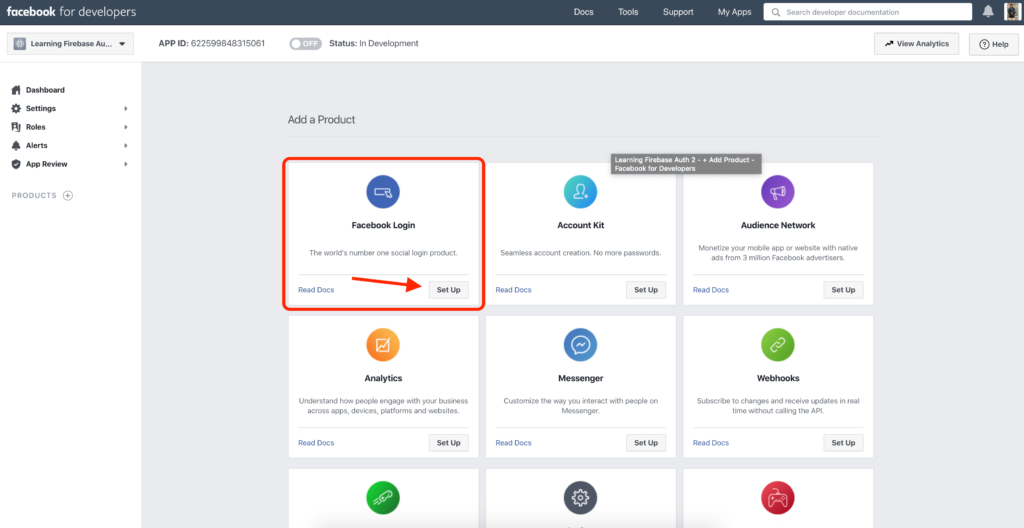

Adding Facebook login to App - Follow the documentation instructions:
- Download the latest Facebook SDK for Android!
- Add Facebook dependency to your build.gradle (Module: app) And Sync the project.
implementation 'com.facebook.android:facebook-android-sdk:[5,6)'
- Tell your app package name and activity class name:


Give details of your Android app to Facebook - Add your development and release of key hashes. Just copy the code according to the operating system you are using and paste it in Terminal in Android Studio. You will get a 28-character long string key, copy that and paste it Facebook developers page and click save and next.
- Enable Single Sign-On for your app:


Enal¥ble single sign-on for your app! - Edit your resources and Manifest according to given instructions
- Leave the log app event; we are not interested in logging the app events to Facebook Console. If you are, then you can follow the guide there. Now our app is safely connected to Facebook Login SDK. Now is the time to implement the functionality
- Add the Facebook Login Button. This is the code that will make the traditional blue button with the Facebook logo and the text “Continue with Facebook“. Just copy this code and paste it in activity_main.xml:
<com.facebook.login.widget.LoginButton android:id="@+id/login_button" android:layout_width="wrap_content" android:layout_height="wrap_content" android:layout_gravity="center_horizontal" android:layout_marginTop="30dp" android:layout_marginBottom="30dp" /> - Now we need to implement the functionality of this button, but first, lets first create an instance of CallBackManager. Which manages the callbacks operations of the authentication process, like if it was successful or not.
CallbackManager mCallbackManager = CallbackManager.Factory.create();
- Let’s implement the click event for Login Button and handle the callbacks. Remember, we need to tell Facebook about the data that we are going to read from the user profile apart from the things which are publicly available.
        LoginButton loginButton = findViewById(R.id.login_button);

        //Setting the permission that we need to read
        loginButton.setReadPermissions("public_profile","email", "user_birthday", "user_friends");

        //Registering callback!
        loginButton.registerCallback(mCallbackManager, new FacebookCallback<LoginResult>() {
            @Override
            public void onSuccess(LoginResult loginResult) {
                //Sign in completed
                Log.i(TAG, "onSuccess: logged in successfully");

                //Getting the user information
                GraphRequest request = GraphRequest.newMeRequest(loginResult.getAccessToken(), new GraphRequest.GraphJSONObjectCallback() {
                    @Override
                    public void onCompleted(JSONObject object, GraphResponse response) {
                        // Application code
                        Log.i(TAG, "onCompleted: response: " + response.toString());
                        try {
                            String email = object.getString("email");
                            String birthday = object.getString("birthday");

                            Log.i(TAG, "onCompleted: Email: " + email);
                            Log.i(TAG, "onCompleted: Birthday: " + birthday);

                        } catch (JSONException e) {
                            e.printStackTrace();
                            Log.i(TAG, "onCompleted: JSON exception");
                        }
                    }
                });

                Bundle parameters = new Bundle();
                parameters.putString("fields", "id,name,email,gender,birthday");
                request.setParameters(parameters);
                request.executeAsync();

            }

            @Override
            public void onCancel() {
                Log.d(TAG, "facebook:onCancel");
            }

            @Override
            public void onError(FacebookException error) {
                Log.d(TAG, "facebook:onError", error);
            }
        });

    }
Our app is perfectly working with Facebook Signup. Now we need to implement it for Firebase as well!
Completing Facebook Authentication with Firebase
Before we start coding the Firebase Authentication, let’s first fine-tune it from the Firebase Console
We need to enable Facebook under Sign-in providers in the Sign-in methods tab in Firebase Authentication.
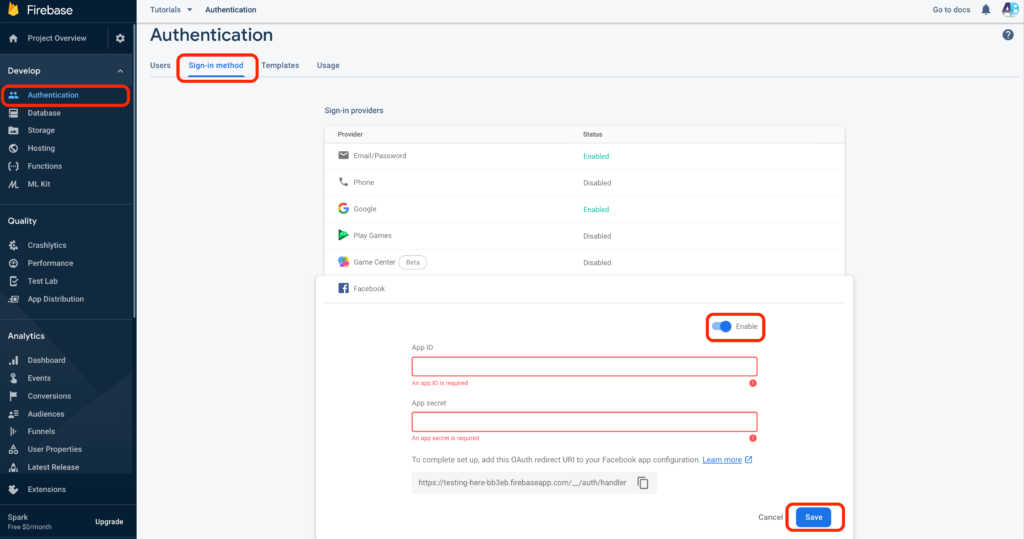
But when you enable it, it will ask you to provide an App ID and App secret and set up OAuth redirect URL.
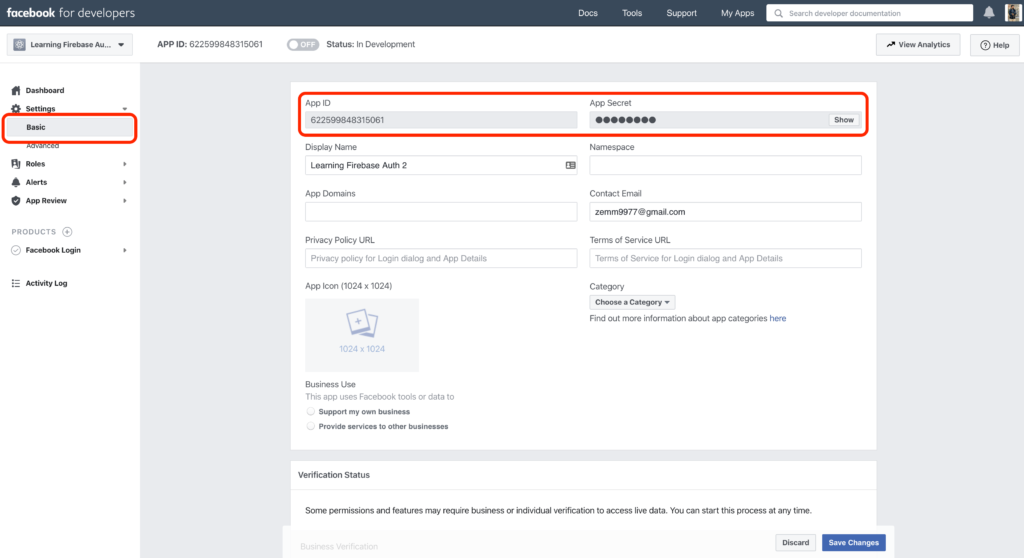
You can find those on Facebook Console. Select the app. Expand the settings option from the left side and click “Basic” you will see both App ID and App Secret right there. Copy and paste them in Firebase Console.
Now let’s add the OAuth redirect URI to your Facebook app configuration.

Just copy that URL and go to your Facebook Console.
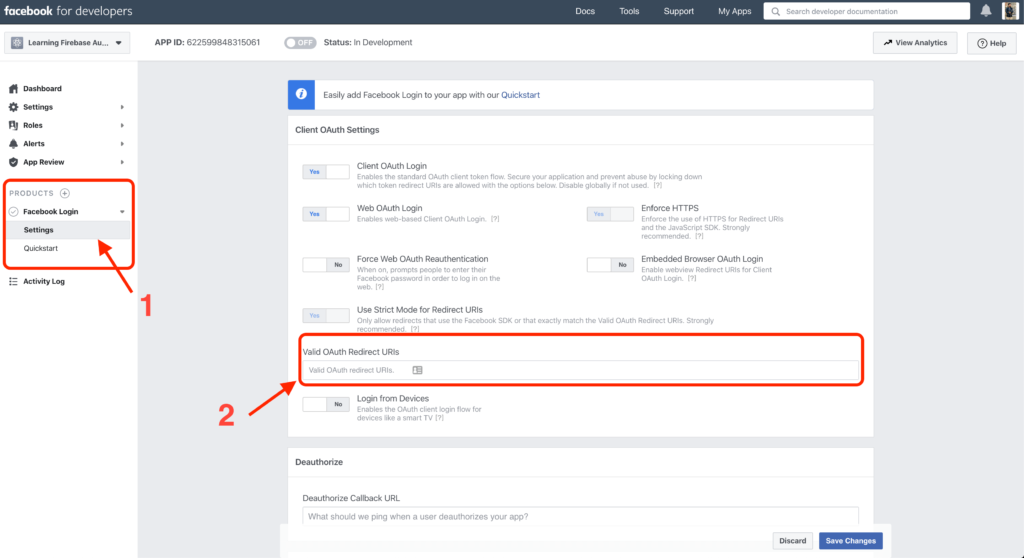
On the left side, under product, expand Facebook Login, and click settings. You will see the Client OAuth Settings on the right side. And there will be an option to provide valid OAuth Redirect URI. Just paste it there
That’s it. Now go to Firebase Console, enable Facebook and we can start writing the Firebase Code.
As we already connected our Android App to Firebase and implemented the Firebase Authentication Libraries.
Let’s implement the functionality now.
First, create an instance of Firebase Auth and initialize it:
FirebaseAuth mFirebaseAuth = FirebaseAuth.getInstance();
We need to check when the app is started to see if someone is logged in or not so that we can act accordingly:
    @Override
    public void onStart() {
        super.onStart();
        // Check if user is signed in (non-null) and update UI accordingly.
        FirebaseUser currentUser = mFirebaseAuth.getCurrentUser();
        if (currentUser != null) {
            Log.i(TAG, "onStart: Someone logged in <3");
        } else {
            Log.i(TAG, "onStart: No one logged in :/");
        }
    }
Remember the onSuccess callback method, which is called when signup with Facebook is successful; we need to get credentials out of that token and provide it to Firebase Auth.
Here is the complete method:
    private void handleFacebookAccessToken(AccessToken token) {
        Log.d(TAG, "handleFacebookAccessToken:" + token);

        AuthCredential credential = FacebookAuthProvider.getCredential(token.getToken());
        mFirebaseAuth.signInWithCredential(credential)
                .addOnCompleteListener(this, new OnCompleteListener<AuthResult>() {
                    @Override
                    public void onComplete(@NonNull Task<AuthResult> task) {
                        if (task.isSuccessful()) {
                            // Sign in success, update UI with the signed-in user's information
                            Log.d(TAG, "signInWithCredential:success");
                            FirebaseUser user = mFirebaseAuth.getCurrentUser();
                            Log.i(TAG, "onComplete: login completed with user: " + user);

                        } else {
                            // If sign in fails, display a message to the user.
                            Log.w(TAG, "signInWithCredential:failure", task.getException());
                            Toast.makeText(MainActivity.this, "Authentication failed.",
                                    Toast.LENGTH_SHORT).show();
                        }

                        // ...
                    }
                });
    }
And just call that method in onSuccess callback function as:
                //handling the token for Firebase Auth
                handleFacebookAccessToken(loginResult.getAccessToken());
That’s it. Here is the complete code of MainActivity.java:
package com.androidbull.learningfirebaseauthui;

import android.content.Intent;
import android.os.Bundle;
import android.util.Log;
import android.widget.Toast;

import androidx.annotation.NonNull;
import androidx.annotation.Nullable;
import androidx.appcompat.app.AppCompatActivity;

import com.facebook.AccessToken;
import com.facebook.CallbackManager;
import com.facebook.FacebookCallback;
import com.facebook.FacebookException;
import com.facebook.GraphRequest;
import com.facebook.GraphResponse;
import com.facebook.Profile;
import com.facebook.login.LoginResult;
import com.facebook.login.widget.LoginButton;
import com.google.android.gms.tasks.OnCompleteListener;
import com.google.android.gms.tasks.Task;
import com.google.firebase.auth.AuthCredential;
import com.google.firebase.auth.AuthResult;
import com.google.firebase.auth.FacebookAuthProvider;
import com.google.firebase.auth.FirebaseAuth;
import com.google.firebase.auth.FirebaseUser;

import org.json.JSONException;
import org.json.JSONObject;

import java.util.Arrays;


public class MainActivity extends AppCompatActivity {

    private static final String TAG = "MainActivity";
    private CallbackManager mCallbackManager;
    private FirebaseAuth mFirebaseAuth;
/*
                */
    @Override
    protected void onCreate(Bundle savedInstanceState) {
        super.onCreate(savedInstanceState);
        setContentView(R.layout.activity_main);
        mFirebaseAuth = FirebaseAuth.getInstance();

        mCallbackManager = CallbackManager.Factory.create();

        LoginButton loginButton = findViewById(R.id.login_button);

        //Setting the permission that we need to read
        loginButton.setReadPermissions("public_profile","email", "user_birthday");

        //Registering callback!
        loginButton.registerCallback(mCallbackManager, new FacebookCallback<LoginResult>() {
            @Override
            public void onSuccess(LoginResult loginResult) {
                //Sign in completed
                Log.i(TAG, "onSuccess: logged in successfully");

                //handling the token for Firebase Auth
                handleFacebookAccessToken(loginResult.getAccessToken());

                //Getting the user information
                GraphRequest request = GraphRequest.newMeRequest(loginResult.getAccessToken(), new GraphRequest.GraphJSONObjectCallback() {
                    @Override
                    public void onCompleted(JSONObject object, GraphResponse response) {
                        // Application code
                        Log.i(TAG, "onCompleted: response: " + response.toString());
                        try {
                            String email = object.getString("email");
                            String birthday = object.getString("birthday");

                            Log.i(TAG, "onCompleted: Email: " + email);
                            Log.i(TAG, "onCompleted: Birthday: " + birthday);

                        } catch (JSONException e) {
                            e.printStackTrace();
                            Log.i(TAG, "onCompleted: JSON exception");
                        }
                    }
                });

                Bundle parameters = new Bundle();
                parameters.putString("fields", "id,name,email,gender,birthday");
                request.setParameters(parameters);
                request.executeAsync();

            }

            @Override
            public void onCancel() {
                Log.d(TAG, "facebook:onCancel");
            }

            @Override
            public void onError(FacebookException error) {
                Log.d(TAG, "facebook:onError", error);
            }
        });

    }

    private void handleFacebookAccessToken(AccessToken token) {
        Log.d(TAG, "handleFacebookAccessToken:" + token);

        AuthCredential credential = FacebookAuthProvider.getCredential(token.getToken());
        mFirebaseAuth.signInWithCredential(credential)
                .addOnCompleteListener(this, new OnCompleteListener<AuthResult>() {
                    @Override
                    public void onComplete(@NonNull Task<AuthResult> task) {
                        if (task.isSuccessful()) {
                            // Sign in success, update UI with the signed-in user's information
                            Log.d(TAG, "signInWithCredential:success");
                            FirebaseUser user = mFirebaseAuth.getCurrentUser();
                            Log.i(TAG, "onComplete: login completed with user: " + user.getDisplayName());

                        } else {
                            // If sign in fails, display a message to the user.
                            Log.w(TAG, "signInWithCredential:failure", task.getException());
                            Toast.makeText(MainActivity.this, "Authentication failed.",
                                    Toast.LENGTH_SHORT).show();
                        }

                        // ...
                    }
                });
    }

    @Override
    protected void onActivityResult(int requestCode, int resultCode, @Nullable Intent data) {
        mCallbackManager.onActivityResult(requestCode, resultCode, data);
        super.onActivityResult(requestCode, resultCode, data);
    }

    @Override
    public void onStart() {
        super.onStart();
        // Check if user is signed in (non-null) and update UI accordingly.
        FirebaseUser currentUser = mFirebaseAuth.getCurrentUser();
        if (currentUser != null) {
            Log.i(TAG, "onStart: Someone logged in <3");
        } else {
            Log.i(TAG, "onStart: No one logged in :/");
        }
    }
}
Here is the link to the Github repository!
If you want Firebase Authentication to authenticate users using their email address and password, then check this out!
Ask any questions in the comment section below, our experts will be happy to help you at no extra cost.
5 thoughts on “Android Facebook Login with Firebase Auth (Tutorial)”
Comments are closed.